## 13.5 Identify picture blocks
This case uses the *eye_to_hand* mode, uses the camera, loads the model data trained by *tensorflow* through *opencv*, identifies the picture object block and locates the position of the picture object block in the video. Through the relevant points, the spatial coordinate position of the object block relative to the manipulator is calculated. Set a set of relevant actions for the manipulator and put the identified blocks into the bucket. In the following chapters, the code implementation process of the whole case will be introduced in detail.
#### **一、Camera adjustment**
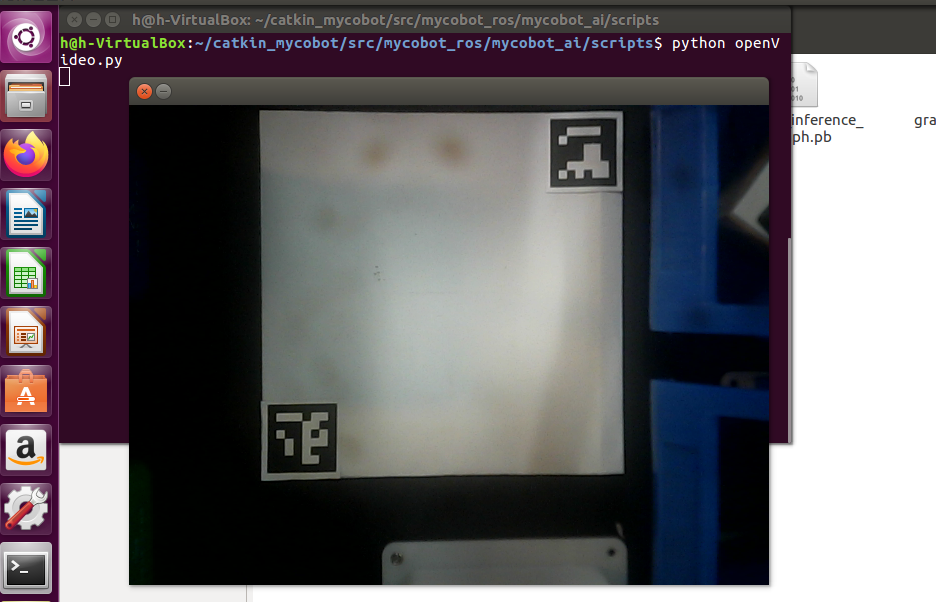
First, you need to use *Python* to run *openvideo. Py* under the *mycobot_ai* package. If the open camera is a computer camera, you need to modify *cap_ Num*, please refer to:[matters needing attention](../2-preparation/README.md)。Make sure that the camera completely covers the whole recognition area, and the recognition area is square in the video, as shown in the figure below. If the recognition area does not meet the requirements in the video, the position of the camera needs to be adjusted.
#### **二、Case reproduction**
The above video operation can realize the *demo* of object block recognition and capture. Next, we will describe the operation process in the video in words:
1. Go to the *mycobot_ai* package in the *mycobot-ros* workspace through the file manager.
2. Right click to open the terminal.
3. Give permission to operate the manipulator, enter `sudo chmod 777 /dev/ttyU` and use the *tab* key to fill in the name of the manipulator equipment.
4. If the device name is not `/dev/ttyUSB0`, you need to change the *port* value in the *vision. Launch* file.
5. Enter `roslaunch launch/vision.launch` to open the *vision. Launch* file, which contains some core libraries and dependencies of *ROS*.
6. Create a *marker* in the *rviz* graphical interface and name it *cube*.
7. Type `ctrl+shift+t` in the command terminal to open another command window under the same directory.
8. Enter ` Python script / detect_ obj_ Color. Py ` open the color recognition program to realize color recognition and capture.
> If you don't know how to modify *port* value and create *marker*, please refer to:[ROS building block model](../2-preparation/3-build_cube.md)
**Matters needing attention**
1. When the camera does not automatically frame the identification area correctly, it is necessary to close the program, adjust the position of the camera, and move the camera to the left and right.
2. If *OK* does not appear in the command terminal and the picture cannot be recognized, move the camera back or forward slightly. When * OK * appears in the command terminal, the program can run normally.
3. Because the picture object in the object block is small, in order to better identify the picture, it is necessary to **put the object block in the video**.
4. OpenCV image recognition will be affected by the environment. If it is in a dark environment, the recognition effect will be greatly reduced.
#### **三、Code explanation**
* This case is based on *opencv* and *ROS* communication control manipulator. First, calibrate the camera to ensure the accuracy of the camera. By identifying two *aruco* codes in the capture range, the recognition range is intelligently located, and the corresponding relationship between the center point of the actual recognition range and the video pixel is determined.
* Use *opencv* to load the image recognition model trained by *tensorflow*, and use the training model to filter a series of regions in the image to identify and locate the objects in the image. The coordinates of the object block relative to the center of the actual recognition range are calculated according to the pixels of the object block in the video and the video pixels of the center of the actual recognition range. Then, the relative coordinates of the object block relative to the manipulator can be calculated according to the relative coordinates of the center of the actual recognition range and the manipulator. Finally, a series of actions are designed to grab the object block and place it in the corresponding bucket.
Do you think it's similar to the last case? Yes, we only need to replace the color recognition module with the object recognition module to complete the function of image recognition and capturing objects.
**Object recognition**
In the initialization of the custom class, load the image recognition model trained by tensorflow. Resize the picture and convert it from BGR to RGB, and then use the model to detect the picture. Process the detection results, frame the object block in the picture and give the corresponding information.
```python
def obj_detect(self, frame):
rows, cols = frame.shape[:-1]
# Resize the image and swap BGR to RGB.
blob = cv2.dnn.blobFromImage(
frame,
size=(300, 300),
mean=(0, 0, 0),
swapRB=True,
crop=False,
)
# Detection picture
self.net.setInput(blob)
out = self.net.forward()
x, y = 0, 0
# Processing results
for detection in out[0, 0, :, :]:
score = float(detection[2]) # Gain confidence
if score > 0.3:
# Object ID
class_id = detection[1]
# Position information of object in picture
left = detection[3] * cols
top = detection[4] * rows
right = detection[5] * cols
bottom = detection[6] * rows
if abs(right + bottom - left - top) > 380:
continue
x, y = (left + right) / 2.0, (top + bottom) / 2.0
# Frame the object in the picture
cv2.rectangle(
frame,
(int(left), int(top)),
(int(right), int(bottom)),
(0, 230, 0),
thickness=2,
)
# Add object identification information to the picture
cv2.putText(
frame,
"{}: {}%".format(self.id_class_name(class_id),round(score * 100, 2)),
(int(left), int(top) - 10),
cv2.FONT_HERSHEY_COMPLEX_SMALL,
1,
(243, 0, 0),
2,
)
if x+y > 0:
return x, y
else:
return None
```
> For specific code, you can directly view the program source file and the comments in the code. If you don't know much about key modules, you can refer to[Last case](./13.4-颜色识别.md).
> 具体代码可直接查看程序源文件,查看代码中的注释。若对重点模块不太了解可参考[上一个案例](./13.4-颜色识别.md)。
 #### **二、Case reproduction**
The above video operation can realize the *demo* of object block recognition and capture. Next, we will describe the operation process in the video in words:
1. Go to the *mycobot_ai* package in the *mycobot-ros* workspace through the file manager.
2. Right click to open the terminal.
3. Give permission to operate the manipulator, enter `sudo chmod 777 /dev/ttyU` and use the *tab* key to fill in the name of the manipulator equipment.
4. If the device name is not `/dev/ttyUSB0`, you need to change the *port* value in the *vision. Launch* file.
5. Enter `roslaunch launch/vision.launch` to open the *vision. Launch* file, which contains some core libraries and dependencies of *ROS*.
6. Create a *marker* in the *rviz* graphical interface and name it *cube*.
7. Type `ctrl+shift+t` in the command terminal to open another command window under the same directory.
8. Enter ` Python script / detect_ obj_ Color. Py ` open the color recognition program to realize color recognition and capture.
> If you don't know how to modify *port* value and create *marker*, please refer to:[ROS building block model](../2-preparation/3-build_cube.md)
**Matters needing attention**
1. When the camera does not automatically frame the identification area correctly, it is necessary to close the program, adjust the position of the camera, and move the camera to the left and right.
2. If *OK* does not appear in the command terminal and the picture cannot be recognized, move the camera back or forward slightly. When * OK * appears in the command terminal, the program can run normally.
3. Because the picture object in the object block is small, in order to better identify the picture, it is necessary to **put the object block in the video**.
4. OpenCV image recognition will be affected by the environment. If it is in a dark environment, the recognition effect will be greatly reduced.
#### **三、Code explanation**
* This case is based on *opencv* and *ROS* communication control manipulator. First, calibrate the camera to ensure the accuracy of the camera. By identifying two *aruco* codes in the capture range, the recognition range is intelligently located, and the corresponding relationship between the center point of the actual recognition range and the video pixel is determined.
* Use *opencv* to load the image recognition model trained by *tensorflow*, and use the training model to filter a series of regions in the image to identify and locate the objects in the image. The coordinates of the object block relative to the center of the actual recognition range are calculated according to the pixels of the object block in the video and the video pixels of the center of the actual recognition range. Then, the relative coordinates of the object block relative to the manipulator can be calculated according to the relative coordinates of the center of the actual recognition range and the manipulator. Finally, a series of actions are designed to grab the object block and place it in the corresponding bucket.
Do you think it's similar to the last case? Yes, we only need to replace the color recognition module with the object recognition module to complete the function of image recognition and capturing objects.
**Object recognition**
In the initialization of the custom class, load the image recognition model trained by tensorflow. Resize the picture and convert it from BGR to RGB, and then use the model to detect the picture. Process the detection results, frame the object block in the picture and give the corresponding information.
```python
def obj_detect(self, frame):
rows, cols = frame.shape[:-1]
# Resize the image and swap BGR to RGB.
blob = cv2.dnn.blobFromImage(
frame,
size=(300, 300),
mean=(0, 0, 0),
swapRB=True,
crop=False,
)
# Detection picture
self.net.setInput(blob)
out = self.net.forward()
x, y = 0, 0
# Processing results
for detection in out[0, 0, :, :]:
score = float(detection[2]) # Gain confidence
if score > 0.3:
# Object ID
class_id = detection[1]
# Position information of object in picture
left = detection[3] * cols
top = detection[4] * rows
right = detection[5] * cols
bottom = detection[6] * rows
if abs(right + bottom - left - top) > 380:
continue
x, y = (left + right) / 2.0, (top + bottom) / 2.0
# Frame the object in the picture
cv2.rectangle(
frame,
(int(left), int(top)),
(int(right), int(bottom)),
(0, 230, 0),
thickness=2,
)
# Add object identification information to the picture
cv2.putText(
frame,
"{}: {}%".format(self.id_class_name(class_id),round(score * 100, 2)),
(int(left), int(top) - 10),
cv2.FONT_HERSHEY_COMPLEX_SMALL,
1,
(243, 0, 0),
2,
)
if x+y > 0:
return x, y
else:
return None
```
> For specific code, you can directly view the program source file and the comments in the code. If you don't know much about key modules, you can refer to[Last case](./13.4-颜色识别.md).
> 具体代码可直接查看程序源文件,查看代码中的注释。若对重点模块不太了解可参考[上一个案例](./13.4-颜色识别.md)。
#### **二、Case reproduction**
The above video operation can realize the *demo* of object block recognition and capture. Next, we will describe the operation process in the video in words:
1. Go to the *mycobot_ai* package in the *mycobot-ros* workspace through the file manager.
2. Right click to open the terminal.
3. Give permission to operate the manipulator, enter `sudo chmod 777 /dev/ttyU` and use the *tab* key to fill in the name of the manipulator equipment.
4. If the device name is not `/dev/ttyUSB0`, you need to change the *port* value in the *vision. Launch* file.
5. Enter `roslaunch launch/vision.launch` to open the *vision. Launch* file, which contains some core libraries and dependencies of *ROS*.
6. Create a *marker* in the *rviz* graphical interface and name it *cube*.
7. Type `ctrl+shift+t` in the command terminal to open another command window under the same directory.
8. Enter ` Python script / detect_ obj_ Color. Py ` open the color recognition program to realize color recognition and capture.
> If you don't know how to modify *port* value and create *marker*, please refer to:[ROS building block model](../2-preparation/3-build_cube.md)
**Matters needing attention**
1. When the camera does not automatically frame the identification area correctly, it is necessary to close the program, adjust the position of the camera, and move the camera to the left and right.
2. If *OK* does not appear in the command terminal and the picture cannot be recognized, move the camera back or forward slightly. When * OK * appears in the command terminal, the program can run normally.
3. Because the picture object in the object block is small, in order to better identify the picture, it is necessary to **put the object block in the video**.
4. OpenCV image recognition will be affected by the environment. If it is in a dark environment, the recognition effect will be greatly reduced.
#### **三、Code explanation**
* This case is based on *opencv* and *ROS* communication control manipulator. First, calibrate the camera to ensure the accuracy of the camera. By identifying two *aruco* codes in the capture range, the recognition range is intelligently located, and the corresponding relationship between the center point of the actual recognition range and the video pixel is determined.
* Use *opencv* to load the image recognition model trained by *tensorflow*, and use the training model to filter a series of regions in the image to identify and locate the objects in the image. The coordinates of the object block relative to the center of the actual recognition range are calculated according to the pixels of the object block in the video and the video pixels of the center of the actual recognition range. Then, the relative coordinates of the object block relative to the manipulator can be calculated according to the relative coordinates of the center of the actual recognition range and the manipulator. Finally, a series of actions are designed to grab the object block and place it in the corresponding bucket.
Do you think it's similar to the last case? Yes, we only need to replace the color recognition module with the object recognition module to complete the function of image recognition and capturing objects.
**Object recognition**
In the initialization of the custom class, load the image recognition model trained by tensorflow. Resize the picture and convert it from BGR to RGB, and then use the model to detect the picture. Process the detection results, frame the object block in the picture and give the corresponding information.
```python
def obj_detect(self, frame):
rows, cols = frame.shape[:-1]
# Resize the image and swap BGR to RGB.
blob = cv2.dnn.blobFromImage(
frame,
size=(300, 300),
mean=(0, 0, 0),
swapRB=True,
crop=False,
)
# Detection picture
self.net.setInput(blob)
out = self.net.forward()
x, y = 0, 0
# Processing results
for detection in out[0, 0, :, :]:
score = float(detection[2]) # Gain confidence
if score > 0.3:
# Object ID
class_id = detection[1]
# Position information of object in picture
left = detection[3] * cols
top = detection[4] * rows
right = detection[5] * cols
bottom = detection[6] * rows
if abs(right + bottom - left - top) > 380:
continue
x, y = (left + right) / 2.0, (top + bottom) / 2.0
# Frame the object in the picture
cv2.rectangle(
frame,
(int(left), int(top)),
(int(right), int(bottom)),
(0, 230, 0),
thickness=2,
)
# Add object identification information to the picture
cv2.putText(
frame,
"{}: {}%".format(self.id_class_name(class_id),round(score * 100, 2)),
(int(left), int(top) - 10),
cv2.FONT_HERSHEY_COMPLEX_SMALL,
1,
(243, 0, 0),
2,
)
if x+y > 0:
return x, y
else:
return None
```
> For specific code, you can directly view the program source file and the comments in the code. If you don't know much about key modules, you can refer to[Last case](./13.4-颜色识别.md).
> 具体代码可直接查看程序源文件,查看代码中的注释。若对重点模块不太了解可参考[上一个案例](./13.4-颜色识别.md)。