Robot Motion Control Guide and Usage Restrictions
Basic Usage Guidelines
myCobot 320 Usage Guidelines
- Payload Capacity: Please note that the myCobot 320 has a rated payload of 1 kilogram. To ensure the normal operation of the robotic arm, avoid exceeding the rated payload to prevent potential damage.
- Power Supply: For stable power supply to the robotic arm, use only the original matching power adapter. Do not replace or modify the power supply for safety reasons.
- Disassembly and Maintenance: When disassembling or performing maintenance on the robotic arm, strictly follow the guidance provided by the official after-sales support. Unauthorized modifications, such as connecting sensors, welding, or short-circuiting IO pins, are not recommended.
- Operating Environment: To ensure the normal functioning of the robotic arm, place it in a dry and temperature-appropriate environment. Avoid exposing the robotic arm to damp or high-temperature conditions.
- Joint Limitations: The robotic arm is equipped with joint limit functions. Avoid moving the robotic arm beyond its movable range to prevent potential damage or safety issues.
- Fixation and Prevention of Falls: Before operating the robotic arm, ensure it is securely fixed. During operation, be cautious to prevent falls or interference from unexpected situations.
- Firmware Flashing: Choose firmware carefully and only use firmware provided by the official source. Using unofficial firmware may lead to unnecessary issues.
Note: For your safety and the well-being of the robotic arm, it is recommended to adhere to the above usage guidelines. Any actions, such as overloading or modifying the robotic arm, that result in damage and are not guided by official after-sales support will not be covered by the robotic arm's warranty. If you have further questions, feel free to contact our official after-sales support.
Robot Motion Control Instructions
myCobot 320 Joint Limitations are as Follows:
| Joints | Range(°) |
|---|---|
| J1 | ±165° |
| J2 | ±165° |
| J3 | ±165° |
| J4 | ±165° |
| J5 | ±165° |
| J6 | ±175° |
笛卡尔空间(坐标)范围如下:
| axis | Cartesian Space Range(mm) |
|---|---|
| x | -350~350 |
| y | -350~350 |
| z | -41~524 |
| rx\ry\rz | +179° |
Note: The above data is for reference only. During the actual operation of the robotic arm, certain positions or orientations may lead to self-interference due to the inherent structure of the robotic arm. For instance, at a specific position, while individual joints may not exceed their limits, it could result in a collision between the J2 and J3 joints of the robotic arm.
Robot Motion Control Tips:
myCobot ##Motion Control Suggestions:
- Before controlling the robotic arm's motion, ensure you know the specific angles/coordinates of the target position. Exercise caution while controlling the robotic arm's motion.
- During the debugging phase, try to avoid running the robotic arm at high speeds to prevent potential harm to yourself and the robotic arm. It is recommended to use lower motion speeds.
- To prevent self-interference (collisions between the robotic arm's own joints), ensure that the robotic arm does not collide during its motion.
Note: We recommend following the above motion control suggestions to minimize potential risks. Please be aware that if damage to the robotic arm is caused by personal use issues, warranty services will no longer apply. If you have any questions or need support, feel free to contact our official after-sales support. We will be happy to assist you in ensuring the safe operation of the robotic arm.
How to Properly Perform Robot Motion Control
When unsure about the target position's angles/coordinates, you can use the following method:
Use a Python script to obtain:
# Importing the Official Python API
from pymycobot.mycobot import MyCobot
# Importing the Time Module
import time

# Setting up Serial Connection, Serial Port, Baud Rate
# Raspberry Pi Version
mc = MyCobot('/dev/ttyAMA0', 1000000)
# M5 version, specific serial port number needs to be checked in Device Manager
mc = MyCobot('COM0', 1000000)
# Set a slight waiting time, 0.5 seconds
time.sleep(0.5)
# Release all joints of the robotic arm, please support the robotic arm by hand
mc.release_all_servos()
# Set waiting time, can be adjusted as needed; at this point, the robotic arm can be moved to the target position
time.sleep(5)
# Power on the robotic arm and fix it in the target position
mc.power_on()
# Read the coordinate information and angle information of the current position and output to the console
print('Coordinates:', mc.get_coords())
print('Angles:', mc.get_angles())
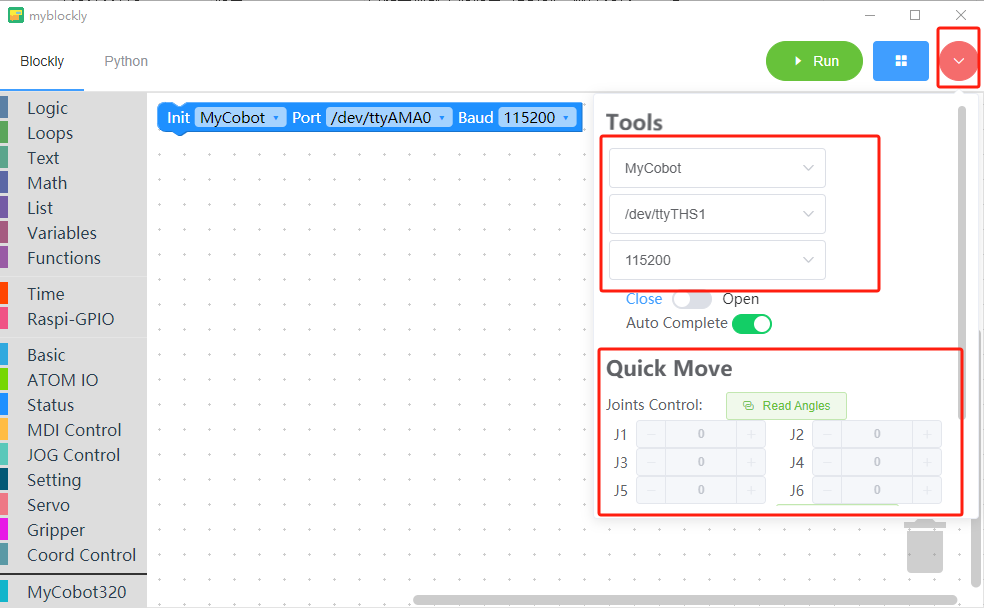
Obtained using myBlockly:
By utilizing the rapid movement feature in myBlockly, you can explore the motion range of the robotic arm, confirming the operational workspace of the robotic arm.