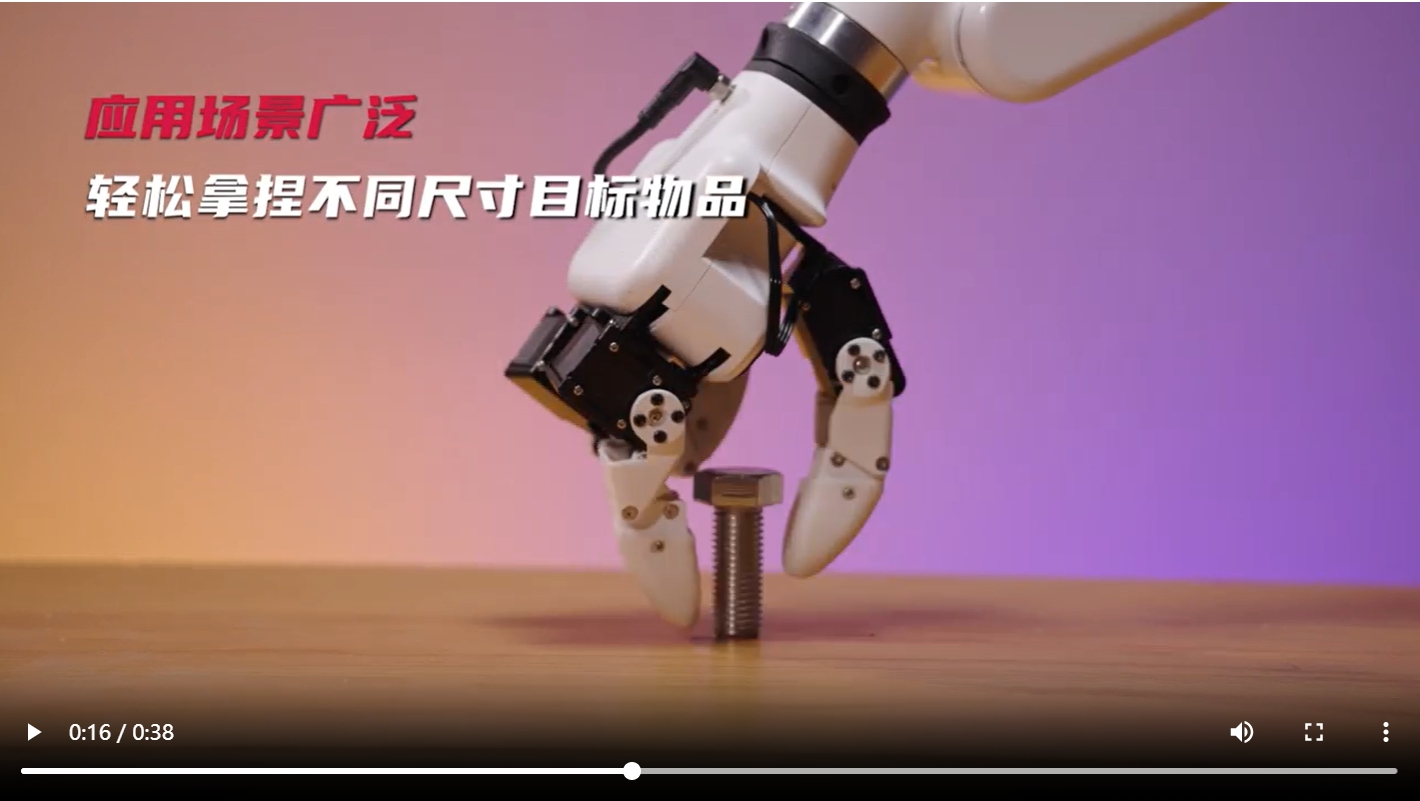
myGripper H100 three-finger dexterous hand
1 Product display
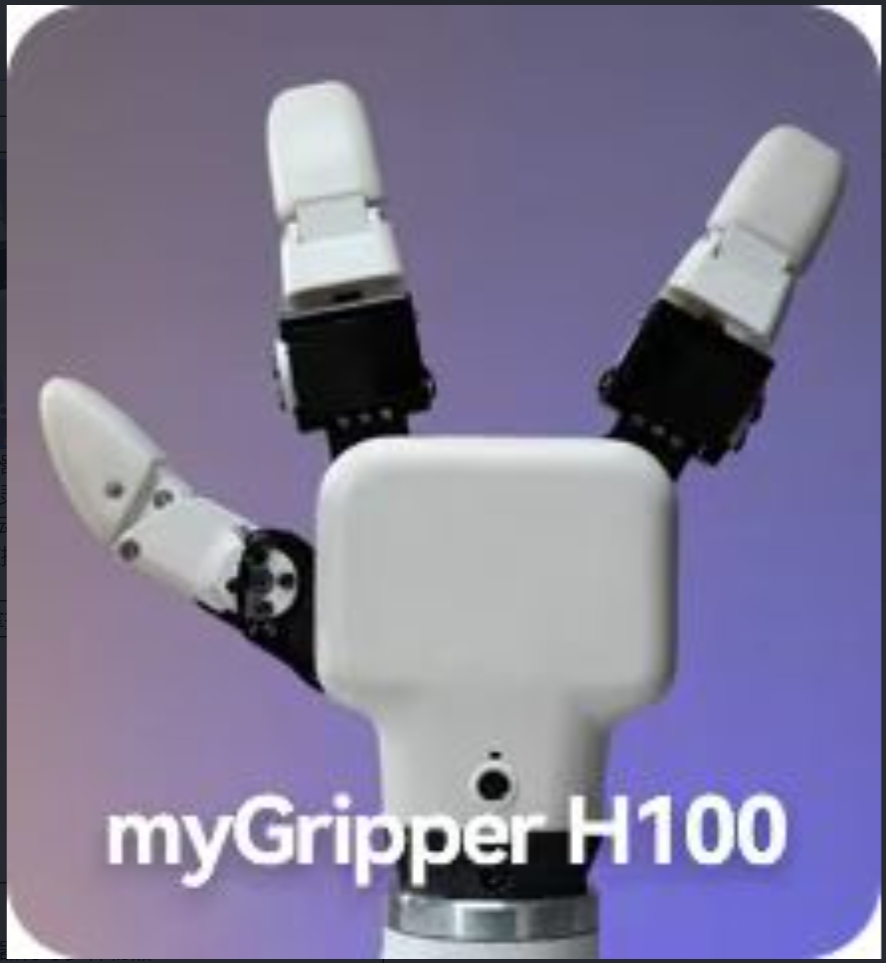
2 Product introduction
myGripper H100 is a three-finger dexterous hand developed by Shenzhen Elephant Robot Technology Co., Ltd. specifically for robot scientific research, teaching and other application scenarios. H100 is equipped with 6 high-performance digital servo motors, which can realize the control of multiple parameters such as output torque, movement speed, absolute position, etc. H100 supports 100Hz high-frequency communication, and can read status information in real time during the grasping process, fully meeting the needs of scientific research scenarios for data collection.
3 Compatible models
ER myCobot Pro 630
ER Mercury series
4 Applicable scenarios
Precision gripping: picking up fruits, food, tools and equipment and other items
Physical interaction: combining robots to achieve actions such as likes, greetings, gesture control, etc.
Experimental operation: precise operation and experimental demonstration in the laboratory
Teaching demonstration: used for practical teaching in robotics courses
5 Specifications
Product Specifications
| Name | myGripper H100 three-finger dexterous hand |
|---|---|
| Gripping range | 0 - 130mm |
| Number of fingertips | 3 fingers, corresponding to the thumb, index finger and ring finger of the human hand |
| Service life | 10W times and above |
| Movable joints | 6 |
| Motor type | Servo servo, supporting current, position and speed control |
| Weight | 780g |
| Rated load | 500g |
| Power supply parameters | 24V2A |
| Fixing method | Screw fixing |
| Environment requirements for use | Normal temperature and pressure |
| Control interface | RS485 control |
| Cable interface model | M8-8PIN |
Pin sequence description
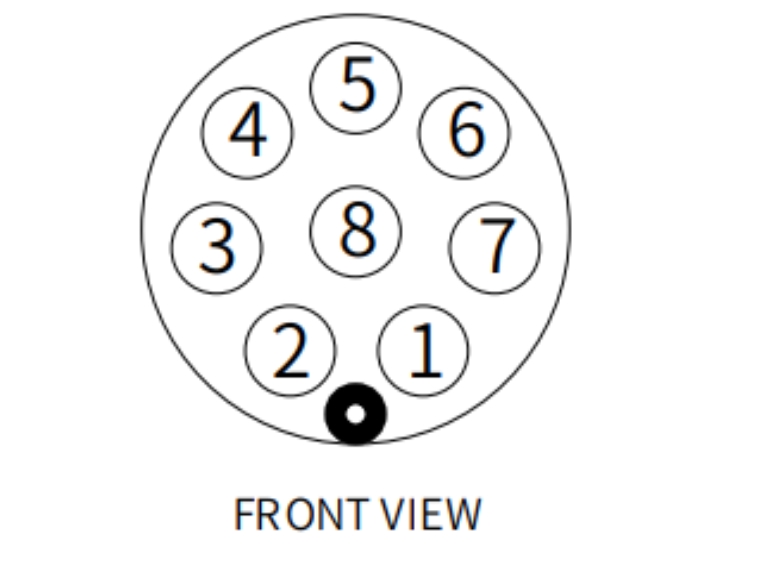
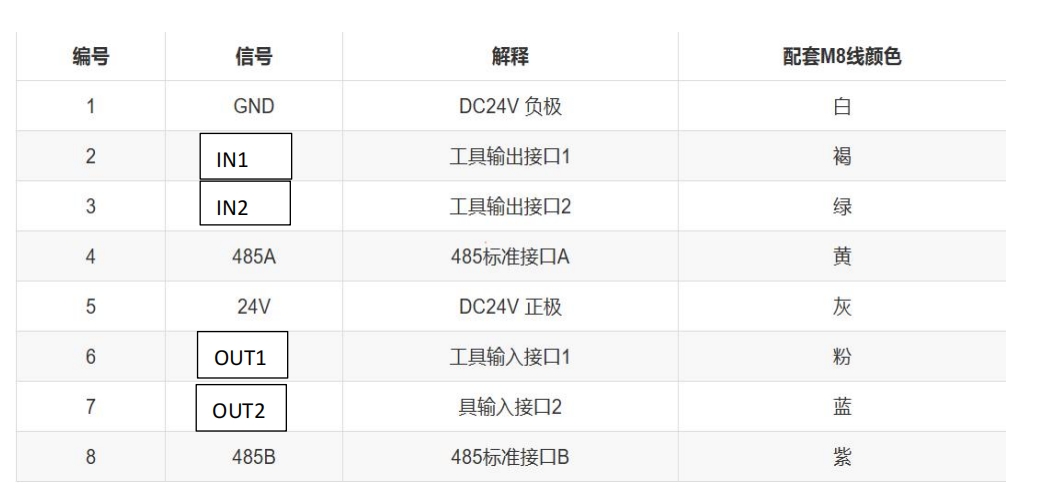
Numbers 1 and 5 connect GND and 24V, numbers 2 and 3 control IO input, numbers 6 and 7 are IO output, and numbers 4 and 8 are 485 communications, which are used to receive and send commands with the dexterous hand
Notes:
Please distinguish the line sequence according to the line mark. If the line mark is lost, detached, or forgotten, please contact our staff to cooperate in determining the line sequence. If you do not contact our staff, you will be responsible for the consequences of the damage to the dexterous hand due to the wrong wiring sequence.
5.1 Working principle
Driven by the motor, the finger surface of the manipulator makes linear reciprocating motion to achieve opening or closing. By setting the clamping torque, the impact of the workpiece is minimized, the positioning point is controllable, and the clamping is controllable.
5.3 Control method
USB-485 module wiring:
Connect the 24V, GND, 485_A (T/R+, 485+), 485_B (T/R-, 485-) of the smart hand end, a total of 4 wires, the power supply is a 24V DC regulated power supply, and insert the USB port of the module into the USB port of the computer
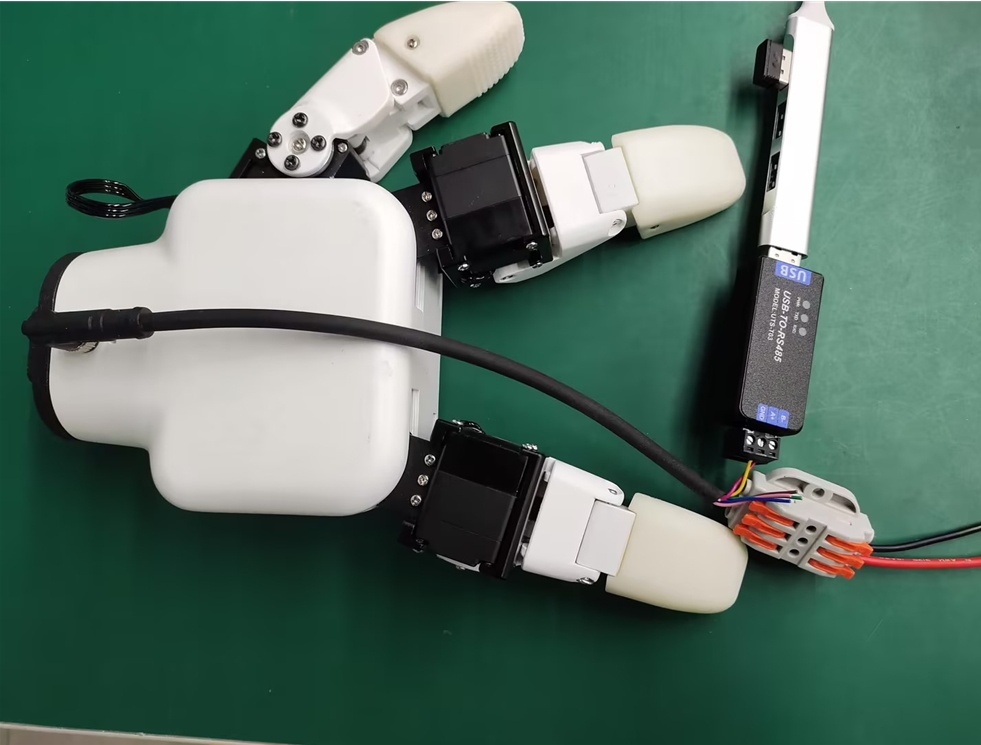
485A connects to the 485 to USB module A+;
485B connects to the 485 to USB module B-;
24V connects to the positive pole of the 24V DC regulated power supply;
GND connects to the negative pole of the 24V DC regulated power supply
python control method
After connecting the wires as described above, refer to python USB-485 control link, control the dexterous hand based on python
Serial port control method
Serial port debugging assistant debugging:
Users can use UartAssist serial port debugging assistant, refer to the figure below to send the corresponding dexterous hand command, CRC checksum does not need to be filled in, UartAssist serial port debugging assistant will automatically generate it.
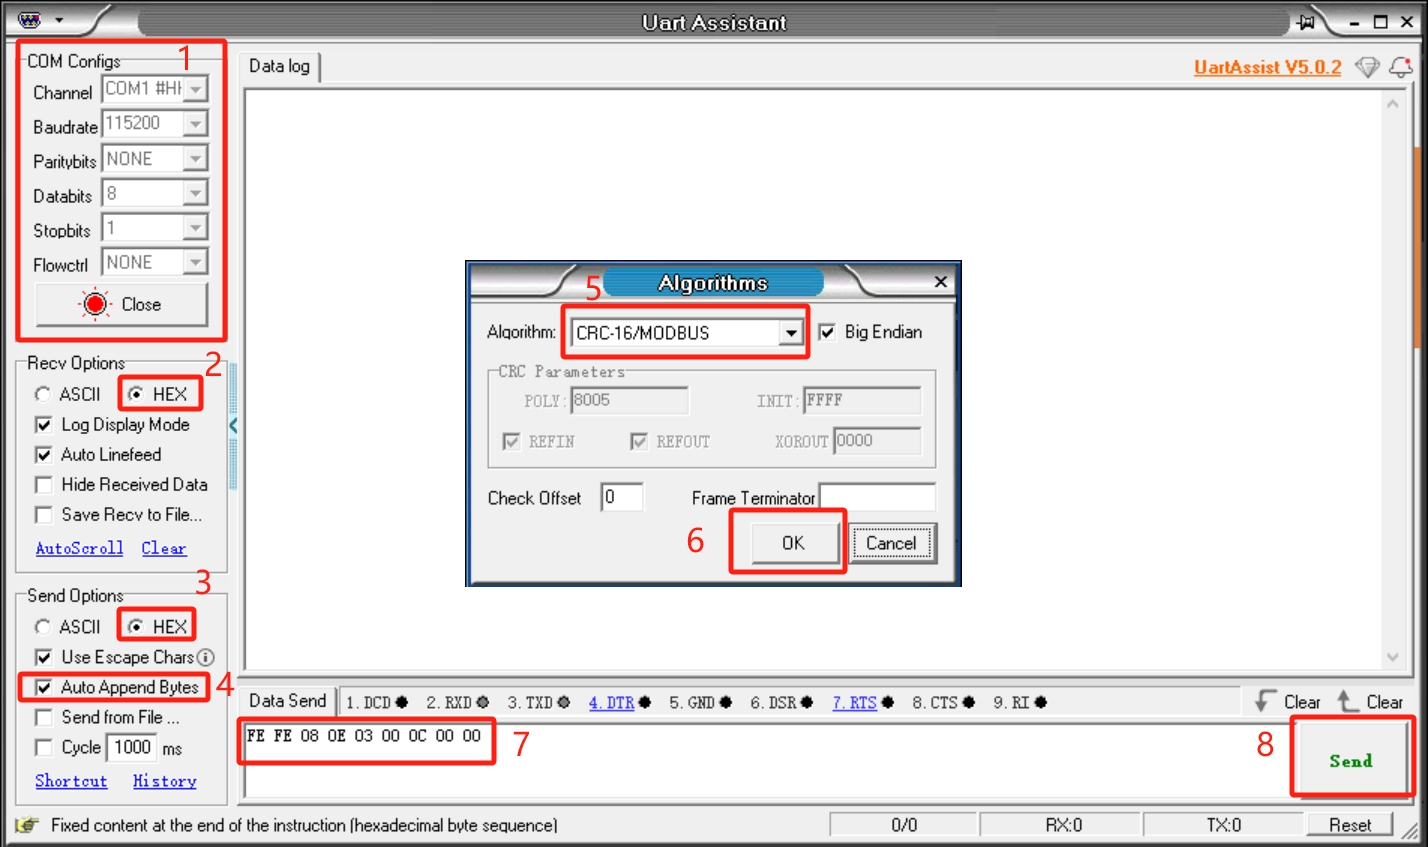
Default configuration of the dexterous hand serial port
- Dexterous hand ID: 14
- Baud rate: 115200
- Data bit: 8
- Stop bit: 1
- Check bit: No check bit
The dexterous hand adopts a custom protocol. An instruction consists of a frame header (2byte), length (1byte), address code ID (1byte), function code (1byte), register address (2byte), register data (2*n bytes), and check code (2byte). Let's take reading the angle of the dexterous hand as an example
| Frame header | Length | ID | Function code | Register address | Register data/parameter | CRC-16MODBUS check code |
|---|---|---|---|---|---|---|
| Fe Fe | 08 | 0e | 03 | 00 0C | 00 01 | 71 01 |
Frame header: 254 254
Length: Command length 08
ID: 0E, can be modified in the device, the default ID is 14, 0E represents the current ID of the dexterous hand is 14
Function code: Identify whether the instruction is a setting or acquisition function, 06 (write operation to the register)/03 (read operation to the register).
Register address: 00 0c Register address corresponding to the dexterous hand function
Register parameter: 00 01 If reading, just fill in the servo ID, if setting, fill in the servo ID and the written parameters
CRC check: 71 01 Ensure that the terminal device does not respond to data that changes during transmission, ensure the security and efficiency of the system, and the CRC check adopts the 16-bit cyclic remainder method. The frame header, length, function code, register address, and register parameter are all directly checked in hexadecimal to obtain the 71 01 check code.
Command Overview
Read the firmware major version number
Command: fe fe 08 0e 03 00 01 00 00 72 51
Function code: 03 Read operation
Parameter: None
Return: fe fe 08 0e 03 00 01 00 01 B2 90
Note: Data return 00 01, return version number is 1
Read the firmware minor version number
Command: FE FE 08 0E 03 00 02 00 00 72 A1
Function code: 03 Read operation
Parameter: None
Return: FE FE 08 0E 03 00 02 00 01 B2 60
Note: Data return 00 01, indicating that the return version number is 1
Set/read device ID number
Set
Command: FE FE 08 0E 06 00 03 00 0E 76 BD
Function code: 06 Write operation
Parameter: 00 0E, ID setting range (1-254)
Return: FE FE 08 0E 06 00 03 00 01 72 FD
Note: Success returns 00 01, failure returns 00 00, after the device ID is modified, the ID in the command also needs to be modified to be the same to communicate
Read
Command: FE FE 08 0E 03 00 04 00 00 73 41
Function code: 03 Read operation
Parameter: None
Return: FE FE 08 0E 03 00 04 00 0E B7 C0
Note: Data returns 00 0E, indicating the current smart hand ID number
Set/read 485 baud rate
Set
Instruction: FE FE 08 0E 06 00 05 00 00 73 1D
Function code: 06 Write operation
Parameter: 00 00, 0-115200, 1-1000000, 2-57600, 3-19200, 4-9600, 5-4800, If set to 1000000, the parameter is changed to 00 01
Return: FE FE 08 0E 06 00 05 00 01 72 FD
Note: Success returns 00 01, failure returns 00 00
Read
Instruction: FE FE 08 0E 03 00 06 00 00 B3 E0
Function code: 03 Read operation
Parameter: None
Return: FE FE 08 0E 03 00 06 00 00 B3 E0
Note: Return data 00 00, corresponding to the baud rate value of the setting parameter
Set the dexterous hand enable state
Instruction: FE FE 08 0E 06 00 0A 00 00 B0 EC
Function code: 06 Write operation
Parameter: 00 00, 00 means disconnection, 00 01 means enablement
Return: FE FE 08 0E 06 00 0A 00 01 70 2D
Note: Success returns 00 01, failure returns 00 00
Set/read the dexterous hand angle
Set
Instruction: FE FE 0A 0E 06 00 0B 00 01 00 64 FF 39
Function code: 06 Write operation
Parameter: 00 01 00 64, set the servo 1 angle to 100
Return: FE FE 08 0E 06 00 0B 00 01 B0 7C
Note: Success returns 00 01, failure returns 00 00
Read
Instruction: FE FE 08 0E 03 00 0C 00 01 71 01
Function code: 03 Read operation
Parameter: None
Return: FE FE 08 0E 03 00 0C 00 64 5A C1
Note: Return data 00 64, indicating that the current angle is 100, fully open state
Set the servo zero position
Command: FE FE 08 0E 06 00 0D 00 01 B1 9C
Function code: 06 Write operation
Parameter: 00 01 Set the servo 1 zero position
Return: FE FE 08 0E 06 00 0D 00 01 B1 9C
Note: Success returns 00 01, failure returns 00 00
Read the gripping status of the dexterous hand
Command: FE FE 08 0E 03 00 0E 00 00 71 61
Function code: 03 Read operation
Parameter: None
Return: FE FE 08 0E 03 00 0E 00 01 B1 A0
Note: 00 01, return data 0 means moving ,1: Stop motion, no clamping detected, 2: Stop motion, clamping detected, 3: Clamping detected, object dropped
Set/read the servo P value
Set
Command: FE FE 0A 0E 06 00 0F 00 01 00 64 3F C8
Function code: 06 Write operation
Parameter: 00 01 00 64, set the servo 1 P value to 100, setting range (1-254)
Return: FE FE 08 0E 06 00 0F 00 01 71 3D
Note: Success returns 00 01, failure returns 00 00
Read
Command: FE FE 08 0E 03 00 10 00 01 B7 C0
Function code: 03 Read operation Parameter: 00 01 Servo 1 Return: FE FE 08 0E 03 00 10 00 64 9C 00 Note: Return data 00 64, indicating that the current P value is 100
Set/read the servo D value
Set
Command: FE FE 0A 0E 06 00 11 00 01 00 64 3D 60
Function code: 06 Write operation
Parameter: 00 01 00 64, set the servo 1 D value to 100, setting range (1-254)
Return: FE FE 08 0E 06 00 11 00 01 77 5D
Note: Success returns 00 01, failure returns 00 00
If the dexterous hand shakes, the D value can be appropriately increased
Read
Command: FE FE 08 0E 03 00 12 00 01 77 61
Function code: 03 Read operation
Parameter: 00 01 Servo 1
Return: FE FE 08 0E 03 00 12 00 64 5C A1
Note: Return data 00 64, indicating that the current D value is 100
Set/read servo I value
Set
Command: FE FE 0A 0E 06 00 13 00 01 00 00 16 18
Function code: 06 Write operation
Parameter: 00 01 00 00, set servo 1 I value to 0, setting range (1-254)
Return: FE FE 08 0E 06 00 13 00 01 B7 FC
Note: Success returns 00 01, failure returns 00 00
Read
Command: FE FE 08 0E 03 00 14 00 01 76 81
Function code: 03 Read operation
Parameter: 00 01 Servo 1
Return: FE FE 08 0E 03 00 14 00 00 B6 40
Note: Return data 00 00, indicating that the current I value is 0
Set/read the clockwise running error of the servo
Set
Command: FE FE 0A 0E 06 00 15 00 01 00 03 17 D0
Function code: 06 Write operation
Parameter: 00 01 00 03, set the error value of servo 1 to 3, setting range (0-16)
Return: FE FE 08 0E 06 00 15 00 01 B6 1C
Mark: Success returns 00 01, failure returns 00 00
Read
Command: FE FE 08 0E 03 00 16 00 01 B6 20
Function code: 03 Read operation
Parameter: 00 01 Servo 1
Return: FE FE 08 0E 03 00 16 00 01 B6 20
Mark: Return data 00 01, indicating that the current value is 1
Set/read the counterclockwise operational error of the servo
Set
Command: FE FE 0A 0E 06 00 17 00 01 00 03 D7 A9
Function code: 06 Write operation
Parameter: 00 01 00 03, set the error value of the servo 3, setting range (0-16)
Return: FE FE 08 0E 06 00 17 00 01 76 BD
Note: Success returns 00 01, failure returns 00 00
Read
Command: FE FE 08 0E 03 00 18 00 01 75 41
Function code: 03 Read operation
Parameter: 00 01 Servo 1
Return: FE FE 08 0E 03 00 18 00 01 75 41
Note: Return data 00 01, indicating that the current value is 1
Set/read the minimum starting force of the servo
Set
Command: FE FE 0A 0E 06 00 19 00 01 00 18 1D 80
Function code: 06 Write operation
Parameter: 00 01 00 18 Set the value of servo 1 to 24
Return: FE FE 08 0E 06 00 19 00 01 B5 DC
Note: Success returns 00 01, failure returns 00 00
Read
Command: FE FE 08 0E 03 00 1A 00 01 B5 E0
Function code: 03 Read operation
Parameter: 00 01 Servo 1
Return: FE FE 08 0E 03 00 1A 00 18 7F 21
Note: Return data 00 18, indicating that the current value is 24
Set/read servo torque
Set
Command: FE FE 0A 0E 06 00 1B 00 01 00 64 3C F8
Function code: 06 Write operation
Parameter: 00 01 00 64 Set the torque of servo 1 to 100, parameter range (0-100)
Return: FE FE 08 0E 06 00 1B 00 01 75 7D
Note: Success returns 00 01, failure returns 00 00
Read
Command: FE FE 08 0E 03 00 1C 00 01 B4 00
Function code: 03 Read operation
Parameter: 00 01 Servo 1
Return: FE FE 08 0E 03 00 1C 01 2C 39 C1
Set/read servo speed
Set
Command: FE FE 0A 0E 06 00 20 00 01 00 14 1D 1C
Function code: 06 Write operation
Parameter: 00 01 00 14 Set the speed of servo 1 to 20, parameter range (1-100)
Return: FE FE 08 0E 06 00 20 00 01 B8 0C
Note: Success returns 00 01, failure returns 00 00
Read
Instruction: FE FE 08 0E 03 00 21 00 01 78 91
Function code: 03 Read operation
Parameter: 00 01 Servo 1
Return: FE FE 08 0E 03 00 21 00 32 6D D1
Note: 00 32 Data returned is 50
Set the dexterous hand gesture
Set
Command: FE FE 08 0E 06 00 34 01 01 00 35 EC
Function code: 06 Write operation
Parameter: 01 01 Set gesture (0-4), gesture closure degree (0-5)
Return: FE FE 08 0E 06 00 34 00 01 B8 0C
Note: Success returns 00 01, failure returns 00 00
Set/read the dexterous hand angle
Set
Command: FE FE 12 0E 06 00 2D 00 00 00 00 00 00 00 00 00 00 00 00 00 14 23 FC
Function code: 06 Write operation
Parameter: 00 00 00 00 00 00 00 00 00 00 00 00 00 14 The first 12 bytes represent the angle (0-100), and the last two bytes represent the speed (0-100)
Return: FE FE 08 0E 06 00 2D 00 01 7B 9D
Note: Success returns 00 01, failure returns 00 00
Read
Instruction: FE FE 08 0E 03 00 32 00 00 7D A1
Function code: 03 Read operation
Parameter: None
Return: FE FE 0C 0E 03 00 32 00 00 00 01 00 00 00 00 00 01 00 00 84 74
Note: 00 00 00 01 00 00 00 00 00 01 00 00 The data returned is [0, 1, 0, 0, 1, 0]
Python USB to 485 module control
Driver library installation
Click to download the driver library

Serial port dependency library installation
Execute the following command in the computer terminal to install the dependency library
pip install pyserial
API description
get_gripper_firmware_version()
- Function: Get the gripper firmware major version number
- Parameter: None
- Return:
(int)Firmware major version number
get_gripper_modified_version()
- Function: Get the gripper firmware minor version number
- Parameter: None
- Return:
(int)Firmware minor version number
get_gripper_gripper_Id()
- Function: Get the gripper ID
- Parameter: None
- Return:
(int)Gripper ID
get_gripper_gripper_baud()
- Function: Get the gripper baud rate
- Parameter: None
- Return:
(int)0-5 0: 1152001: 10000002: 576003: 192004: 96005: 4800
get_gripper_joint_angle(id)
- Function: Get the current position data of the gripper
- Parameter:
id:(int)Gripper joint ID, value range1-6 - Return:
(int)Current position data of the gripper joint ID
get_gripper_status()
- Function: Get the current status of the gripper
- Parameter: None
- Return:
(int)0-3 0: Moving1: Stopped moving, no object was detected2: Stopped moving, detected an object was clamped3: After detecting an object was clamped, the object fell
get_gripper_joint_speed(id)
- Function: Get the current speed of the gripper joint ID
- Parameters:
id:(int)Gripper joint ID, value range1-6 - Return:
(int)Current speed of the gripper joint ID
get_gripper_joint_P(id)
- Function: Get the P value of the PID of the gripper joint ID
- Parameters:
id:(int)Gripper joint ID, value range1-6 - Return:
(int)The P value of the PID of the gripper joint ID
get_gripper_joint_I(id)
- Function: Get the I value of the PID of the gripper joint ID
- Parameters:
id:(int)Gripper joint ID, value range1-6 - Return:
(int)The I value of the PID of the gripper joint ID
get_gripper_joint_D(id)
- Function: Get the D value of the PID of the gripper joint ID
- Parameter:
id:(int)Gripper joint ID, value range1-6 - Return:
(int)The D value of the PID of the gripper joint ID
get_gripper_joint_cw(id)
- Function: Get the clockwise runnable error of the gripper joint ID
- Parameter:
id:(int)Gripper joint ID, value range1-6 - Return:
(int)The clockwise runnable error of the gripper joint ID
get_gripper_joint_cww(id)
- Function: Get the counterclockwise runnable error of the gripper joint ID
- Parameter:
id:(int)Gripper joint ID, value range1-6 - Return:
(int)Anti-clockwise runnable error of the gripper joint ID
get_gripper_joint_mini_pressure(id)
Function: Get the minimum starting force of the gripper joint ID
Parameter:
id:(int)Gripper joint ID, value range1-6- Return:
(int)Minimum starting force of the gripper joint ID
get_gripper_joint_mini_pressure(id)
Function: Get the minimum starting force of the gripper joint ID
Parameter:
id:(int)Gripper joint ID, value range1-6- Return:
(int)Minimum starting force of the gripper joint ID
get_gripper_angles()
Function: Get the angles of the 6 joints of the gripper
Parameter:
id:(int)Gripper joint ID, value range1-6- Return:
(list)The angles of the 6 joints of the gripper
set_gripper_Id(value)
- Function: Set the gripper ID
- Parameter:
value:(int)Gripper ID, value range1-254- Return:
(int)0-1 0: Failed1: Success
set_gripper_baud(value)
- Function: Set the gripper baud rate
- Parameter:
value:(int)Gripper baud rate, value range0-50: 1152001: 10000002: 576003: 192004: 96005: 4800- Return:
(int)0-1 0: Failed1: Success
set_gripper_enable(value)
- Function: Set the gripper enable state
- Parameter:
value:(int)Enable state, value range0-10: Off enable1: On enable- Return:
(int)0-1 0: Failure1: Success
set_gripper_joint_calibration(id)
- Function: Set the zero calibration of the gripper joint ID
- Parameter:
id:(int)Gripper joint ID, value range1-6 - Return:
(int)0-1 0: Failed1: Success
set_gripper_joint_P(id,value)
- Function: Set the P value of the PID of the gripper joint ID
- Parameter:
id:(int)Joint ID, value range1-6value:(int)P value, value range0-254- Return:
(int)0-1 0: Failed1: Success
set_gripper_joint_I(id,value)
- Function: Set the I value of the PID of the gripper joint ID
- Parameters:
id:(int)Joint ID, value range1-6value:(int)I value, value range0-254- Return:
(int)0-1 0: Failed1: Success
set_gripper_joint_D(id,value)
- Function: Set the D value of the PID of the gripper joint ID
- Parameters:
id:(int)Joint ID, value range1-6value:(int)D value, value range0-254- Return:
(int)0-1 0: Failed1: Success
set_gripper_joint_cw(id,value)
- Function: Set the clockwise runnable error of the gripper joint ID
- Parameters:
id:(int)joint ID, value range1-6value:(int)error, value range0-16- Return:
(int)0-1 0: failed1: successful
set_gripper_joint_cww(id,value)
- Function: Set the counterclockwise runnable error of the gripper joint ID
- Parameters:
id:(int)joint ID, value range1-6value:(int)error, value range0-16- Return:
(int)0-1 0: failed1: successful
set_gripper_joint_mini_pressure(id,value)
- Function: Set the minimum starting force of the gripper joint ID
- Parameters:
id:(int)Joint ID, value range1-6value:(int)Minimum starting force, value range0-254- Return:
(int)0-1 0: Failed1: Success
set_gripper_joint_torque(id,value)
- Function: Set the torque of the gripper joint ID
- Parameters:
id:(int)Joint ID, value range1-6value:(int)Torque, value range0-300- Return:
(int)0-1 0: Failed1: Success
set_gripper_joint_speed(id,speed)
- Function: Set the speed of the gripper joint ID
- Parameters:
id:(int)Joint ID, value range1-6speed:(int)Speed, value range1-100- Return:
(int)0-1 0: Failed1: Success
set_gripper_angles(angles,speed)
- Function: Set the gripper joint angles
- Parameters:
angles:(list)6 joint angles, each joint angle has a value range of0-100speed:(int)Speed, value range1-100- Return:
(int)0-1 0: Failed1: Success
set_gripper_action(value)
- Function: Set the gripper pinch action
- Parameters:
value:(int)action, value range0-30: index finger and thumb pinch1: middle finger and thumb pinch2: three-finger grip3: two-finger grip- Return:
(int)0-1 0: failure1: success
set_gripper_pose(pose,value,flag)
- Function: Set the gripper pinch action and opening and closing degree
- Parameters:
pose:(int)action, value range0-30: index finger and thumb pinch1: middle finger and thumb pinch2: three-finger grip3: two-finger gripvalue:(int)opening and closing degree, value range0-5, degree of closing, the higher the level, the closer it isflag:(int)idle flag, when flag is 1, the idle finger can be freely manipulatedReturn:
(int)0-10: Failure1: Success
Testing Procedure
from MyHand import MyGripper_H100
import time
if __name__=="__main__":
    g=MyGripper_H100("COM27",baudrate=115200,id=14)##Fill in the actual serial port number, baud rate and gripper ID
    print("The actual ID of the gripper is:",g.get_gripper_Id())
    print(g.set_gripper_joint_angle(0,50))
    time.sleep(2)
    print(g.set_gripper_joint_angle(0,0))
    time.sleep(2)
6 Scenario Cases
Python control case based on USB-485 module
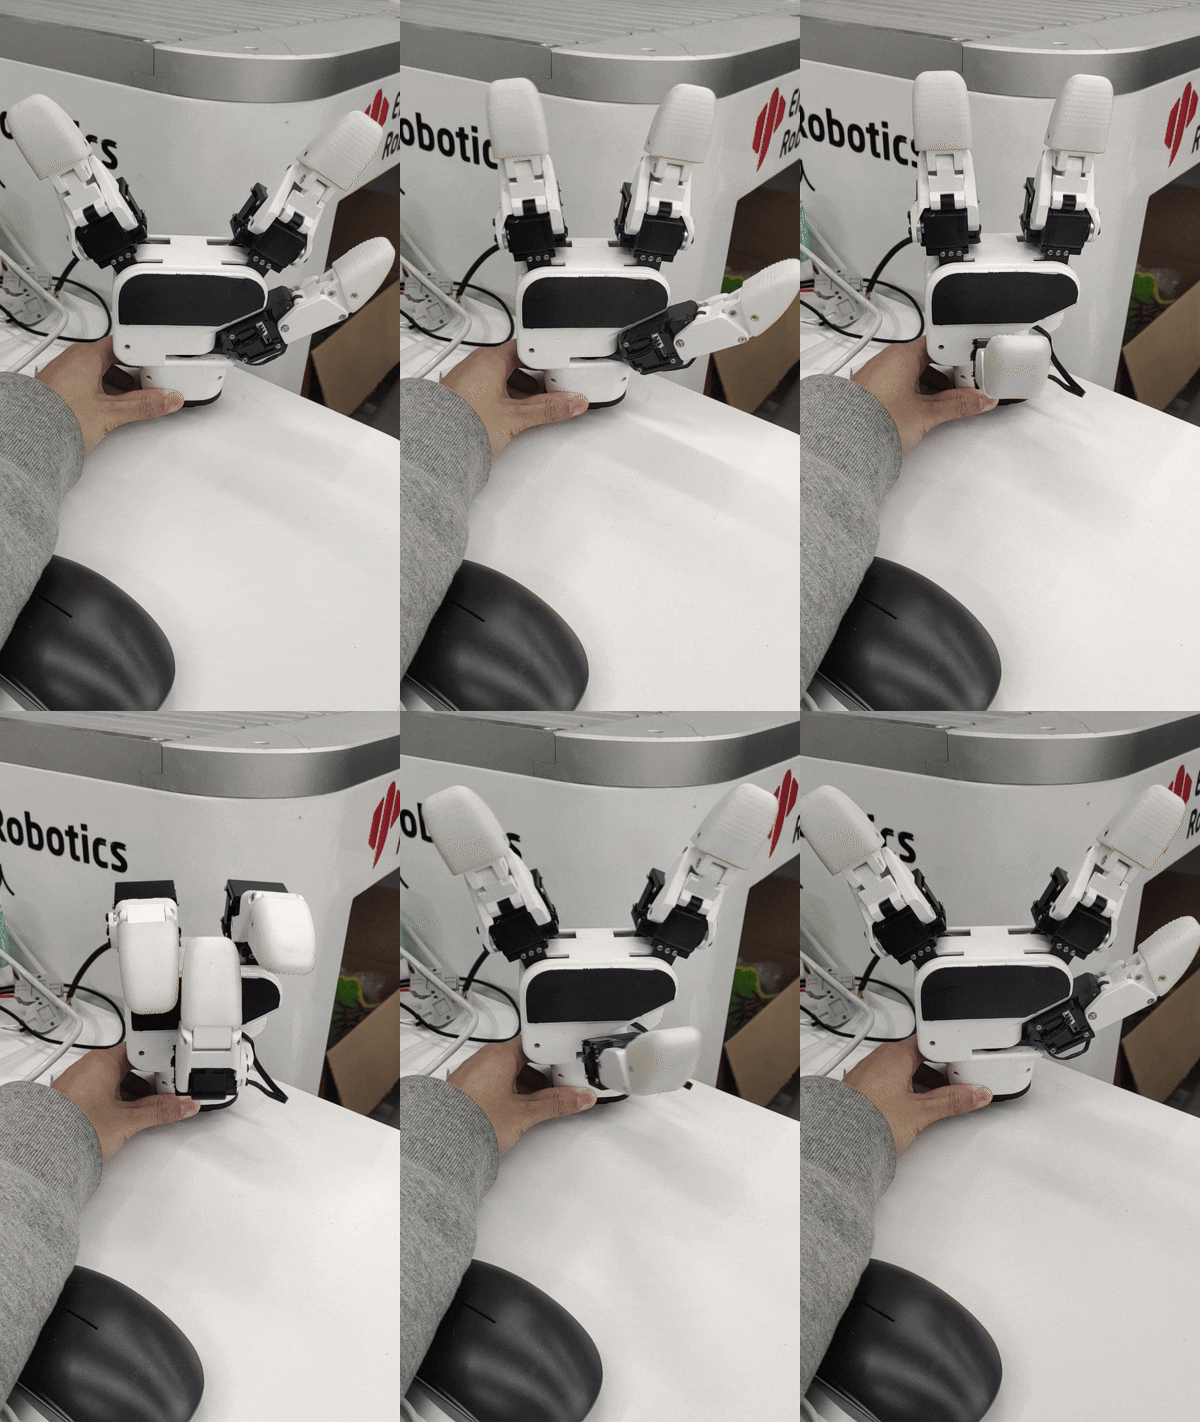
Based on 630, A1 grabbing case
