ROS2 introduction
The predecessor of ROS2 is ROS, and ROS is the Robot Operating System (Robot Operating System). But ROS itself is not an operating system, but a software library and toolset. The emergence of Ros solved the communication problem of each component of the robot. Later, more and more robot algorithms were integrated into ROS. ROS2 inherited ROS, which is more powerful and better than ROS.
1 Design goals and features of ROS2
ROS2 has the historical mission of changing the era of intelligent robots. At the beginning of the design, it was considered to meet the needs of various robot applications.
Multi-Robot Systems: In the future, robots will not be independent individuals, and communication and collaboration between robots are also required. ROS2 provides standard methods and communication mechanisms for the application of multi-robot systems.
Cross-platform: Robot application scenarios are different, and the control platforms used will also be very different. In order to allow all robots to run ROS2, ROS2 can run on Linux, Windows, MacOS, and RTOS across platforms.
Real time: Robot motion control and many behavior strategies require the robot to be real-time. For example, the robot must reliably detect pedestrians in front of it within 100ms, or complete kinematics and dynamics calculations within 1ms. ROS2 is a real-time like this Basic requirements are provided.
Productization: A large number of robots have entered our lives, and there will be more and more in the future,ROS2 can not only be used in the robot research and development stage, but also can be directly installed in the product and go to the consumer market. This also poses a huge challenge to the stability and robustness of ROS2.
Project management: Robot development is a complex system engineering. The project management tools and mechanisms for the whole process of design, development, debugging, testing, and deployment will also be reflected in ROS2, making it easier for us to develop a robot.
2 Release Version
The release version and maintenance cycle corresponding to ROS2 and Ubuntu.
| ROS2 version | release date | Maintenance deadline | Ubuntu version |
| :----:| :----:| :----: | :----: |
| Dashing | 2019.5 | 2021.5 | Ubuntu 18.04 (Bionic Beaver) |
| Eloquent | 2019.11 | 2020.11 | Ubuntu 18.04 (Bionic Beaver) |
| Foxy | 2020.6 | 2023.5 | Ubuntu 20.04(Focal Fossa) |
| Galactic | 2021.5 | 2022.11 | Ubuntu 20.04(Focal Fossa) |
| Humble | 2022.5 | 2027.5 | Ubuntu 22.04(Jammy Jellyfish) |
3 Comparison of ROS and ROS2
ROS2 redesigned the system architecture. The architecture changes between the two generations of ROS are as follows: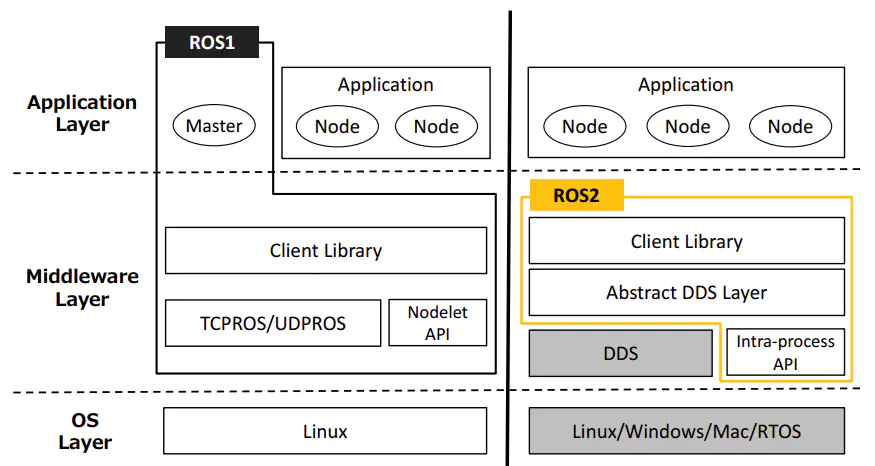
OS Layer: In ROS2, it can be built on linux or other systems, even bare metal without an operating system.
Middleware Layer: The communication system of ROS1 is based on TCPROS/UDPROS, while the communication system of ROS2 is based on DDS. DDS is a standard solution for data publishing/subscribing in distributed real-time systems.
Application Layer: ROS1 relies on ROS Master, while in ROS2, a discovery mechanism called "Discovery" is used between nodes to help establish connections with each other.
ROS has designed a complete set of communication mechanisms (topics, services, parameters, actions) to simplify robot development. Through this mechanism, the various components of the robot can be connected. This mechanism has designed a node called Ros Master, and the communication of all other components must go through the master node. Once the master node hangs up, it will cause the communication of the entire robot system to collapse! Therefore, the instability of Ros cannot be used to make some high-risk robots such as automatic driving. In addition, there are the following disadvantages:
- Communication based on TCP has poor real-time performance and high system overhead
- Unfriendly to python3 support
- Messaging mechanism is not compatible
- No encryption mechanism, low security
ROS2 first removes the master node that exists in ROS. After removing the master node, each node can discover each other through the DDS node, each node is equal, and can realize one-to-one, one-to-many, and many-to-many communication. After using DDS for communication, reliability and stability have been enhanced.
Compared with ROS that only supports Linux systems, ROS2 also supports windows, mac, and even RTOS platforms
Myarm M750 version:
Install different versions of ubuntu in Linux
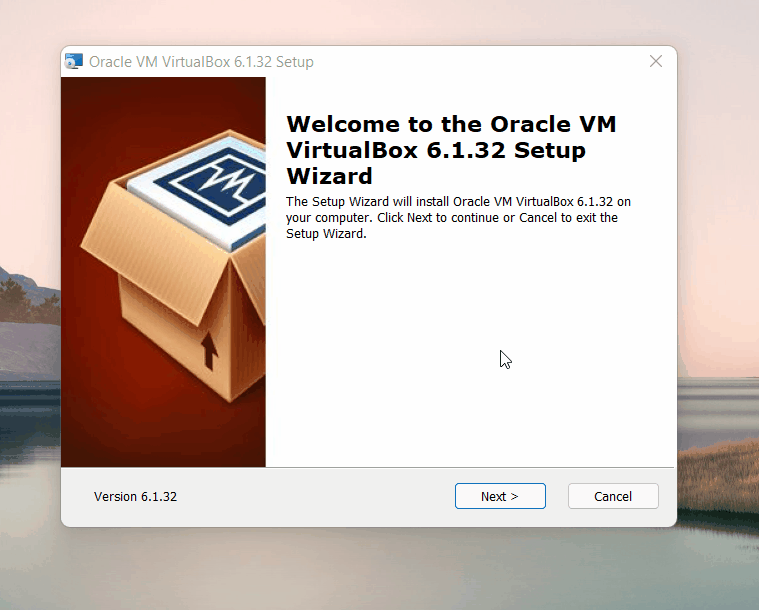
1 Virtual machine installation
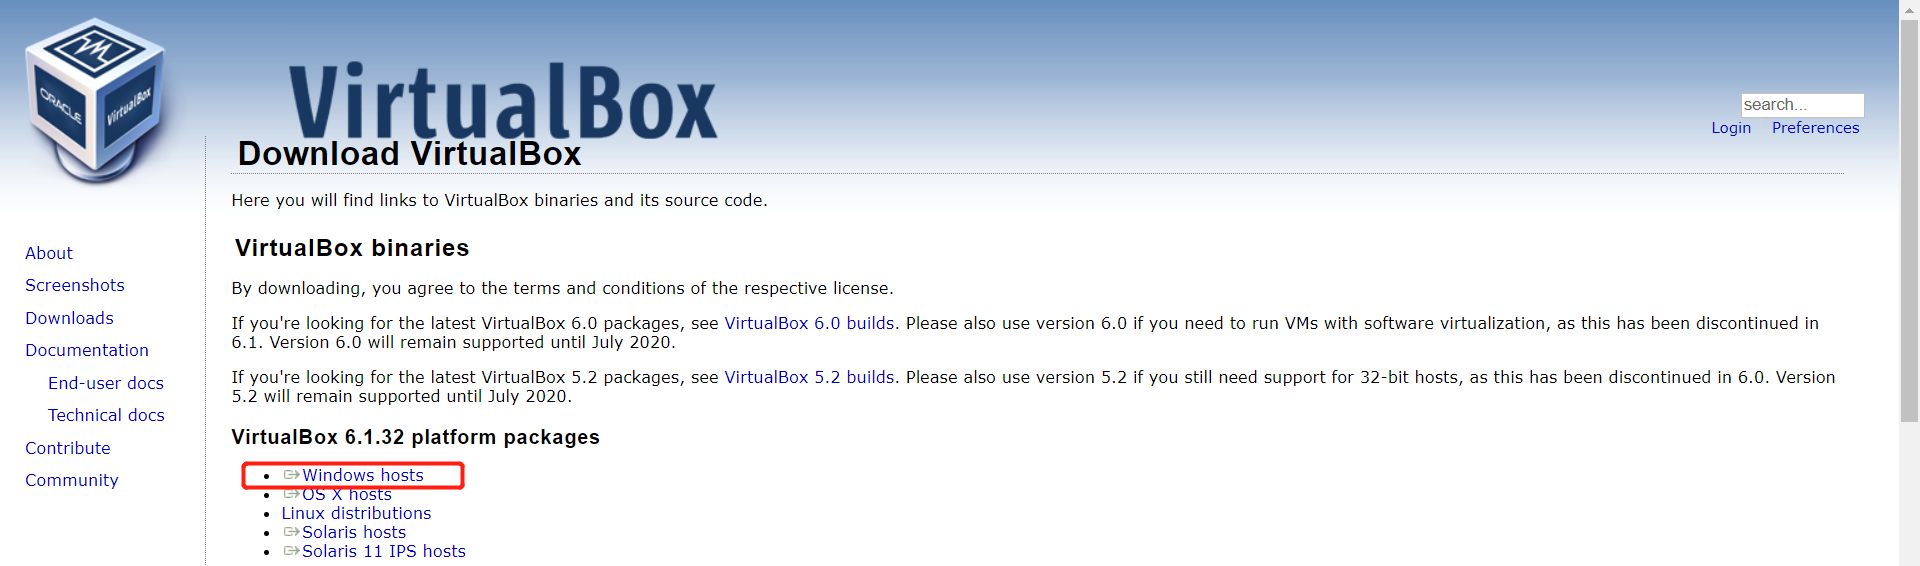
Go to Official website to download the virtual machine Viltul albox or go to the official website download the virtual machine Wimwal
Of course, if you already have your virtual machine, you can skip that step.
We chose to download the Virtual box because it is free.
2 Create a new virtual machine
2.1 Create a virtual machine
In Control, select New
Enter the name of the VM and the location where the VM is stored, select the VM type as Linux, and select the ubuntu 64-bit version to proceed to the next step.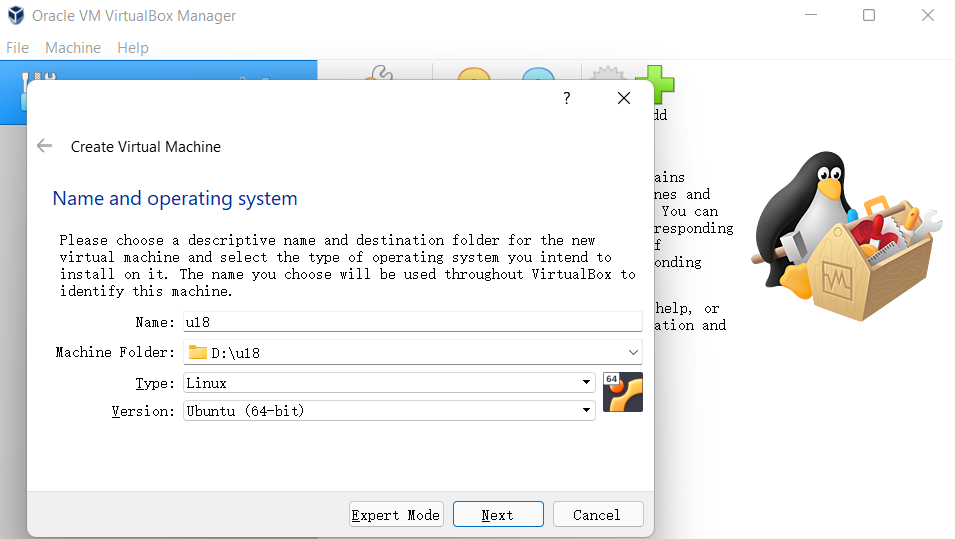
Configure the memory size according to your needs and proceed to the next step.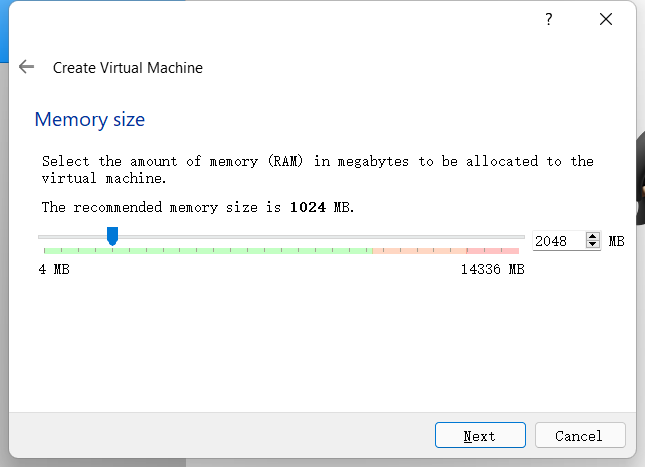
Select Create virtual hard disk now to create it.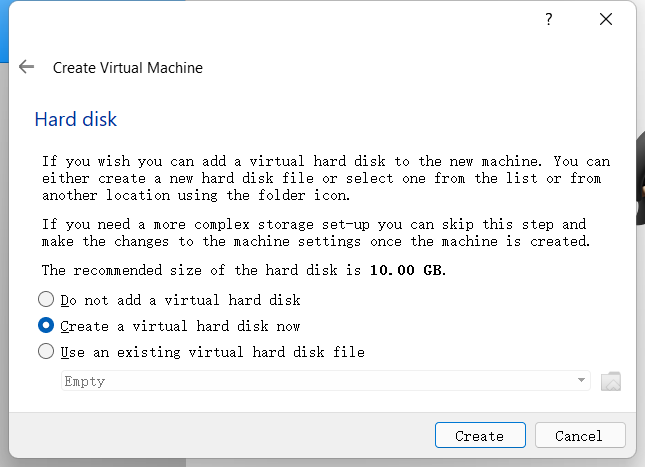
Select VDI for Virtual Hard Disk Type and proceed to the next step.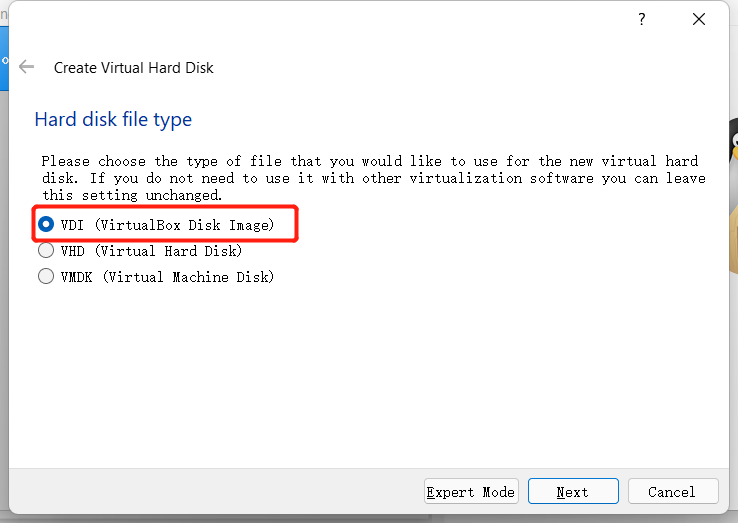
Allocate the size of the virtual hard disk, since the ubuntu system needs to be installed, and it will also operate in the system, it is recommended that the size should not be less than 20G.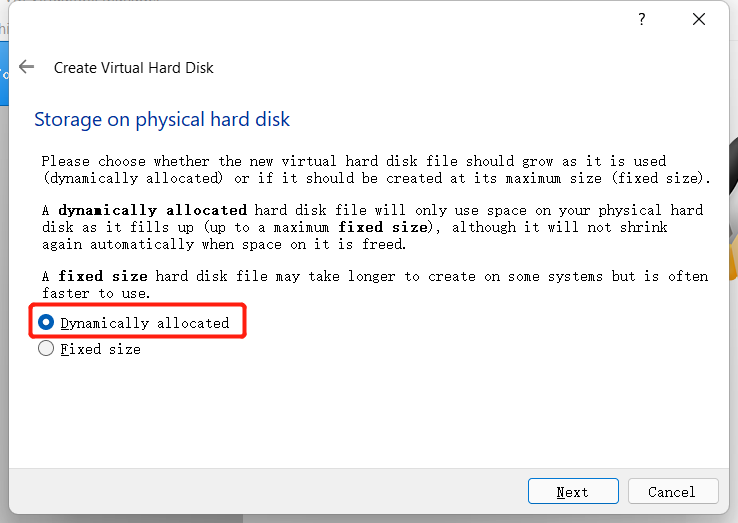

2.2 Import the Ubuntu system
2.2.1 Download the Ubuntu system
Please choose the Ubuntu version according to your needs to install it.
Note: ROS2 requires version 20.04 to be downloaded.
The installation method and process are the same for all three versions, and version 18.04 is used as an example for installation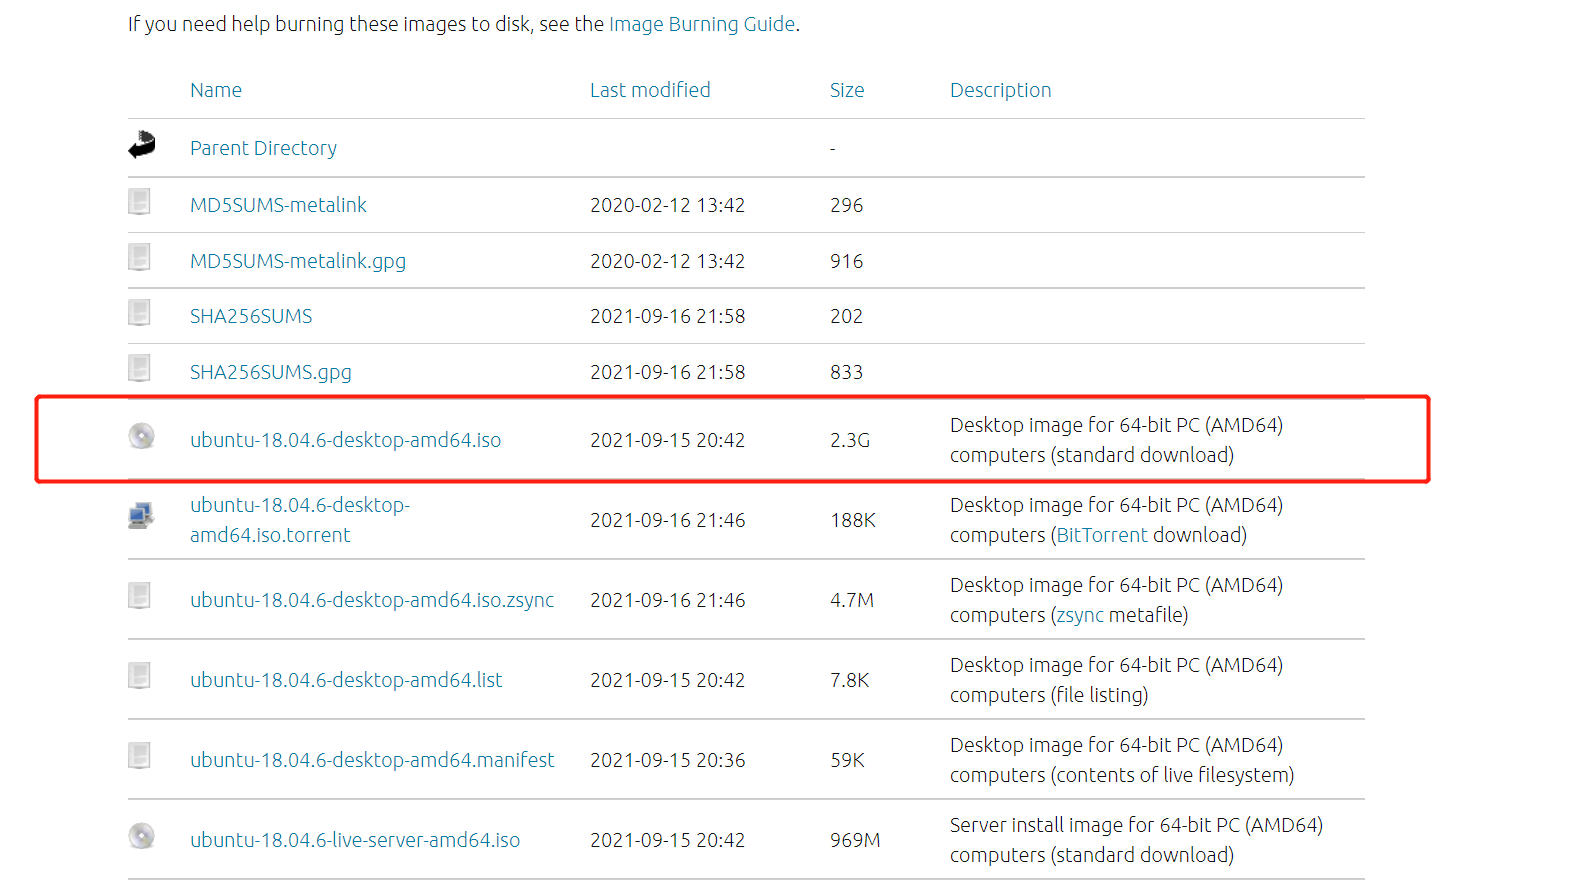
After the download is completed, there is a file as shown in the figure:
2.2.2 Import Ubuntu to the virtual machine
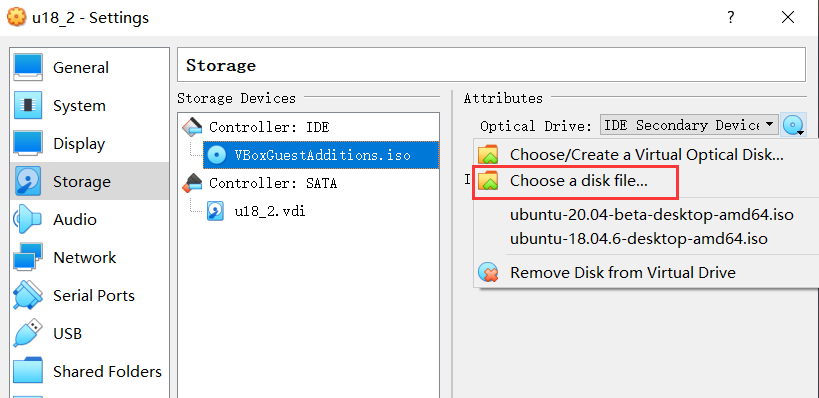
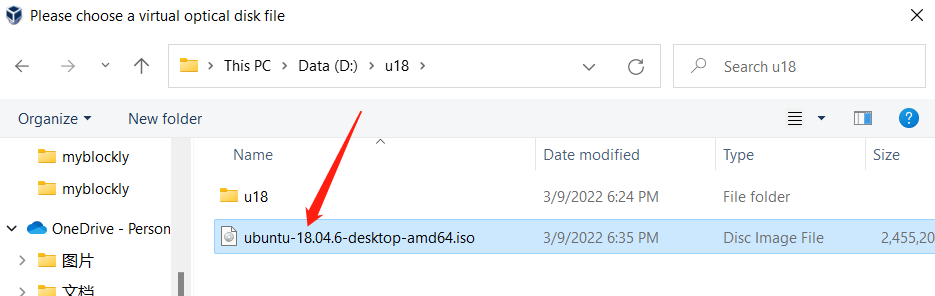
Locate the previously installed virtual machine in the virtual box, go to Settings, and assign a disc to the controller in Storage: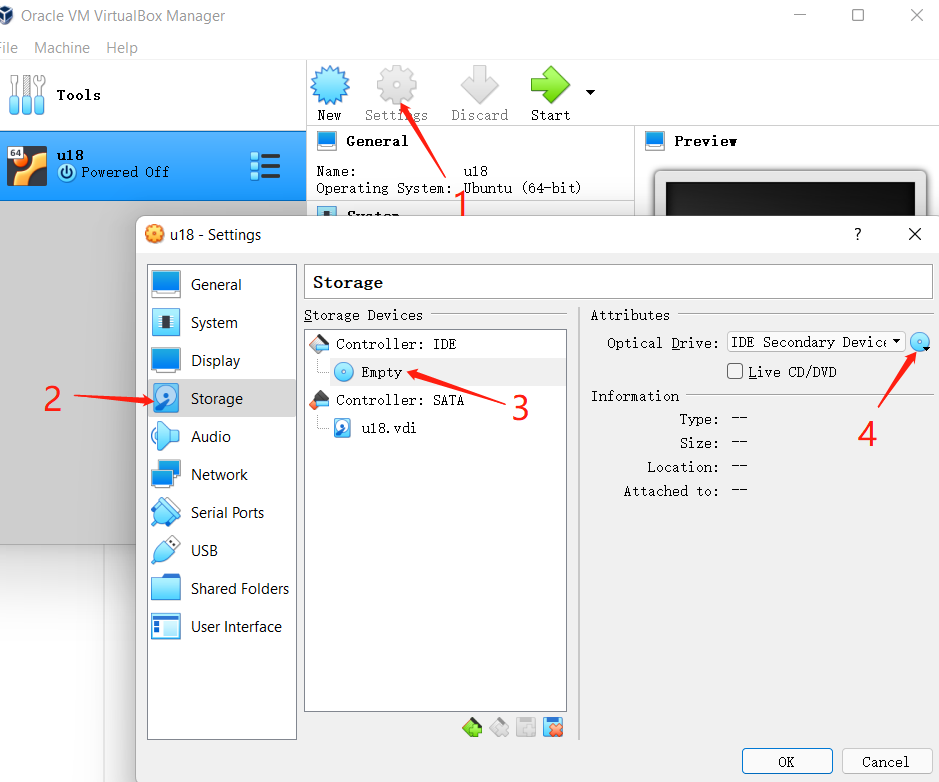
Then open the virtual machine for ubuntu installation and click start.
2.2.3 ubuntu installation
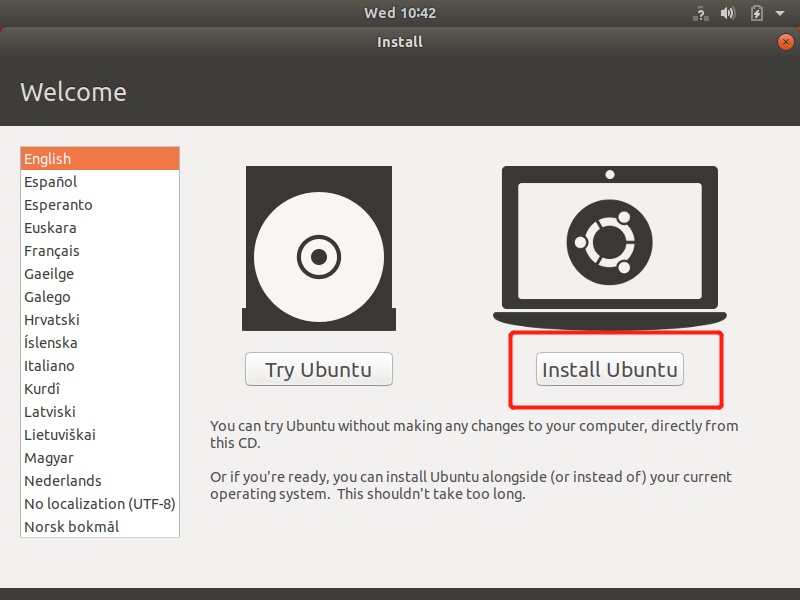
Wait for the system to boot, enter the Welcome interface, select "Chinese (Simplified)", and click the "Install Ubuntu" button;
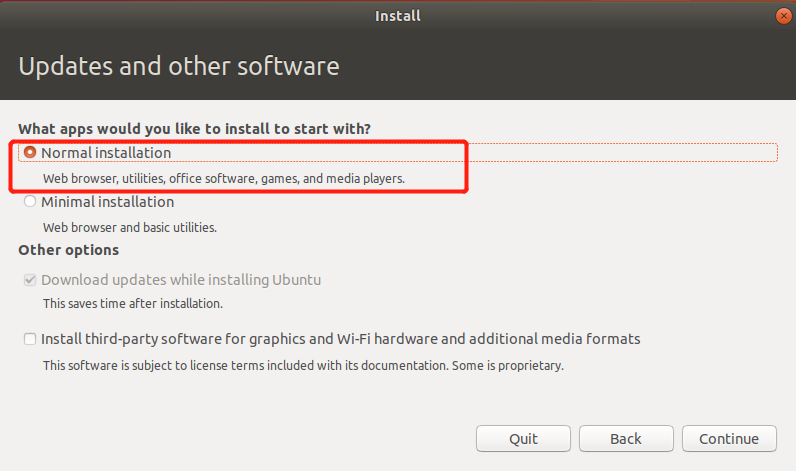
Click “Continue” button;
Select the "Clear entire disk and install Ubuntu" option, and click the "Install Now" button;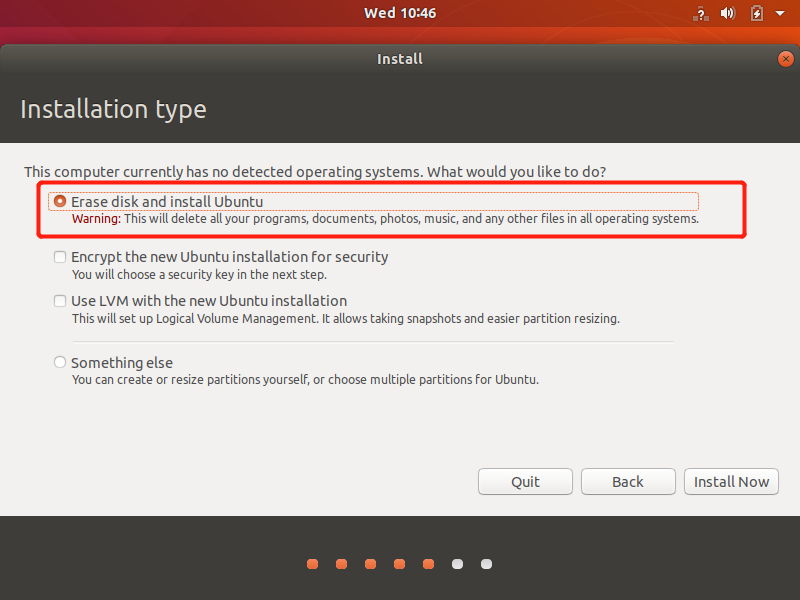
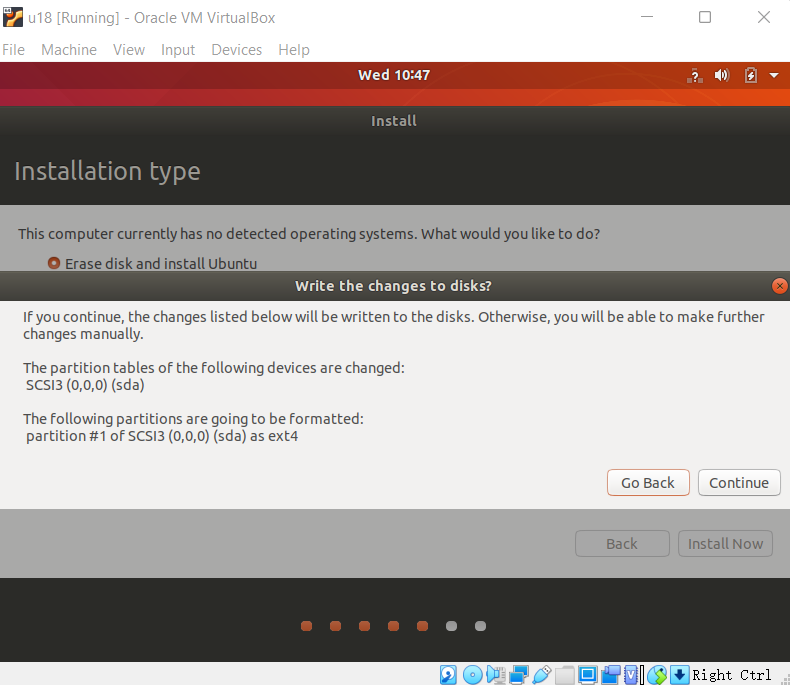
Click the "Continue" button in the pop-up dialog box;
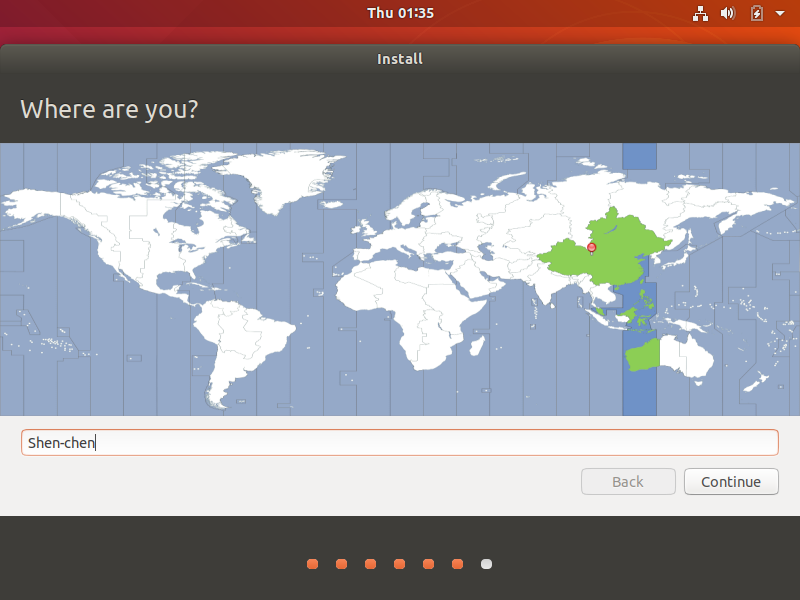
Set a geographic position and click the “Continue” button;
Set a user name and password, and click the “Continue” button;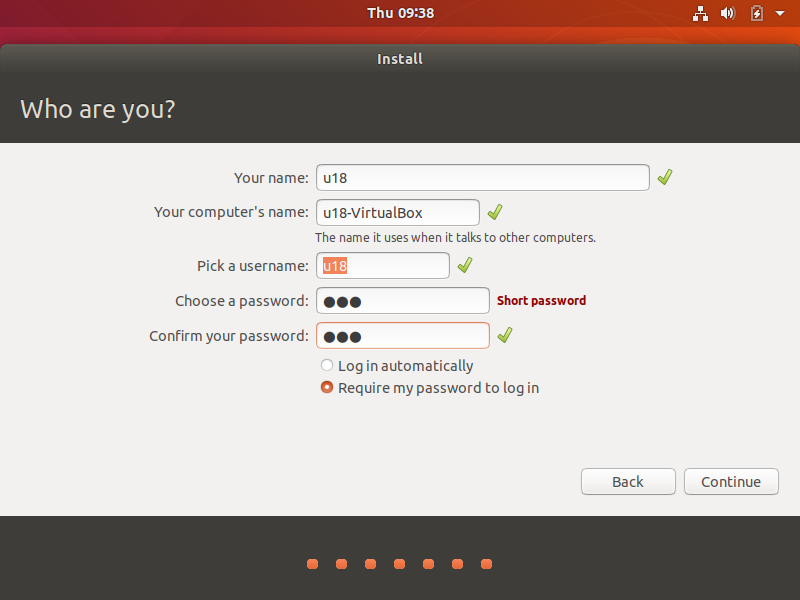
Enter the system installation interface, and wait patiently;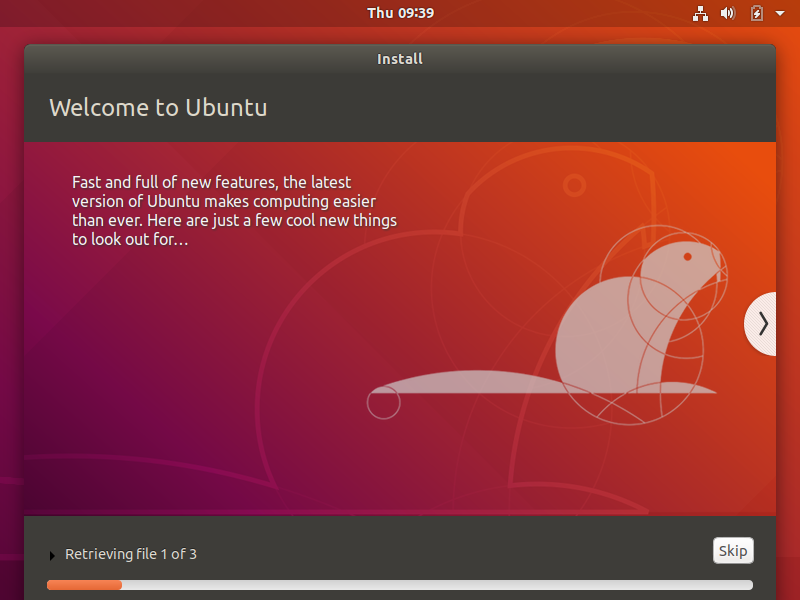
After installation is complete, click the "Restart now" button in the pop-up dialog box to complete the installation.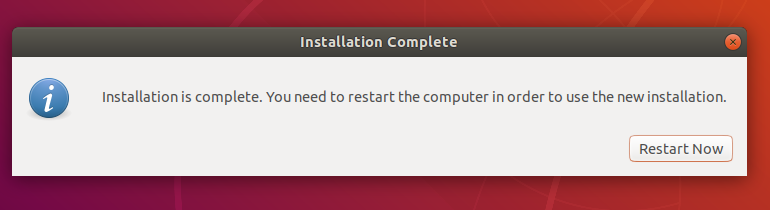
1 ROS2 Environment building
1.1 Installing ROS2
Building a basic development environment requires the installation of the robot operating system (short for ROS2), MoveIt2 and a git version manager. The installation methods and procedures are described respectively below.
1.1.1 Selecting a version
There is a one-to-one relationship between ROS2 and ubuntu. Different versions of ubuntu correspond to different versions of ROS2. The reference website is as follows: http://docs.ros.org/en/foxy/Releases.html
Here are the ROS versions supported by Ubuntu: | ROS2 version | release date | Maintenance deadline | Ubuntu version | | :----:| :----:| :----: | :----: | | Foxy | 2020.6 | 2023.5 | Ubuntu 20.04(Focal Fossa) | | Galactic | 2021.5 | 2022.11 | Ubuntu 20.04(Focal Fossa) | | Humble | 2022.5 | 2027.5 | Ubuntu 22.04(Jammy Jellyfish) |
Install the ROS version corresponding to the Ubuntu version you have installed.
If the versions are different, the downloading will fail. The system we choose here is Ubuntu 20.04(recommend), so the corresponding ROS2 version is ROS2 Foxy.
- NOTE: At present, we do not provide any reference for installing ROS in windows. If necessary, refer to http://docs.ros.org/en/foxy/Installation/Alternatives/Windows-Development-Setup.html
1.1.2 Installing ROS2
1 Adding a software source
There is no ROS2 software source in the software source list of Ubuntu itself, so you need to Configure the ROS software source into the software list repository first, and then download ROS2. Open a console terminal (shortcut key: Ctrl+Alt+T) and input the following command:
official source:
echo "deb [arch=$(dpkg --print-architecture) signed-by=/usr/share/keyrings/ros-archive-keyring.gpg] http://packages.ros.org/ros2/ubuntu $(source /etc/os-release && echo $UBUNTU_CODENAME) main" | sudo tee /etc/apt/sources.list.d/ros2.list > /dev/null
If the download speed is slow, it is recommended to select a nearby mirror source to replace the above command. For example, huawei cloud is:
echo "deb [arch=$(dpkg --print-architecture)] https://repo.huaweicloud.com/ros2/ubuntu/ $(lsb_release -cs) main" | sudo tee /etc/apt/sources.list.d/ros2.list > /dev/null
2 Setting a key
Configuring a public key. This step is to let the system confirm that our path is safe, so that there is no problem in downloading the file. Otherwise it will be deleted immediately after downloading:
sudo apt install curl gnupg2 -y
curl -s https://gitee.com/ohhuo/rosdistro/raw/master/ros.asc | sudo apt-key add -
3 Installation
After adding a new software source, you need to update the software source list. Open a console terminal (shortcut key: Ctrl+Alt+T) and input the following command:
sudo apt-get update
Execute Installing ROS2. Open a console terminal (shortcut key: Ctrl+Alt+T) and input the following command according to your Ubuntu version:
# Ubuntu 20.04 foxy version
sudo apt install ros-foxy-desktop
# Ubuntu 20.04 galactic version
sudo apt install ros-galactic-desktop
# Ubuntu 22.04 humble version
sudo apt install ros-humble-desktop
The installation process takes a long time, so please wait with patience.
Refresh environment variables after installation is complete:
source /opt/ros/foxy/setup.bash
1.1.3 Set up the ros2 environment
In order to avoid re-validating the ROS2 function path every time the terminal window is closed, we can set the path to an environment variable, so that each time you open a new terminal, the ROS2 function path will automatically take effect. Execute the following commands in sequence in the terminal, and open a console terminal (shortcut key: Ctrl+Alt+T):
Execute the following commands:
# Ubuntu 20.04 foxy version
# Add the ros2 environment to the environment variables of the current console
echo "source /opt/ros/foxy/setup.bash" >> ~/.bashrc# Ubuntu 20.04 galactic version
echo "source /opt/ros/galactic/setup.bash" >> ~/.bashrc# Ubuntu 22.04 humble version
echo "source /opt/ros/humble/setup.bash" >> ~/.bashrcsource ~/.bashrc
Installing a ROS2 extra dependency
Input the following command in the terminal to install a ROS2 extra dependency, and open a console terminal (shortcut key: Ctrl+Alt+T):
sudo apt install python3-argcomplete -y
sudo apt install ros-foxy-xacro
sudo apt-get install python3-colcon-common-extensions
# Ubuntu 20.04 foxy version
sudo apt install ros-foxy-joint-state-publisher-gui# Ubuntu 20.04 galactic version
sudo apt install ros-galactic-joint-state-publisher-gui# Ubuntu 22.04 humble version
sudo apt install ros-humble-joint-state-publisher-gui
1.1.4 Verify installation
To verify whether ROS2 has been installed successfully, open a console terminal (shortcut key: Ctrl+Alt+T) and execute the following command in the terminal:
ros2
When the following interface is displayed, it means that ROS2 has been installed successfully.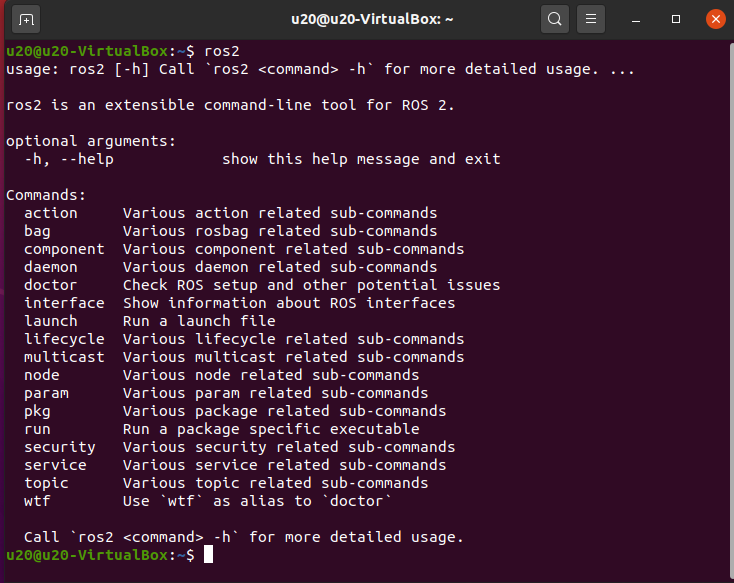
1.2 MoveIt2 Installation
MoveIt2 is the composition of a series of function packages for movement operations in ros, mainly including motion planning, collision detection, kinematics, 3D perception, operation control and other functions.
1.2.1 Updating the software source list
Open a console terminal (shortcut key: Ctrl+Alt+T) and input the following command on the terminal window to update the software source list:
sudo apt-get update
1.2.2 Installing MoveIt2
Open a console terminal (shortcut key: Ctrl+Alt+T) and input the following command on the terminal window to execute the installation of MoveIt2:
# Ubuntu 20.04 foxy version
sudo apt-get install ros-foxy-moveit
# Ubuntu 20.04 galactic version
sudo apt-get install ros-galactic-moveit
# Ubuntu 22.04 galactic version
sudo apt-get install ros-humble-moveit
1.3 git Installation
1.3.1 Updating the software source list
Open a console terminal (shortcut key: Ctrl+Alt+T) and input the following command on the terminal window to update the software source list:
sudo apt-get update
1.3.2 Installing git
Open a console terminal (shortcut key: Ctrl+Alt+T) and input the following command on the terminal window to execute the installation of git:
sudo apt-get install git
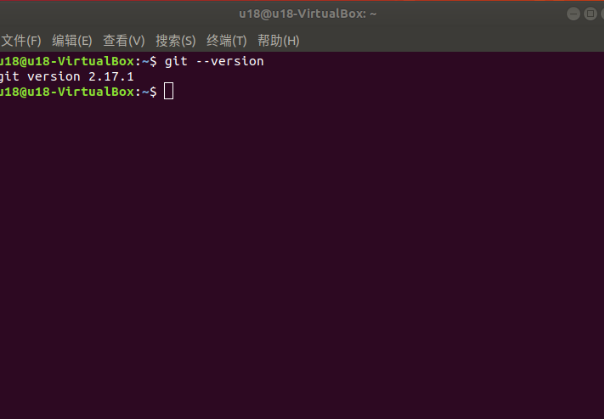
1.3.3 Verifying git
Read the git version, open a console terminal (shortcut key: Ctrl+Alt+T) and input the following command on the terminal window:
git --version
The git version number can be displayed in the terminal as follows, that is, the installation is successful.
2 MyarmM750 Installation
The MyarmM750 is a ROS package launched by ElephantRobotics that adapts to its desktop six-axis robotic arm Myarm series.
Project Address: https://github.com/elephantrobotics/mycobot_ros2/tree/myArmC650_M750
2.1 precondition
Before installing the package, make sure you have a ROS2 workspace.
Here we give a sample command to create a workspace,The default is colcon_ws, Open a console terminal (Ctrl+Alt+T),On the command line, enter the following command:
mkdir -p ~/colcon_ws/src # Create folders
cd ~/colcon_ws/src # Go to the folder
colcon build # Build the code in the workspace
Add the environment for the workspace
The official default ROS2 workspace is colcon_ws.
echo "source ~/colcon_ws/install/setup.bash" >> ~/.bashrc
source ~/.bashrc
2.2 Installation
NOTE:
- This package relies on ROS2 and MoveIT2, make sure to install ROS and MoveIT successfully before use.
- The interaction between this package and the real robotic arm relies on the PythonApi - pymycobot
- The API project locations are:https://github.com/elephantrobotics/pymycobot
- Quick Installation:pip install pymycobot --upgrade
When executing the Pip Instale Pimicobo-Uprad command, if the following error message appears:
Enter the following command to install pip when prompted:
sudo apt install python-pip
If your Ubuntu system is version 20.04, run the sudo apt install python3-pip installation pip installation and run the terminal again after the installation is complete
pip install pymycobot --upgrade
The installation method depends on Git, so make sure you have Git installed on your computer.
The official default ROS1 workspace is colcon_ws.
Open the terminal:
cd ~/colcon_ws/src # Enter the src folder of the workspace
# Clone the code on github
git clone --depth 1 https://github.com/elephantrobotics/mycobot_ros2.git
cd .. # return to the workspace
colcon build --symlink-install # Build the code in the workspace, --symlink-install: Avoid having to recompile python scripts every time you adjust them
source install/setup.bash # add environment variables
At this point, the environment construction is partially completed
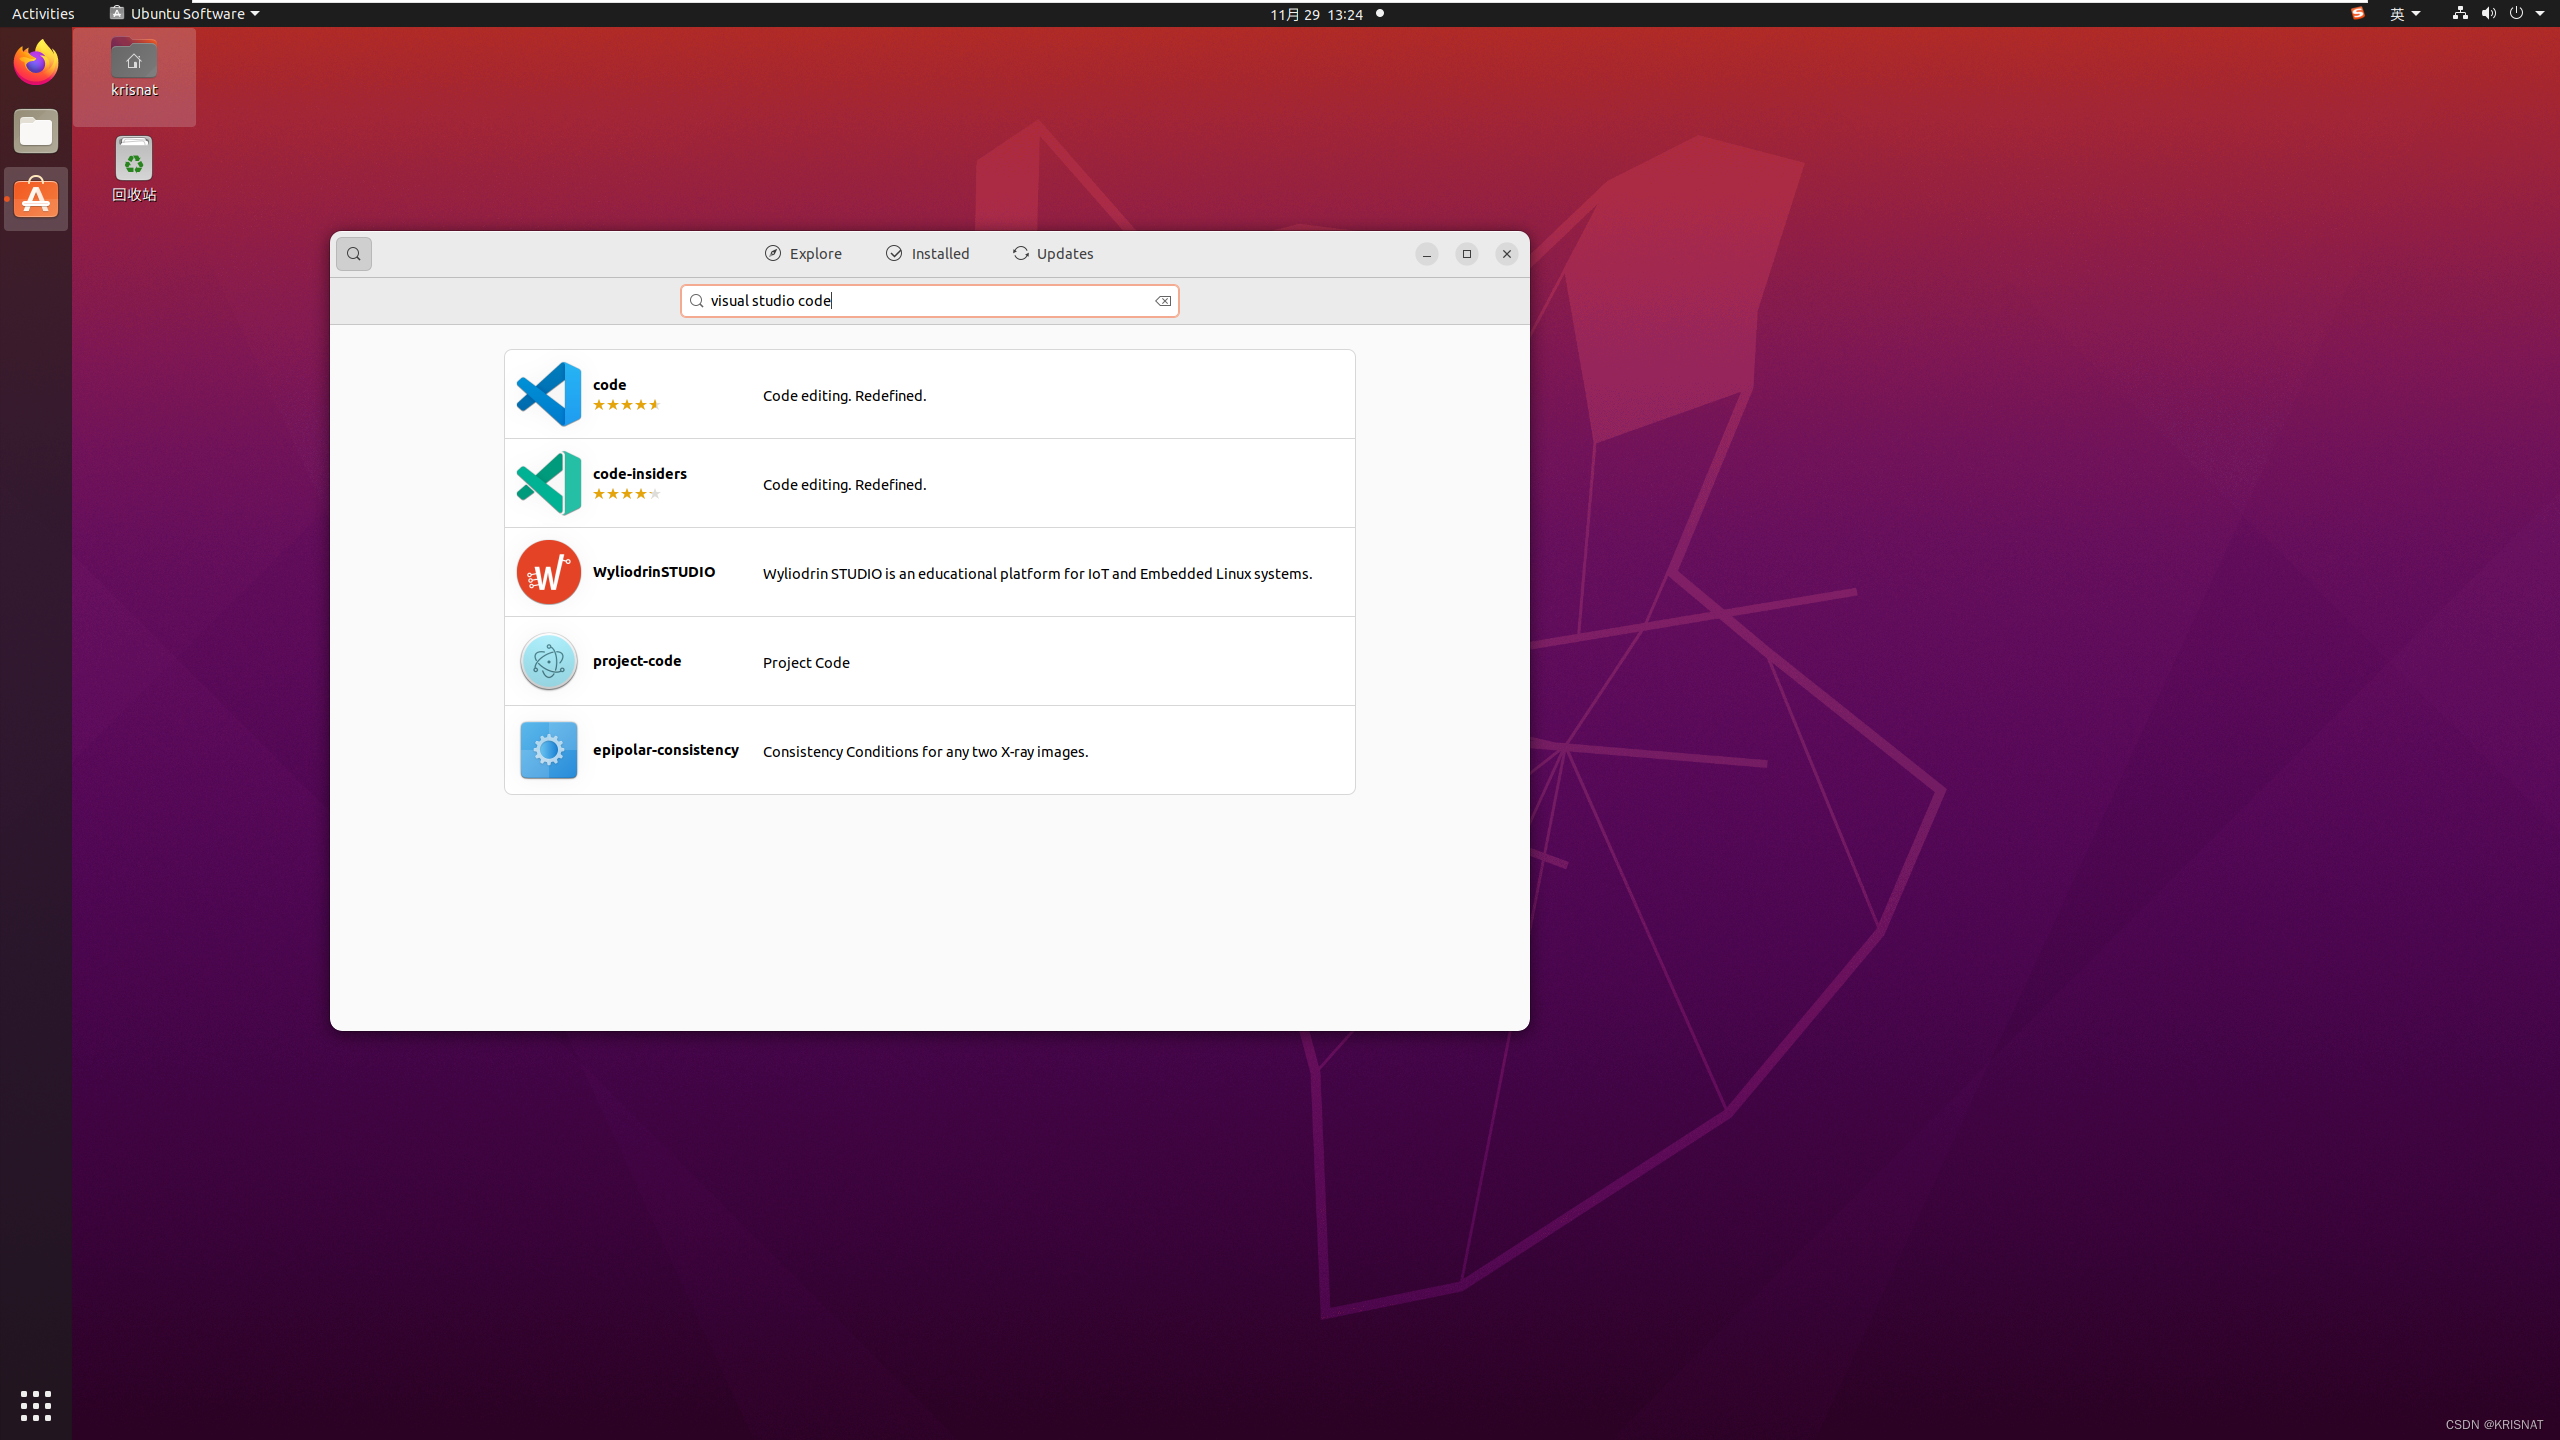
For the subsequent programming, we also need to download one VS code
Here we will choose the most convenient method: Installing in Ubuntu Software [Easy & Convenient]

After installation, we also need to install the python environment
To run a python file, click on the left extension (ctrl+shift+X) - search for python, download and install
After installation, you can click on the upper left file, select New File, select the file type as Python, write your own Python code, and then click Run in the upper menu bar
3 Brief introduction and use of rviz2
rviz2 is a three-dimensional visualization platform in ROS. On the one hand, it can realize the graphical display of external information, and on the other hand, it can also release control information to the object through rviz2, so as to realize the monitoring and control of the robot.
3.1 Introduction to rviz2
The successful installation of ros2 indicates that rviz2 is also successfully installed together, because the installation of ros2 includes rviz2.
Open a new terminal (shortcutCtrl+Alt+T)enter the command to open rviz2
rviz2
Open RVIZ2 and display the following interface: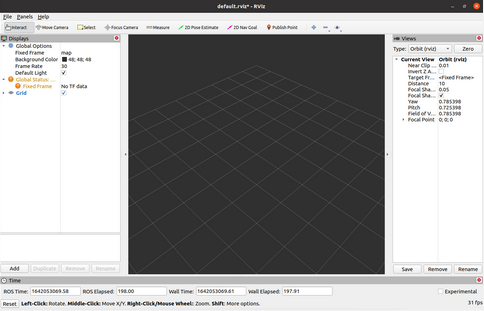
3.1.1 Introduction to each area
- On the left is a list of monitors, which are things that draw something in the 3D world and may have some options available in the display list.
- Above is the toolbar, which allows users to use various function buttons to select tools with multiple functions
- The middle part is the 3D view: it is the main screen where you can view various data in 3D. The background color, fixed frame, mesh, etc of the 3D view can be set in detail in the Global Options and Grid items displayed on the left.
- Below is the time display area, including system time and ROS time.
- The right side is the observation angle setting area, and different observation angles can be set.
We only give a rough introduction in this part, if you want to know more details, you can go to User Guide to review.