Install different versions of ubuntu system in Linux
1 Virtual machine installation
Notice: When installing the virtual machine system, please install the Ubuntu 20.04 version of the system, The installation method is consistent with ubuntu 18.04.
To install different versions of Ubuntu systems in Linux, please refer to the 6.1 ROS1 Environment building chapter for specific installation methods.
There are two options for virtual machine creation:
- ① Using our configured virtual machine ROS1 virtual machine files, imported into the virtual machine software, you can save the time to configure the environment, easy to quickly use the ROS case.
- ROS2 VM files:
https://download-elephantrobotics.oss-cn-shenzhen.aliyuncs.com/system_images/ubuntu20.04_ROS2_V20240228.zip- Step-by-step video on how to import VM files into VM software:
https://drive.google.com/file/d/1KeYk_CUgDE46rVn7zbd0EhraIbgt3qZt/view?usp=sharing- ② Follow the steps below to deploy the ROS environment yourself.
2 ROS2 Environment building
2.1 ROS2 installation
To build a basic development environment, you need to install the robot operating system ROS2 and the git version manager. The installation methods and processes are introduced below.
2.1.1 Selecting a version
There is a one-to-one relationship between ROS2 and ubuntu. Different versions of ubuntu correspond to different versions of ROS2. The reference website is as follows: http://docs.ros.org/en/foxy/Releases.html
Here are the ROS versions supported by Ubuntu:
| ROS2 version | release date | Maintenance deadline | Ubuntu version |
|---|---|---|---|
| Foxy | June 5, 2020 | May 2023 | Ubuntu 20.04(Focal Fossa) |
| Galactic | May 23, 2021 | November 2022 | Ubuntu 20.04(Focal Fossa) |
| Humble | May 23, 2022 | May 2027 | Ubuntu 22.04(Jammy Jellyfish) |
Install the ROS2 version corresponding to the Ubuntu version you have installed.
If the versions are different, the downloading will fail. The system we choose here is Ubuntu 20.04(recommend), so the corresponding ROS2 version is ROS2 Foxy.
NOTE: At present, we do not provide any reference for installing ROS in windows. If necessary, refer to http://docs.ros.org/en/foxy/Installation/Alternatives/Windows-Development-Setup.html
2.1.2 Start installation
1 Adding a software source
There is no ROS2 software source in the software source list of Ubuntu itself, so you need to Configure the ROS software source into the software list repository first, and then download ROS2. Open a console terminal (shortcut key: Ctrl+Alt+T) and input the following command:
- official source:
echo "deb [arch=$(dpkg --print-architecture) signed-by=/usr/share/keyrings/ros-archive-keyring.gpg] http://packages.ros.org/ros2/ubuntu $(source /etc/os-release && echo $UBUNTU_CODENAME) main" | sudo tee /etc/apt/sources.list.d/ros2.list > /dev/null
- If the download speed is slow, it is recommended to select a nearby mirror source to replace the above command. For example, huawei cloud is:
echo "deb [arch=$(dpkg --print-architecture)] https://repo.huaweicloud.com/ros2/ubuntu/ $(lsb_release -cs) main" | sudo tee /etc/apt/sources.list.d/ros2.list > /dev/null
2 Setting a key
Configuring a public key. This step is to let the system confirm that our path is safe, so that there is no problem in downloading the file. Otherwise it will be deleted immediately after downloading:
sudo apt install curl gnupg2 -y
curl -s https://gitee.com/ohhuo/rosdistro/raw/master/ros.asc | sudo apt-key add -
3 Installation
After adding a new software source, you need to update the software source list. Open a console terminal (shortcut key: Ctrl+Alt+T) and input the following command:
sudo apt-get update
Execute Installing ROS2. Open a console terminal (shortcut key: Ctrl+Alt+T) and input the following command according to your Ubuntu version:
# Ubuntu 20.04 foxy version
sudo apt install ros-foxy-desktop
# Ubuntu 20.04 galactic version
sudo apt install ros-galactic-desktop
# Ubuntu 22.04 humble version
sudo apt install ros-humble-desktop
The installation process takes a long time, so please wait with patience.
Refresh environment variables after installation is complete:
source /opt/ros/foxy/setup.bash
2.1.3 Set up the ros2 environment
In order to avoid re-validating the ROS2 function path every time the terminal window is closed, we can set the path to an environment variable, so that each time you open a new terminal, the ROS2 function path will automatically take effect. Execute the following commands in sequence in the terminal, and open a console terminal (shortcut key: Ctrl+Alt+T):
Execute the following command according to your Ubuntu version:
# Ubuntu 20.04 foxy version
echo "source /opt/ros/foxy/setup.bash" >> ~/.bashrc
# Ubuntu 20.04 galactic version
echo "source /opt/ros/galactic/setup.bash" >> ~/.bashrc
# Ubuntu 22.04 humble version
echo "source /opt/ros/humble/setup.bash" >> ~/.bashrc
Then run:
source ~/.bashrc
Installing a ROS2 extra dependency
Input the following command in the terminal to install a ROS2 extra dependency, and open a console terminal (shortcut key: Ctrl+Alt+T):
sudo apt install python3-argcomplete -y
sudo apt install ros-foxy-xacro
sudo apt-get install python3-colcon-common-extensions
# Ubuntu 20.04 foxy version
sudo apt install ros-foxy-joint-state-publisher-gui
# Ubuntu 20.04 galactic version
sudo apt install ros-galactic-joint-state-publisher-gui
# Ubuntu 22.04 humble version
sudo apt install ros-humble-joint-state-publisher-gui
2.1.4 Verify installation
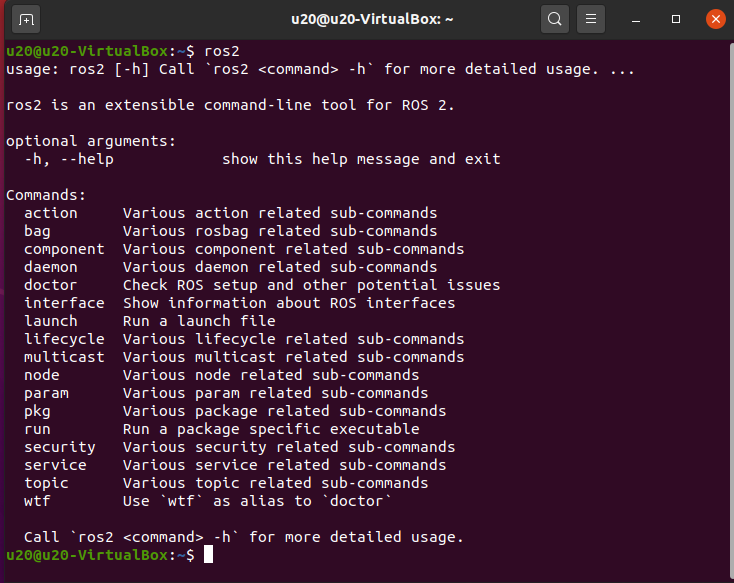
To verify whether ROS2 has been installed successfully, open a console terminal (shortcut key: Ctrl+Alt+T) and execute the following command in the terminal:
ros2
When the following interface is displayed, it means that ROS2 has been installed successfully.
2.2 git Installation
1 Updating the software source list
Open a console terminal (shortcut key: Ctrl+Alt+T) and input the following command on the terminal window to update the software source list:
sudo apt-get update
2 Installation git
Open a console terminal (shortcut key: Ctrl+Alt+T) and input the following command on the terminal window to execute the installation of git:
sudo apt-get install git
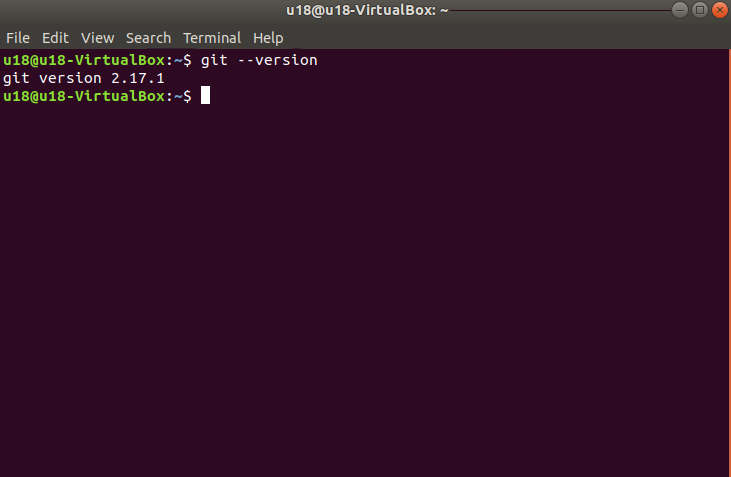
3 Verify installation
Read the git version, open a console terminal (shortcut key: Ctrl+Alt+T) and input the following command on the terminal window:
git --version
The git version number can be displayed in the terminal as follows, that is, the installation is successful.
2.3 mycobot_ros2 Installation
mycobot_ros2 is a ROS2 package launched by Elephant Robotics and applicable to its mycobot series of desktop six-axis robot arms.
Project address: http://github.com/elephantrobotics/mycobot_ros2
1 Precondition
Before installing the package, make sure you have a ros2 workspace.
Here is an example command for creating a workspace. Open a console terminal (shortcut key: Ctrl+Alt+T) and input the following command in the command line:
mkdir -p ~/colcon_ws/src  # Create a folder
cd ~/colcon_ws
colcon build  # compile workspace
Add workspace environment
The official default ROS2 workspace is colcon_ws.
echo "source ~/colcon_ws/install/setup.bash" >> ~/.bashrc
source ~/.bashrc
2 Installation
NOTE:
- This package depends on ROS2 and MoveIT2. Before using it, make sure that you have installed ROS2 and MoveIT2 successfully.
- The interaction of this package with a real robot arm depends on PythonApi -
pymycobot. - The Api project location is: https://github.com/elephantrobotics/pymycobot
Quick installation:
pip install pymycobot --upgradeWhen executing the pip install pymycobot --upgrade command, if the following error message appears:

Enter the following command to install pip at the prompt
sudo apt install python3-pip
After the pip installation is complete, the terminal executes again
pip install pymycobot --upgrade
- The installation method depends on Git, so make sure that Git have been installed in your computer.
The official default ROS2 workspace is colcon_ws.
cd ~/colcon_ws/src  # Enter the src folder of the workspace
# Clone the code on github
git clone --depth 1 https://github.com/elephantrobotics/mycobot_ros2.git
cd ..       # return to the workspace
colcon build --symlink-install # Build the code in the workspace, --symlink-install: Avoid having to recompile python scripts every time you adjust them
source install/setup.bash # add environment variables
So far, the ROS2 environment construction has been completed.You can learn the basics of ROS2 or ROS2 use cases