Mechanical control
1 Joint control
For serial multi joint robots, joint control is aimed at controlling the variables of each joint of the robotic arm, with the goal of enabling each joint of the robotic arm to reach the target position at a certain speed
1.1 Single joint control
1.1.1 Send single joint angle
SendOneAngle(int jointNo, int angle, int speed)
Return value: None
Parameter Description: Parameter 1: Joint Number (1-6), Parameter 2: Angle (Range: -170 ° -170 °), Parameter 3: Speed (0-100)
Example:
mc.SendOneAngle(1, 100,70);
1.2 Multi joint control
1.2.1 Obtain all joint angles
GetAngles()
Return value: Returns an int type array, int [], length: 6
Parameter Description: None
Example:
var recv = mc.GetAngles();
1.2.2 Send all joint angles
SendAngles(int[] angles, int speed)
Return value: None
Parameter Description: Parameter 1: All joint angles (range: -170 ° -170 °), Parameter 2: Speed (0-100)
Example:
int[] angles = new[] {100, 100, 100, 100, 100, 100};
mc.SendAngles(angles ,30);
1.3 Complete Use Cases
The program.cs in the project is a complete use case program that can be modified as needed
    using System;

    namespace Mycobot.csharp
    {
        class Test
        {
            static void Main(string[] args)
            {
                MyCobot mc = new MyCobot("/dev/ttyUSB0");
                mc.Open();
                // int[] angles = new[] {100, 100, 100, 100, 100, 100};
                // mc.SendAngles(angles, 50);
                // Thread.Sleep(5000);
                // var recv = mc.GetAngles();
                // foreach (var v in recv)
                // {
                    // Console.WriteLine(v);
                // }

                // int[] coords = new[] {160, 160, 160, 0, 0, 0};
                // mc.SendCoords(coords, 90, 1);
                // Thread.Sleep(5000);
                // var recv = mc.GetCoords();
                // foreach (var v in recv)
                // {
                    // Console.WriteLine(v);
                // }

                mc.SendOneAngle(1, 100,70);

                // byte[] setColor = {0xfe, 0xfe, 0x05, 0x6a, 0xff, 0x00, 0x00, 0xfa};
                mc.Close();
            }
        }
    }
2 Coordinate control
Coordinate control is to move the robotic arm to a specified point in a specified posture, divided into x, y, z, rx, ry, and rz. X. Y and Z represent the position of the robotic arm head in space (which is a Cartesian coordinate system), while rx, ry, and rz represent the pose of the robotic arm head at that point (which is an Euler coordinate system)
2.1 Single parameter coordinates
2.1.1 Send single parameter coordinates
SendOneCoord(int coord, int value, int speed)
Return value: None
Parameter Description: Parameter 1: Coordinate Number (1-6 ( x, y, z, rx, ry, rz )), Parameter 2: Coordinate ( X, Y, Z value range -300-300.00 units mm RX, RY, RZ, value range -180-180), Parameter 3: Speed (0-100)
Example:
`mc.SendOneCoord(1, 160,30);`
2.2 Multi parameter coordinates
2.2.1 Obtain all coordinates
GetCoords()
Return value: Returns an int type array, int [], length: 6
Parameter Description: None
Example:
var recv = mc.GetCoords();
2.2.2 Sending multi parameter coordinates
SendCoords (int [] coords, int speed, int mode)
Return value: None
Parameter Description: Parameter 1: All coordinates (X, Y, Z value range -300-300.00 units mm RX, RY, RZ, value range -180-180), Parameter 2: Speed (0-100), Parameter 3: Mode (0-angular, 1-linear)
Example:
int[] coords = new[] {160, 160, 160, 0, 0, 0};
mc.SendCoords(coords ,30);
2.3 Complete Use Cases
The program.cs in the project is a complete use case program that can be modified as needed
    using System;

    namespace Mycobot.csharp
    {
        class Test
        {
            static void Main(string[] args)
            {
                MyCobot mc = new MyCobot("/dev/ttyUSB0");
                mc.Open();
                // int[] angles = new[] {100, 100, 100, 100, 100, 100};
                // mc.SendAngles(angles, 50);
                // Thread.Sleep(5000);
                // var recv = mc.GetAngles();
                // foreach (var v in recv)
                // {
                    // Console.WriteLine(v);
                // }

                // int[] coords = new[] {160, 160, 160, 0, 0, 0};
                // mc.SendCoords(coords, 90, 1);
                // Thread.Sleep(5000);
                // var recv = mc.GetCoords();
                // foreach (var v in recv)
                // {
                    // Console.WriteLine(v);
                // }

                mc.SendOneAngle(1, 100,70);

                // byte[] setColor = {0xfe, 0xfe, 0x05, 0x6a, 0xff, 0x00, 0x00, 0xfa};
                mc.Close();
            }
        }
3 IO control
There are pins on both the Basic and Atom pins at the bottom of the robotic arm, which can be controlled by IO to set the high and low levels of the pins and control tools such as pumps (the pin numbers can be viewed from the pin labels attached to the Basic and Atom pins, which are shared for input and output)
3.1 M5Stack basic IO control (m5)
3.1.1 Set the high and low levels of output IO
SetBasicOut(byte pin_number, byte pin_signal)
Return value: None
Parameter Description: Parameter 1: Pin Number (Basic Output Pin Number), Parameter 2: State (0- Low Level, 1- High Level)
Case:
mc.SetBasicOut(2, 1);
Thread.Sleep(100);
mc.SetBasicOut(5, 1);
Thread.Sleep(100);
3.1.2 Obtaining Input IO Status
GetBasicIn (byte pinnumber)
Return value: Pin status (0- low level, 1- high level)
Parameter Description: Pin Number (Basic Input Pin Number)
Example: Set output pin 2 to high level
Console.WriteLine(mc.GetBasicIn(35));
Thread.Sleep(100);
Console.WriteLine(mc.GetBasicIn(36));
Thread.Sleep(100);
3.2 Atom io Control
Note: 320m5 does not have atom io, so it is not necessary to use this module API
3.2.1 Setting the high and low levels of output IO
SetDigitalOut (byte pinnumber, byte pin_signal)
Return value: None
Parameter Description: Parameter 1: Pin Number (Atom Output Pin Number), Parameter 2: State (0- Low Level, 1- High Level)
Case:
mc.SetDigitalOut(23, 0);
Thread.Sleep(100);
mc.SetDigitalOut(33, 0);
Thread.Sleep(100);
3.2.2 Obtaining Input IO Status
GetDigitalIn (byte pinnumber)
Return value: Pin status (0- low level, 1- high level)
Parameter Description: Pin Number (Atom Input Pin Number)
Case:
Console.WriteLine(mc.GetDigitalIn(19));
Thread.Sleep(100);
Console.WriteLine(mc.GetDigitalIn(22));
Thread.Sleep(100);
3.3 Complete Use Cases
    using System;
    using System.Threading;

    namespace Mycobot.csharp
    {
        class Test
        {
            static void Main(string[] args)
            {
                MyCobot mc = new MyCobot("COM57");//树莓派机械臂串口名称:/dev/ttyAMA0
                mc.Open();
                Thread.Sleep(5000);//windows打开串口后,需要等待5s,Windows打开串口底部basic会重启

                //set basic output io
                /*mc.SetBasicOut(2, 1);
                Thread.Sleep(100);
                mc.SetBasicOut(5, 1);
                Thread.Sleep(100);
                mc.SetBasicOut(26, 1);
                Thread.Sleep(100);*/

                //get basic input io
                Console.WriteLine(mc.GetBasicIn(35));
                Thread.Sleep(100);
                Console.WriteLine(mc.GetBasicIn(36));
                Thread.Sleep(100);

                //set atom output io
                /*mc.SetDigitalOut(23, 0);
                Thread.Sleep(100);
                mc.SetDigitalOut(33, 0);
                Thread.Sleep(100);*/

                //get m5 input io
                /*Console.WriteLine(mc.GetDigitalIn(19));
                Thread.Sleep(100);
                Console.WriteLine(mc.GetDigitalIn(22));
                Thread.Sleep(100);*/

                mc.Close();
            }
        }
    }
4 gripper control
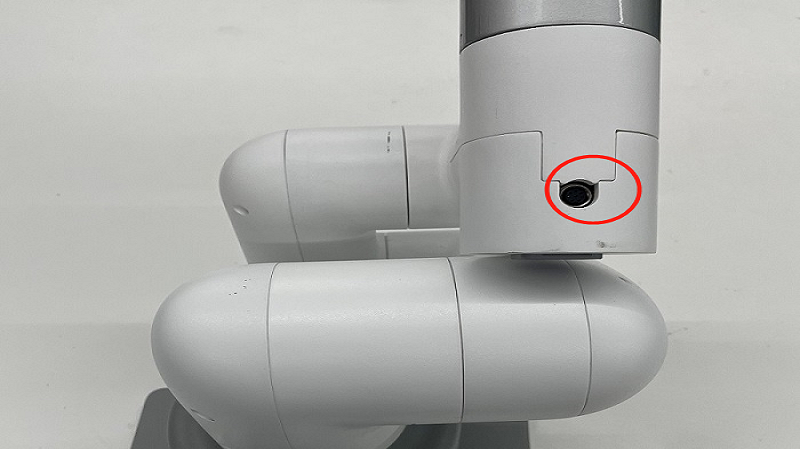
Claw installation:
The adaptive gripper inserts the gripper onto the pins on the atom, as shown in the following figure:
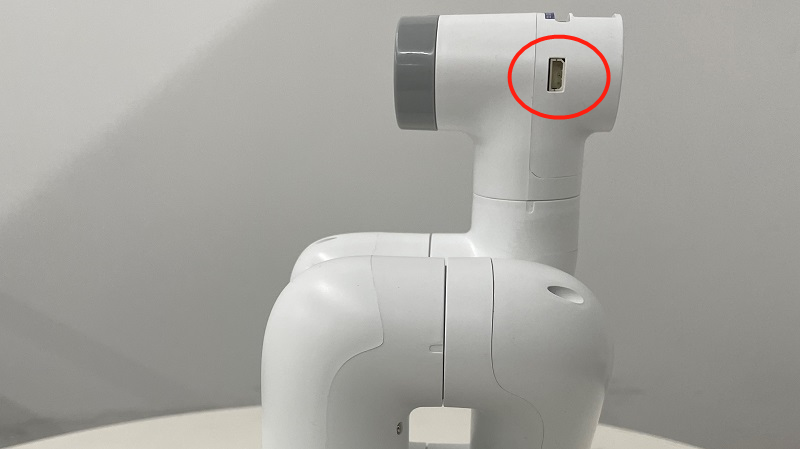
The electric gripper is inserted at the 485 interface on the top, as shown in the following figure:
Attention: myCobot280 and myPalletizer 260 do not have electric grippers, only myCobot320 has electric grippers
4.1 Adaptive gripper control
Supported devices: myCobot280, 320&&myPalletizer 260
4.1.1 setGripperValue (byte angle, byte speed)
Return value: None
Call the interface before use
Case:
mc.SetGripperMode(0);
Parameter Description: Parameter 1: Claw opening and closing angle (0-100, 0- closed, 100- maximum opening angle), Parameter 2: Claw opening and closing speed (0-100)
Case:
mc.setGripperValue(0, 10);
Thread.Sleep(3000);
mc.setGripperValue(50, 100);
Thread.Sleep(3000);
4.1.2 getGripperValue ()
Return value: int type, returns the gripper angle (0- closed, 100- maximum open angle)
Parameter Description: None
Case:
`Console.WriteLine(mc.getGripperValue());`
4.2 Electric gripper control
Supported devices: myCobot320
4.2.1 setEletricGripper (int state)
Return value: None
Parameter description: Claw switch status (0- off, 1- on)
Case:
`mc.setEletricGripper(0);`
4.3 Complete Use Cases
        using System;
    using System.Threading;

    namespace Mycobot.csharp
    {
        class Test
        {
            static void Main(string[] args)
            {
                MyCobot mc = new MyCobot("COM57");//树莓派机械臂串口名称:/dev/ttyAMA0
                mc.Open();
                Thread.Sleep(5000);//windows打开串口后,需要等待5s,Windows打开串口底部basic会重启

                //set gripper open or close 0--close 100-open max 0-100
                mc.setGripperValue(0, 10);
                Thread.Sleep(3000);
                mc.setGripperValue(50, 100);
                Thread.Sleep(3000);

                //set electric gripper
                mc.setEletricGripper(0);
                Thread.Sleep(100);
                mc.setEletricGripper(1);
                Thread.Sleep(100);

                //get gripper state 0--close 1--open
                Console.WriteLine(mc.getGripperValue());
                mc.Close();
            }
        }
    }