Gripper control
1 Adaptive gripper
Supported devices: myCobot280, 320, 600 && myPalletizer 260, 630
Function description:
- Run RoboFlow, enter the program editing interface, and select M5Stack-basic--Gripper (for instructions on how to enter the program editing interface, please refer to 6.2 Simple Usage of RoboFlow);
mycobot pro600 does not support hot plugging. The robotic arm must be powered off, meaning the end light is not illuminated, before connecting the gripper. Plugging or unplugging while the device is powered on poses a risk of damaging the gripper.
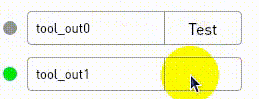
- IO mode (Tool selection I/O, overall steps as shown in the figure):
IO controls the opening and closing of the gripper, with pin tool_out0 closed and tool_out1 open, indicating that the gripper is open
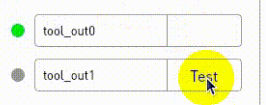
IO controls the opening and closing of the gripper. When pin tool_out0 is closed and tool_out1 is opened, the gripper is extended
Click Define New Gripper, fill in the Gripper Name as "CAG-1" (this name is mandatory), and then click Save;
Transparent transmission mode (Saved status can be set to open or close, and the overall steps are as shown in the figure below):
(Note: Before using the transparent transmission mode, you need to set the gripper to transparent transmission mode, i.e., set_cag_gripper_mode(0). For detailed interface usage, please refer to Socket API)
2 Electric gripper
Supported device: myCobot320
Function description:
- Run RoboFlow and select M5Stack-basic--Gripper;
- Click Define New Gripper, fill in the Gripper Name as "DH PGE 8" (this must be the exact name), and then click Save;
- Choose "open" or "close" for the "Saved status". The overall steps are as shown in the figure below: