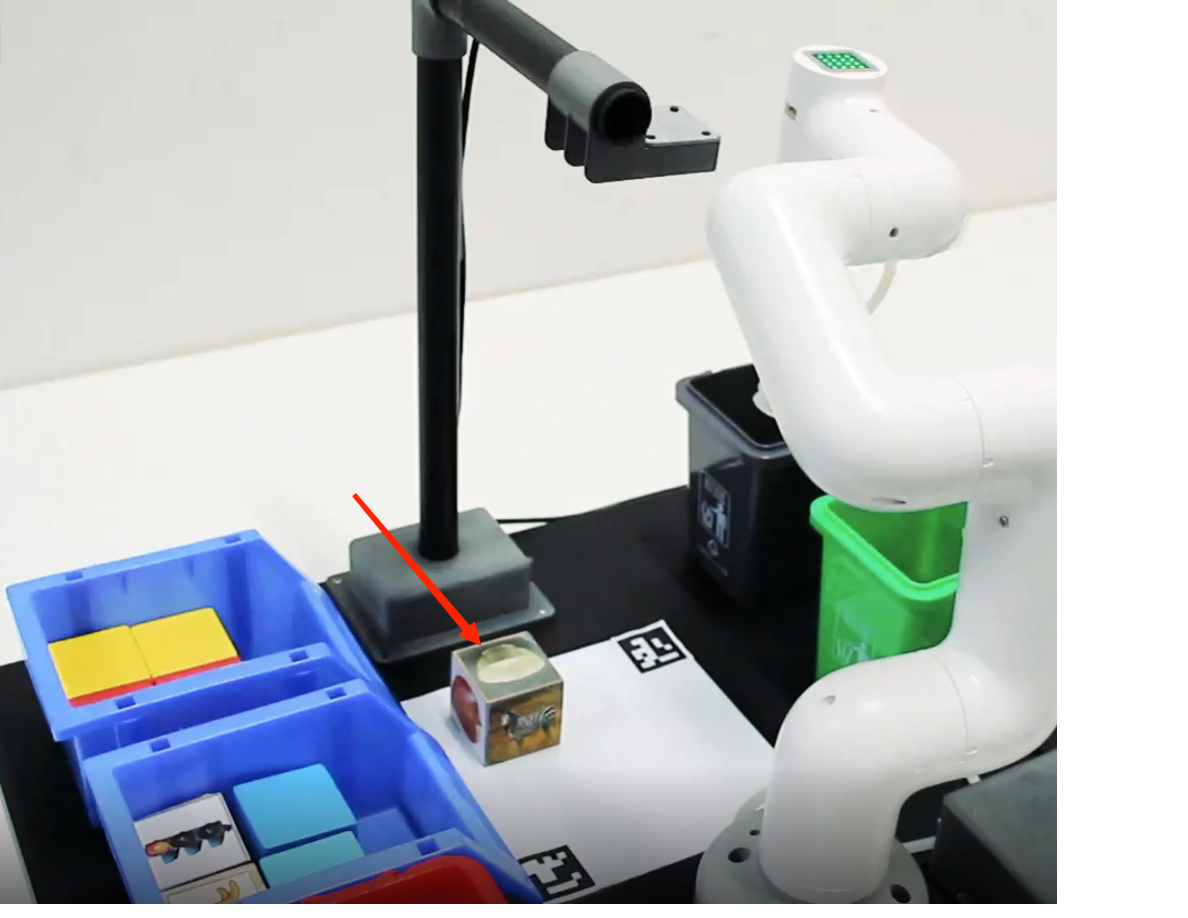
Identify picture blocks
This case uses the eye_to_hand mode, uses the camera, loads the model data trained by tensorflow through opencv, identifies the picture object block and locates the position of the picture object block in the video. Through the relevant points, the spatial coordinate position of the object block relative to the manipulator is calculated. Set a set of relevant actions for the manipulator and put the identified blocks into the bucket. In the following chapters, the code implementation process of the whole case will be introduced in detail.
1 Update the mycobot_ai package
In order to ensure that users can use the latest official package in time (new users do not need to update), they can go to the /home/ubuntu/catkin_ws/src folder through the file manager and open the console terminal (shortcut Ctrl+Alt+T ) , enter the following command to update:
# Clone the code on github
mkdir -p ~/catkin_ws/src  # Create a folder (if the folder already exists, you don't need to create it again)
cd ~/catkin_ws/src
git clone https://github.com/elephantrobotics/mycobot_ros.git # Please check the attention section below before deciding whether to execute this command
cd ~/catkin_ws      # Back to work area
catkin_make # Build the code in the workspace
source devel/setup.bash # add environment variable
Note: If the mycobot_ros folder already exists in the /home/ubuntu/catkin_ws/src (equivalent to ~/catkin_ws/src) directory, you need to delete the original mycobot_ros before executing the above command. Among them, ubuntu in the directory path is the user name of the virtual machine. If it is inconsistent, please modify it.
2 Camera adjustment
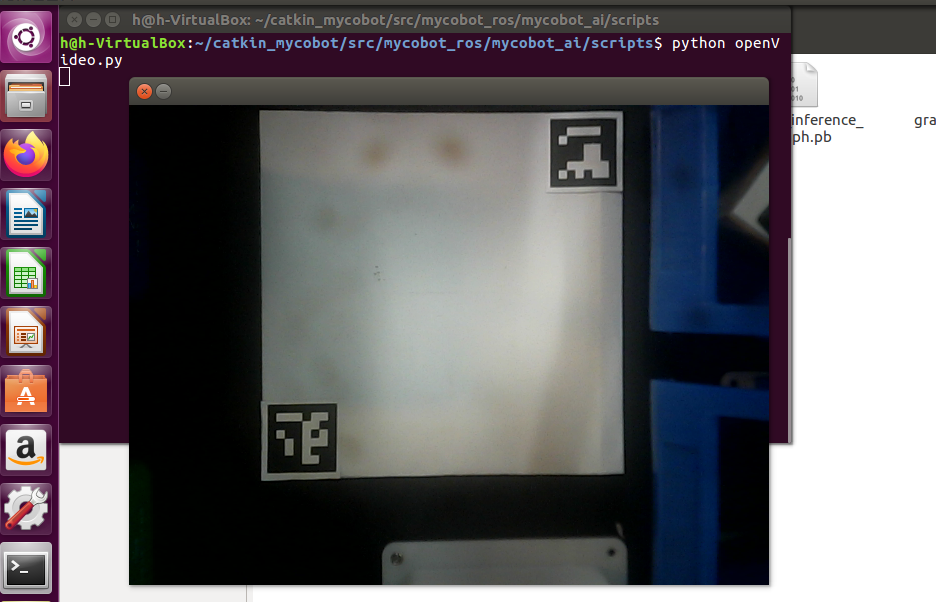
First, you need to use Python to run openvideo. Py under the mycobot_ai package. If the open camera is a computer camera, you need to modify cap_ Num, please refer to:matters needing attention。Make sure that the camera completely covers the whole recognition area, and the recognition area is square in the video, as shown in the figure below. If the recognition area does not meet the requirements in the video, the position of the camera needs to be adjusted.
- Go to the target folder
cd ~/catkin_ws/src/mycobot_ros/mycobot_ai/ai_mycobot_280/
- Enter
python scripts/openVideo.pyto open the camera for adjustment.
3 Add new image
- Go to the target function package directory:
cd ~/catkin_ws/src/mycobot_ros/mycobot_ai/ai_mycobot_280/
- Enter
python scripts/add_img.pyto open the program for adding images. - Operate according to the prompt input by the terminal, and take the image capture in the second image box that pops up.
- After the image capture area is completed, press the Enter key, enter the number (1~4) according to the terminal prompt, and save it to the corresponding image folder, and press the Enter key to save it to the corresponding folder.
4 Case reproduction
- Use the shortcut key combination Ctrl+Alt+T to open a terminal window, and enter the following command to start the master node
roscore
Type Ctrl+Shift+T in the command terminal to open another terminal window in the same directory and view the device name:
# View the name of the robotic arm device
ls /dev/ttyUSB* # old version myCobot280 M5

# If the terminal does not display the /dev/ttyUSB related name, you need to use the following command
ls /dev/ttyACM* # new version myCobot280 M5
- Grant permission to operate the robotic arm:
# The default device name is /dev/ttyUSB0. If the device name is not the default value, it needs to be modified.
sudo chmod 777 /dev/ttyUSB0 # old version myCobot280 M5

sudo chmod 777 /dev/ttyACM0 # new version myCobot280 M5
- Enter the following command to start the launch file.
# When the device name is not the default value, you need to modify the port value
roslaunch ai_mycobot_280 vision_m5.launch port:=/dev/ttyUSB0 baud:=115200   # old version myCobot280 M5

roslaunch ai_mycobot_280 vision_wio.launch port:=/dev/ttyACM0 baud:=115200  # old version myCobot280 M5
- Use the Ctrl+Alt+T shortcut to open another terminal window and enter the directory corresponding to the robotic arm:
cd ~/catkin_ws/src/mycobot_ros/mycobot_ai/ai_mycobot_280/
Enter python scripts/combine_detect_obj_img_foler_opt.py to open the image recognition program to realize image recognition and capture
Raspberry Pi version:
- Use the shortcut key combination Ctrl+Alt+T to open a terminal window, and enter the following command to start the master node
roscore
Type Ctrl+Shift+T in the command terminal to open another terminal window in the same directory and view the device name:
# View the name of the robotic arm device
ls /dev/ttyAMA*
- Grant permission to operate the robotic arm:
# The default device name is /dev/ttyAMA0. If the device name is not the default value, it needs to be modified.
sudo chmod 777 /dev/ttyAMA0
- Enter the following command to start the launch file.
# When the device name is not the default value, you need to modify the port value
roslaunch ai_mycobot_280 vision_pi.launch port:=/dev/ttyAMA0 baud:=1000000
- Use the Ctrl+Alt+T shortcut to open another terminal window and enter the directory corresponding to the robotic arm:
cd ~/catkin_ws/src/mycobot_ros/mycobot_ai/ai_mycobot_280/
Enter python scripts/combine_detect_obj_img_foler_opt.py to open the image recognition program to realize image recognition and capture
Matters needing attention
When the camera does not automatically frame the identification area correctly, it is necessary to close the program, adjust the position of the camera, and move the camera to the left and right.
If OK does not appear in the command terminal and the picture cannot be recognized, move the camera back or forward slightly. When OK appears in the command terminal, the program can run normally.
Since the identification method has been changed, please make sure that there is a folder for storing pictures and pictures that need to be identified in the code path. If not, you can use
python scripts/add_img.pyto add pictures.Because the picture object in the object block is small, in order to better identify the picture, it is necessary to put the object block in the video.
- OpenCV image recognition will be affected by the environment. If it is in a dark environment, the recognition effect will be greatly reduced.
5 Code explanation
This case is based on opencv and ROS communication control manipulator. First, calibrate the camera to ensure the accuracy of the camera. By identifying two aruco codes in the capture range, the recognition range is intelligently located, and the corresponding relationship between the center point of the actual recognition range and the video pixel is determined.
Use opencv to load the image recognition model trained by tensorflow, and use the training model to filter a series of regions in the image to identify and locate the objects in the image. The coordinates of the object block relative to the center of the actual recognition range are calculated according to the pixels of the object block in the video and the video pixels of the center of the actual recognition range. Then, the relative coordinates of the object block relative to the manipulator can be calculated according to the relative coordinates of the center of the actual recognition range and the manipulator. Finally, a series of actions are designed to grab the object block and place it in the corresponding bucket.
Do you think it's similar to the last case? Yes, we only need to replace the color recognition module with the object recognition module to complete the function of image recognition and capturing objects.
5.1 add image
In the adding image program, place the image card in the camera area, follow the prompts, select files according to different paths, and save them to the corresponding folder.
def cut_photo():

    path1 = '/home/ubuntu/catkin_ws/src/mycobot_ros/mycobot_ai/ai_mycobot_280/'    # pi
    path2 = '/home/h/catkin_ws/src/mycobot_ros/mycobot_ai/ai_mycobot_280/'         # m5 "h" is the user name of the virtual machine system of its own computer, which can be modified according to the actual situation
    # Judgment path choice
    if os.path.exists(path1):
        path = path1
    elif os.path.exists(path2):
        path = path2
    else:
        print("invalid file path! Please check whether the file path exists or modify it!")

    # Get folder path and number of files
    path_red = path + '/res/red'
    for i, j, k in os.walk(path_red):
        file_len_red = len(k)

    path_gray = path + '/res/gray'
    for i, j, k in os.walk(path_gray):
        file_len_gray = len(k)

    path_green = path + '/res/green'
    for i, j, k in os.walk(path_green):
        file_len_green = len(k)

    path_blue = path + '/res/blue'
    for i, j, k in os.walk(path_blue):
        file_len_blue = len(k)
    print("请截取要识别的部分")

    cut = cv2.imread(r"res/takephoto.jpeg")

    cv2.imshow('original', cut)

    # Select ROI area
    roi = cv2.selectROI(windowName="original",
                        img=cut,
                        showCrosshair=False,
                        fromCenter=False)
    x, y, w, h = roi
    print(roi)

    msg = """\
    Image save location:
        1 - Save to red folder
        2 - Save to gray folder
        3 - Save to green folder
        4 - Save to blue folder
        """
    print(msg)
    kw = int(input("请输入保存图片文件夹数字编号:"))
    # print(kw)

    # Display the ROI and save the picture
    if roi != (0, 0, 0, 0):

        crop = cut[y:y + h, x:x + w]
        cv2.imshow('crop', crop)
        # Select the red bucket folder
        if kw == 1:
            cv2.imwrite(path + '/res/red/goal{}.jpeg'.format(str(file_len_red + 1)),crop)
            print('Saved')
        # Select the gray bucket folder
        elif kw == 2:
            cv2.imwrite(path + '/res/gray/goal{}.jpeg'.format(str(file_len_gray+1)),crop)
            print('Saved')
        # Select the green bucket folder
        elif kw == 3:
            cv2.imwrite(path + '/res/green/goal{}.jpeg'.format(str(file_len_green+1)),crop)
            print('Saved')
        # Select the blue bucket folder
        elif kw == 4:
            cv2.imwrite(path + '/res/blue/goal{}.jpeg'.format(str(file_len_blue+1)),crop)
            print('Saved')

     # quit
    cv2.waitKey(0)
    cv2.destroyAllWindows()
See the source code for details: https://github.com/elephantrobotics/mycobot_ros/blob/noetic/mycobot_ai/ai_mycobot_280/scripts/add_img.py
5.2 Object recognition
In the initialization of the custom class, the image detection is performed by matching the feature points of the two pictures, the detection results are processed, the blocks are framed in the picture, and the corresponding information is given.
        def obj_detect(self, frame, goal):
        count = 0
        # Minimum matching points
        MIN_MATCH_COUNT = 10
        # sift is the instantiated sift function
        sift = cv2.xfeatures2d.SIFT_create()
        # Find feature points and descriptions in images
        kp = []
        des = []

        for i in goal:
            kp0, des0 = sift.detectAndCompute(i, None)
            kp.append(kp0)
            des.append(des0)
        kp2, des2 = sift.detectAndCompute(img, None)

        # FLANN parameter
        FLANN_INDEX_KDTREE = 0
        index_params = dict(algorithm=FLANN_INDEX_KDTREE, trees=5)
        search_params = dict(checks=50)   # pass empty dictionary

        flann = cv2.FlannBasedMatcher(index_params, search_params)

        x, y = 0, 0
        try:
            for i in range(len(des)):
                matches = flann.knnMatch(des[i], des2, k=2)
                # All good matches are stored according to the ratio test.
                good = []
                for m, n in matches:
                    if m.distance < 0.7*n.distance:
                        good.append(m)

                # When there are enough robust matching point pairs (at least MIN_MATCH_COUNT)
                if len(good) > MIN_MATCH_COUNT:

                    # Get keypoint coordinates
                    src_pts = np.float32(
                        [kp1[m.queryIdx].pt for m in good]).reshape(-1, 1, 2)
                    dst_pts = np.float32(
                        [kp2[m.trainIdx].pt for m in good]).reshape(-1, 1, 2)

                    # Find homography matrix in CV2.RANSAC using matching points
                    M, mask = cv2.findHomography(
                        src_pts, dst_pts, cv2.RANSAC, 5.0)
                    matchesMask = mask.ravel().tolist()

                    # Get the height and width of the original image
                    h, w, d = goal.shape
                    # Use the obtained transformation matrix to transform the four corners of the original image to obtain the corresponding coordinates on the target image。
                    pts = np.float32(
                        [[0, 0], [0, h-1], [w-1, h-1], [w-1, 0]]).reshape(-1, 1, 2)
                    dst = cv2.perspectiveTransform(pts, M)

                    # Calculate the coordinates of the center point of the object
                    ccoord = (dst[0][0]+dst[1][0]+dst[2][0]+dst[3][0])/4.0

                    # output center point coordinates
                    cv2.putText(img, "{}".format(ccoord), (50, 60), fontFace=None,
                                fontScale=1,  color=(0, 255, 0), lineType=1)

                    x = (dst[0][0][0]+dst[1][0][0] +
                            dst[2][0][0]+dst[3][0][0])/4.0
                    y = (dst[0][0][1]+dst[1][0][1] +
                            dst[2][0][1]+dst[3][0][1])/4.0

                    # draw border
                    img = cv2.polylines(
                        img, [np.int32(dst)], True, 244, 3, cv2.LINE_AA)

            else:
                # When there are not enough matching points
                if(len(good) < MIN_MATCH_COUNT):
                    # Output no matching success and matching points
                    count += 1
                    if(count % 10 == 0):
                        print("Not enough matches are found - %d/%d" %
                            (len(good), MIN_MATCH_COUNT))

                matchesMask = None
        except Exception as e:
            pass
        if x+y > 0:
            return x, y
        else:
            return None
5.3 Grab the implementation module
Design a series of points for the motion of the robotic arm, such as the initial point of the robotic arm, the point to be grasped, the point above the blue bucket, the point above the green bucket, etc. In order to be able to simulate the movement of blocks in rviz, a series of points are also set for the movement of the blocks. Since the model coordinates in rviz are in m, and the robot arm coordinates are in mm, it needs to be divided by 1000 when transferring data.
    # Grasping motion
    def move(self, x, y, color):
         # send Angle to move mycobot
        print (color)
        self.mc.send_angles(self.move_angles[1], 25)
        time.sleep(3)

        # send coordinates to move mycobot
        self.mc.send_coords([x, y,  190.6, 179.87, -3.78, -62.75], 25, 1) # usb :rx,ry,rz -173.3, -5.48, -57.9
        time.sleep(3)

        # self.mc.send_coords([x, y, 150, 179.87, -3.78, -62.75], 25, 0)
        # time.sleep(3)

        # self.mc.send_coords([x, y, 105, 179.87, -3.78, -62.75], 25, 0)
        self.mc.send_coords([x, y, 60, 179.87, -3.78, -62.75], 25, 0)

        time.sleep(3)

        # open pump
        if "dev" in self.robot_m5 or "dev" in self.robot_wio:
            self.pump_on()
        elif "dev" in self.robot_raspi or "dev" in self.robot_jes:
            self.gpio_status(True)
        time.sleep(1.5)

        tmp = []
        while True:
            if not tmp:
                tmp = self.mc.get_angles()
            else:
                break
        time.sleep(0.5)

         # Send the angle to move the robotic arm
        self.mc.send_angles([tmp[0], -0.71, -54.49, -23.02, -0.79, tmp[5]],25) # [18.8, -7.91, -54.49, -23.02, -0.79, -14.76]
        time.sleep(5)
        # Send the coordinates to move the robotic arm to the top of the corresponding color bucket
        self.mc.send_coords(self.move_coords[color], 25, 1)
        self.pub_marker(self.move_coords[color][0]/1000.0, self.move_coords[color]
                        [1]/1000.0, self.move_coords[color][2]/1000.0)
        time.sleep(4)

        # close pump
        if "dev" in self.robot_m5 or "dev" in self.robot_wio:
            self.pump_off()
        elif "dev" in self.robot_raspi or "dev" in self.robot_jes:
            self.gpio_status(False)
        time.sleep(4)

        self.mc.send_angles(self.move_angles[0], 25)
        time.sleep(3)
5.4 Pick point calibration
When the suction pump is inaccurate in grasping the wooden block, it can be calibrated by modifying the code coordinates. The code modification position is as follows (both the coordinates of position 1 and position 2 can be modified, and one of the two can be selected):
~/catkin_ws/src/mycobot_ros/mycobot_ai/ai_mycobot_280/scripts/combine_detect_obj_img_folder_opt.py
class Object_detect(Movement):
    # Position 1: Adjust the suction position of the suction pump, increase y, move to the left; decrease y, move to the right; increase x, move forward; decrease x, move backward
    def __init__(self, camera_x = 160, camera_y = -5):
        # inherit the parent class
        super(Object_detect, self).__init__()
        # get path of file
        dir_path = os.path.dirname(__file__)
        self.mc = None

        # move angle
        self.move_angles = [
            [-7.11, -6.94, -55.01, -24.16, 0, -15],  # init the point
            [18.8, -7.91, -54.49, -23.02, -0.79, -14.76],  # point to grab
        ]

        # move coords
        self.move_coords = [
            [120.8, -134.4, 258.0, -172.72, -5.31, -109.09],  #  above the red bucket
            [219.8, -126.4, 249.7, -158.68, -7.93, -101.6], # green
            [124.7, 145.3, 250.4, -173.5, -2.23, -11.7], # blue
            [14.6, 175.9, 250.4, -177.42, -0.08, 25.93], # gray
        ]

        # Determine the connected device: ttyUSB* is M5, ttyACM* is seeed
        self.raspi = False
        self.robot_m5 = os.popen("ls /dev/ttyUSB*").readline()[:-1]
        self.robot_wio = os.popen("ls /dev/ttyACM*").readline()[:-1]
        self.robot_raspi = os.popen("ls /dev/ttyAMA*").readline()[:-1]
        self.robot_jes = os.popen("ls /dev/ttyTHS1").readline()[:-1]


    # decide whether grab cube
    def decide_move(self, x, y, color):
        print(x, y, self.cache_x, self.cache_y)
        # detect the cube status move or run
        if (abs(x - self.cache_x) + abs(y - self.cache_y)) / 2 > 5:  # mm
            self.cache_x, self.cache_y = x, y
            return
        else:
            self.cache_x = self.cache_y = 0
            # Position 2: Adjust the suction position of the suction pump, increase y, move to the left; decrease y, move to the right; increase x, move forward; decrease x, move backward
            self.move(x, y, color)
For specific code, you can directly view the program source file and the comments in the code. If you don't know much about key modules, you can refer toLast case.