myAGV-Update log
In order to bring a better user experience, we have updated and upgraded the software, optimized dwa navigation, added teb navigation function, and supported collision detection and dynamic obstacle avoidance. Suggestion When using the navigation function, remove the upper cover shell, and the navigation effect is the best; if there is a shell navigation, there may be navigation failures.
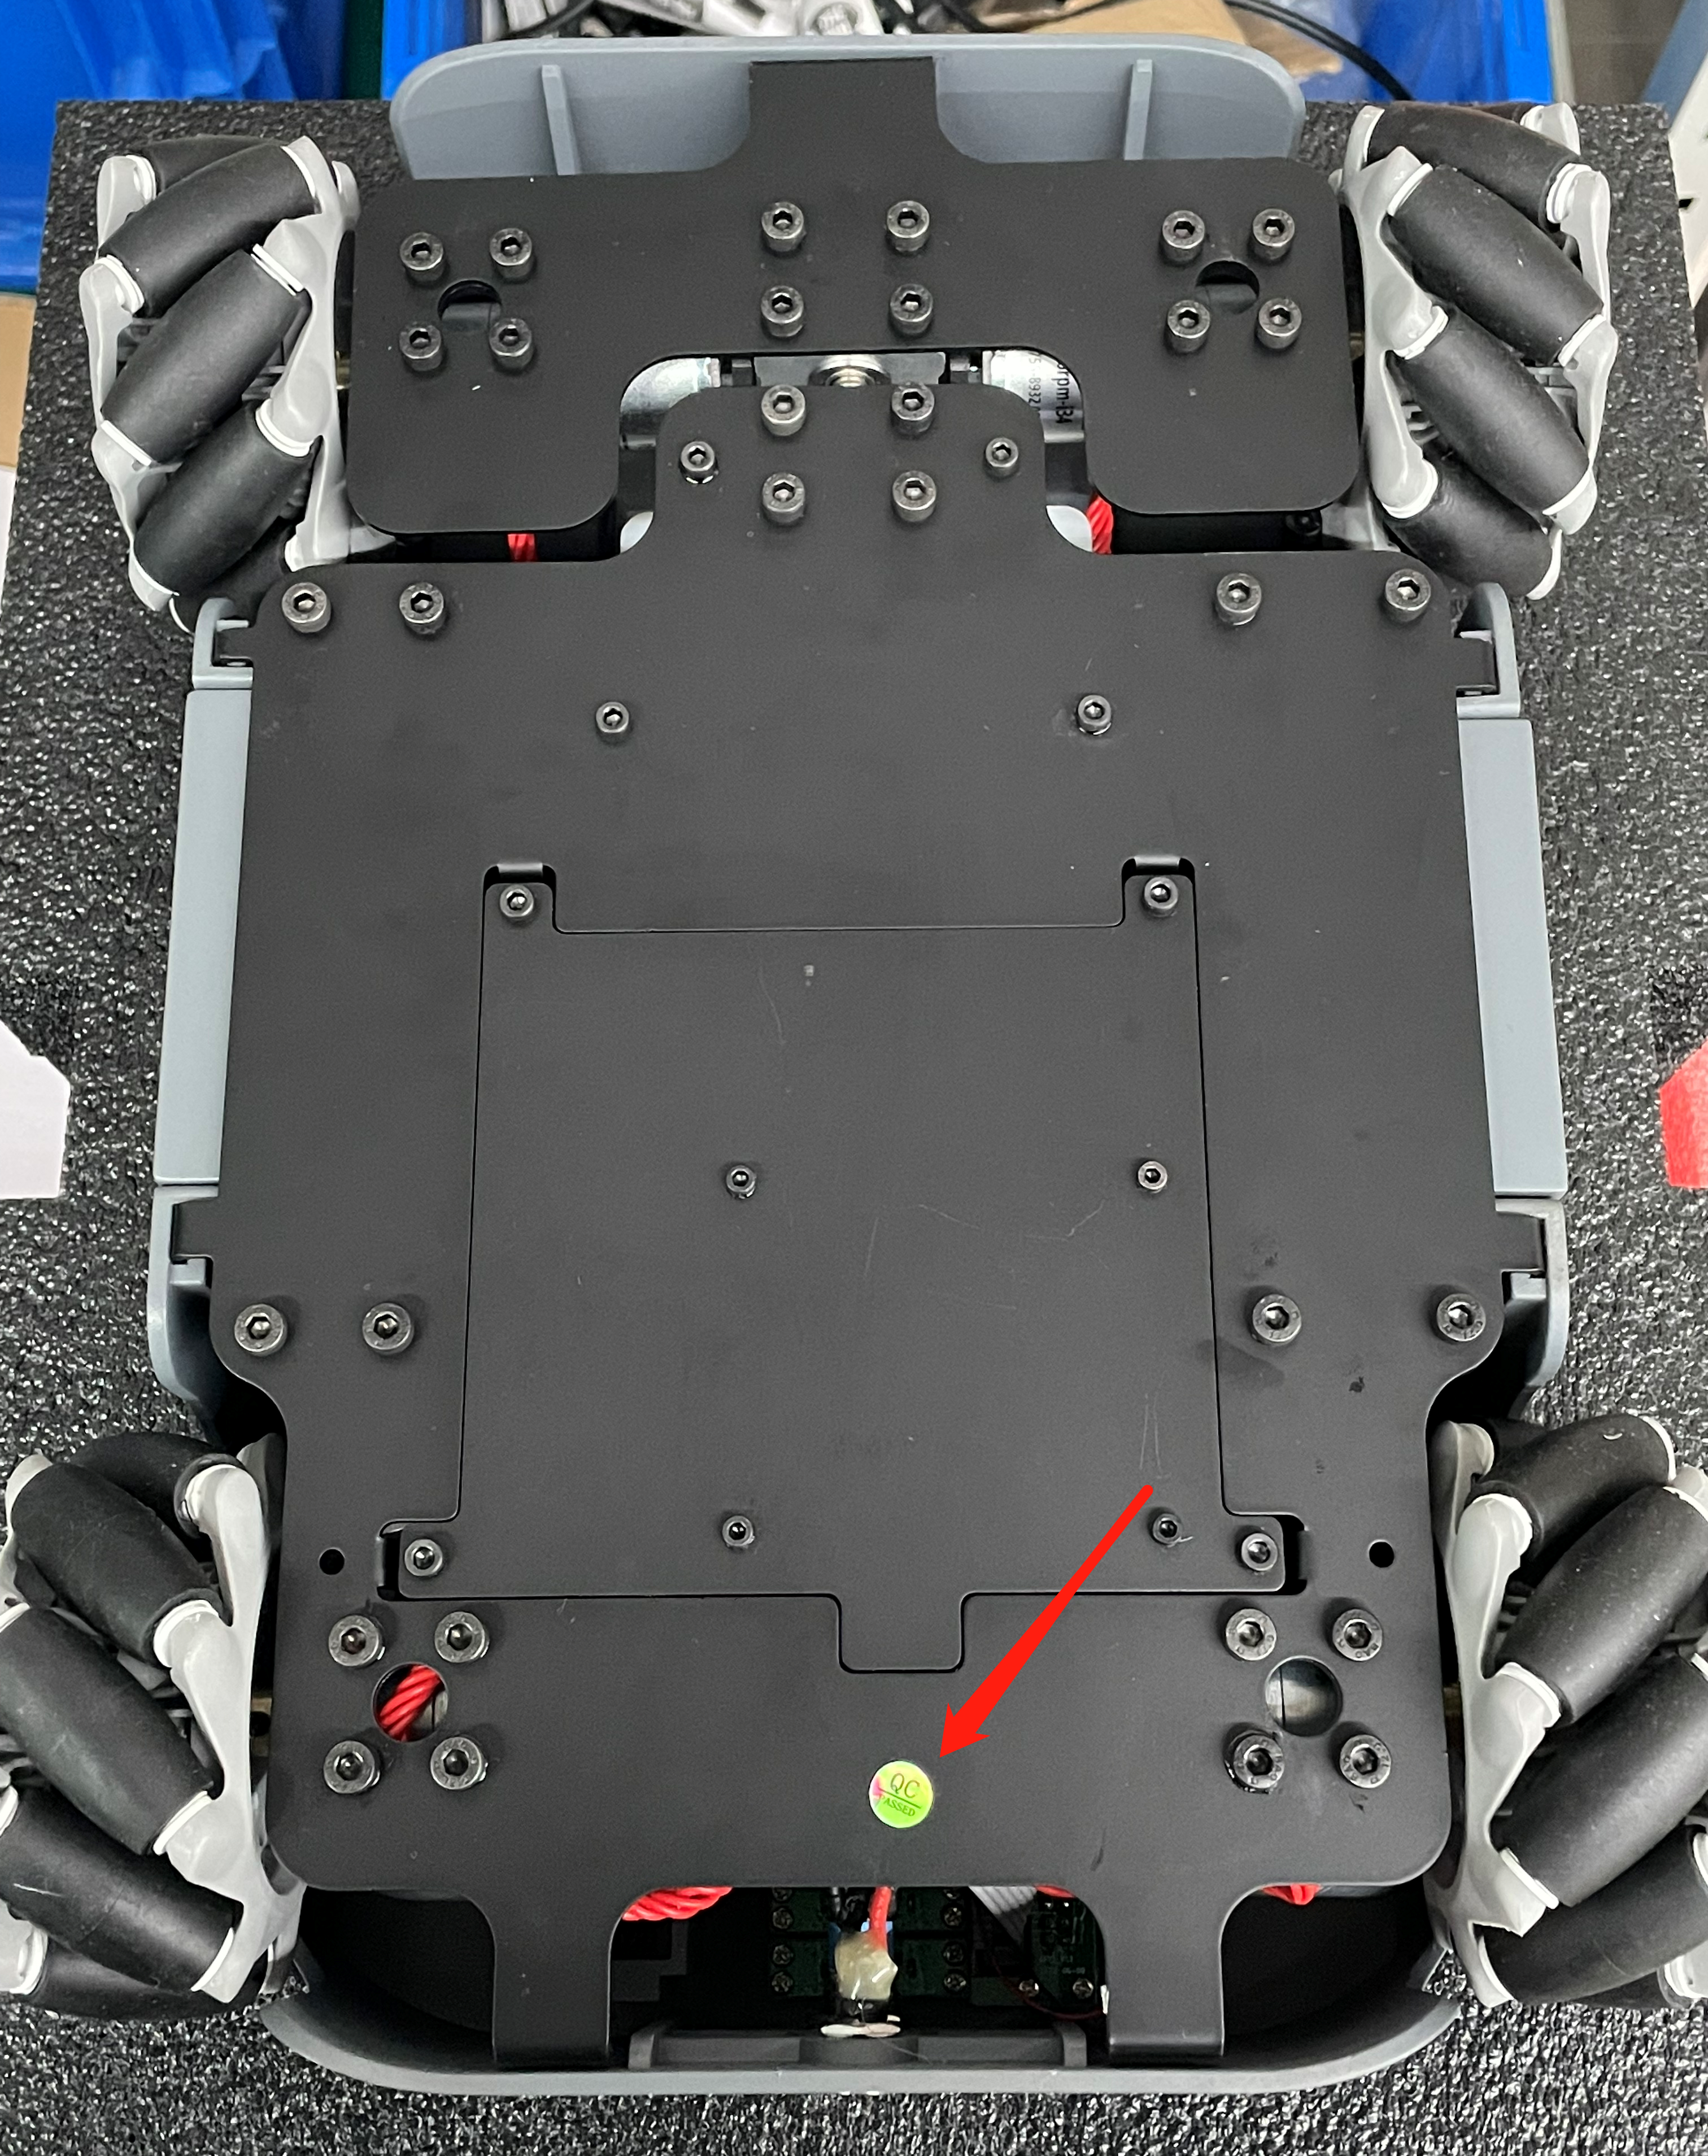
Note:There is a QC label at the bottom of the received cart, which is the latest system image. Please operate according to the tutorial in this chapter.
1 Software Update Instructions
Navigation function update instructions:
Summarize :
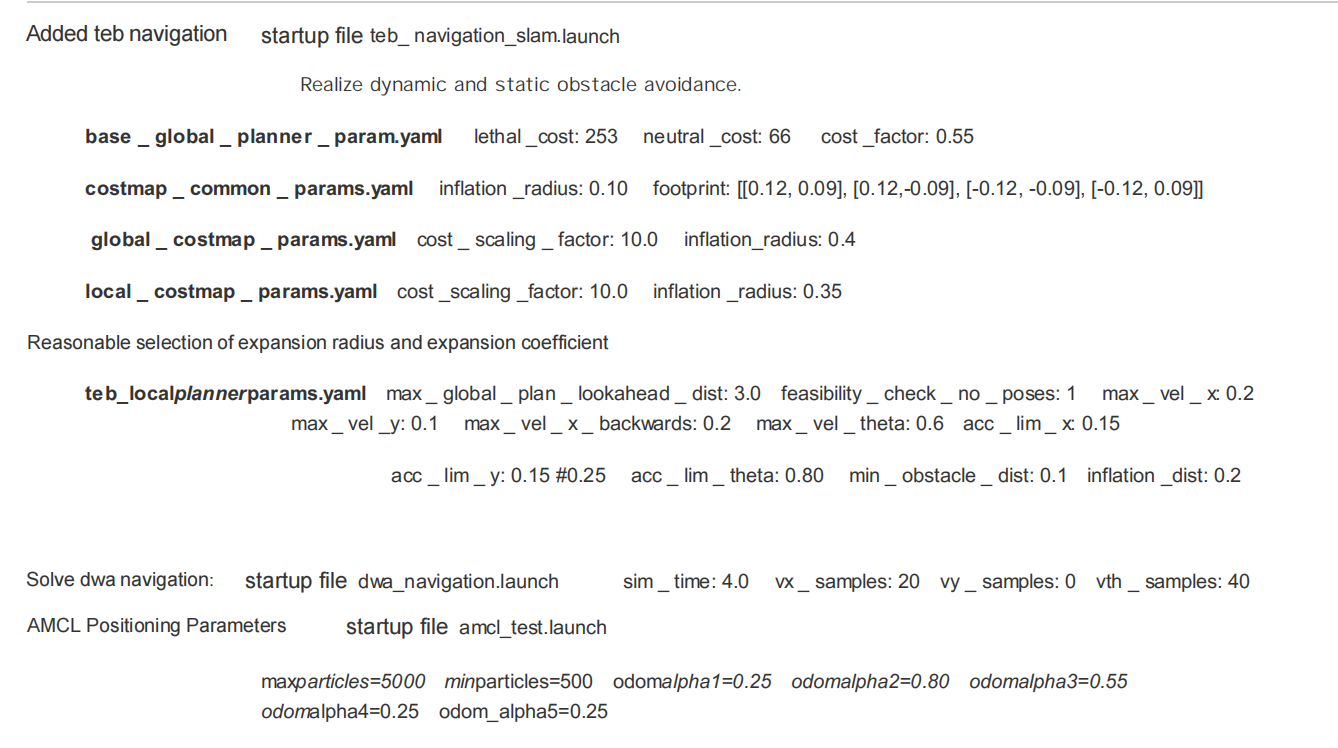
一、cost map
1、costscalingfactor inflation_radius
- It is usually placed in the parameter costmapcommonparams.yaml file, that is, both the global cost map and the local cost map use this parameter. But in the narrow channel, you can set globalcostmapparams.yaml; localcostmapparams.yaml respectively. Avoid swelling too large to pass through. It is also possible to control the cost parameters of the global map so that the route planned by the global path is located in the middle of the channel; in this process, dynamic parameter adjustment tools can be used to carefully debug and select reasonable values.
2、updatefrequency publishfrequency
- During the navigation process, there may be a warning about the update frequency of the map. You can set the updatefrequency to a smaller value, and the publishfrequency is the visualization frequency sent to rviz. According to the performance setting of the host computer, the impact is not great.
3、rolling_window
- The local cost map requires a rolling window, and the global cost map does not need a rolling window.
二、Route plan
1、baseglobalplanner baselocalplanner
- Path planner selection, set in movebaseparams.yaml.
2、lethalcost neutralcost cost_factor
Global path planner parameters, set in baseglobalplannerparam.yaml. Setting the costfactor too high or too low will reduce the path quality. These paths do not pass through the middle of the obstacles on each side, nor do they have relatively smooth curvature. Extreme COSTNEUTRAL values have a similar effect. For critical cost values, setting it too low may fail to generate any paths, even if feasible paths are obvious.
After several experiments, it is found that when COSTFACTOR=0.55, COST_NEUTRAL=66, cost=253, the global path is very good.
3、TEB parameter
map_frame: odom here needs to be set as the frame of the odometer.
If maxglobalplanlookaheaddist is too large, the path will not be smooth, if it is too small, the effect of obstacle avoidance and turning will not be good, and if it is too small, the car will not dare to go. Decreasing the forward planning distance can make the local path closer to the global path and complete the running map, and then slowly increase it to find the optimal value. Because teb uses the initial trajectory generated by the global planner to initialize the TEB local planner.
4、feasibilitycheckno_poses
- This value should not be chosen very high, and can even be 0; because the optimizer may not converge completely: for example, violations of small obstacles can be corrected in future pose planning. When the robot moves forward to the target point, if it is driven in a narrow environment, determine the appropriate obstacle avoidance behavior (local planning and global planning). Also the local path planner may reject an infeasible trajectory (from its point of view), but the global planner may conversely consider the chosen global plan feasible: the robot is now stuck.
5、weight_optimaltime
- The larger the value, the bolder the car is, the easier it is to pull to the maximum speed, and it is easier to collide.
6、footprint_model
- In narrow passages, lower the expansion radius in order to pass. But it is prone to collisions, and the body can be set too large.
2 Instructions for use
myAGV-gmapping real-time map building
1、Open the SLAM laser scan launch file
After opening the car, open the console terminal (shortcut Ctrl+Alt+T),and enter the following command in the command line:
cd myagv_ros
roslaunch myagv_odometry myagv_base.launch
Note: Before opening the launch file, please place the car at a suitable starting point in the environment where you need to build the map, because opening the launch file will open the IMU sensor and odometer of the car, and moving the car artificially will cause distortion of the car build.
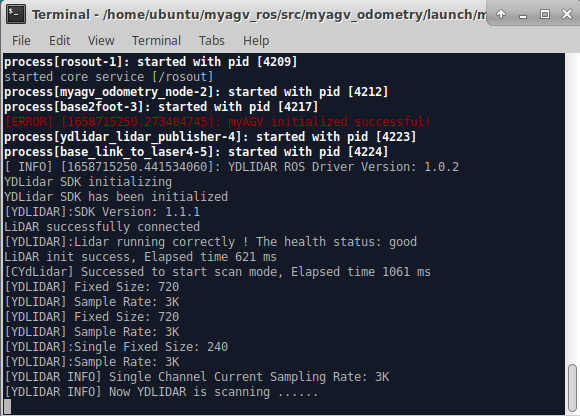
Open the launch file required for the carriage SLAM laser scan, if it shows
Now YDLIDAR is scanning ......
Then the car lidar file is opened successfully and the status is displayed in the terminal as follows:
2、Open the gmapping build launch file
Open a new console terminal again and enter the following command at the command line.
cd myagv_ros
roslaunch myagv_navigation myagv_slam_laser.launch
Open the launch file required for the cartographer build. If the terminal keeps scrolling the output data, the cartographer build file is successfully opened, and the terminal displays the following status:
3、Open the keyboard control file
Open a new console terminal and in the terminal command line type.
cd myagv_ros
roslaunch myagv_teleop myagv_teleop.launch
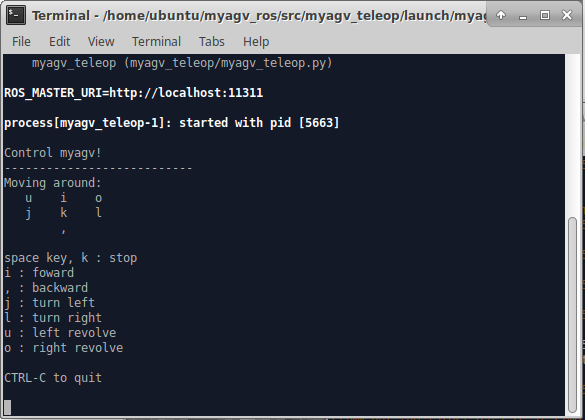
Directional keys:
| Keystrokes | Directions |
|---|---|
| i | forward |
| , | Backward |
| j | Move left |
| l | Move right |
| u | Rotate counterclockwise |
| o | clockwise rotation |
| k | stop |
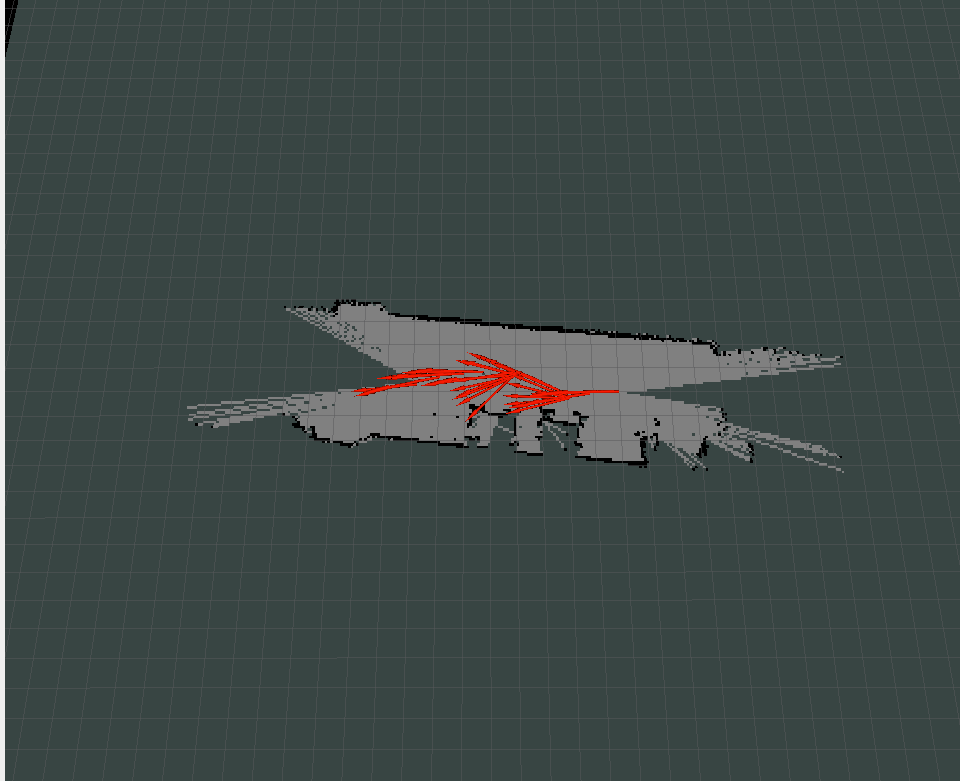
4、Start building a map
Now the car can start to move under the control of the keyboard, control the car around the space where you want to build the map. At the same time, you can see our map in the Rviz space will follow the car's movement and build the map a little bit. Note: When using the keyboard to operate the car, make sure that the terminal running the myagv_teleop.launch file is the currently selected window, otherwise the keyboard control program will not recognize the keyboard keys.
5、Save the constructed map
Open another new console terminal and enter the following command on the command line to save the completed map from the car scan.
rosrun map_server map_saver
After running successfully the terminal displays the following:
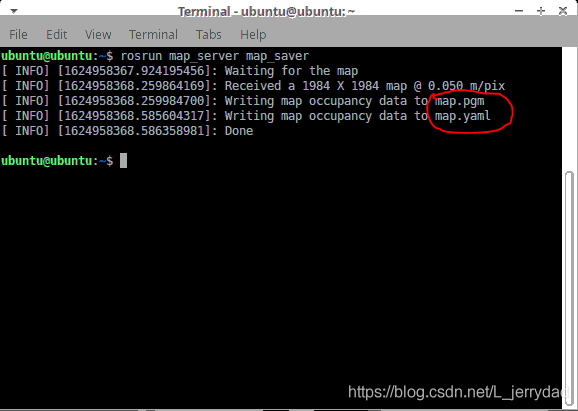
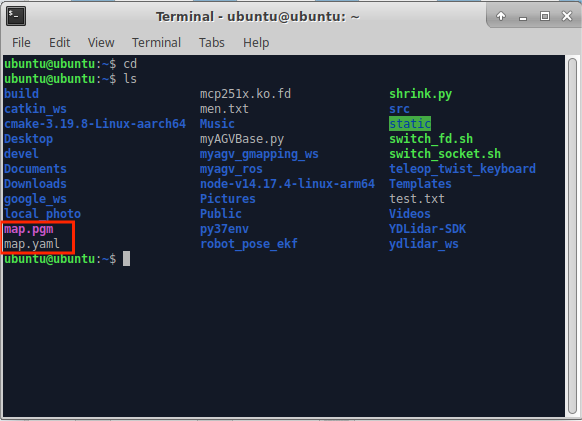
Here you can see that we have drawn a red circle for the two files generated after saving the map, map.pgm and map.yaml, which will be saved in the home directory by default. Typing cd in the same terminal will bring us to our home directory, and then typing ls will bring us to our home directory where the generated map files have been created.
myAGV-Map Navigation
Previously we have built a spatial map and obtained two map files, map.pgm and map.yaml, in the home directory
Now let's see how to use the created map to navigate the car
1、Copy the map file to the corresponding location in the project folder
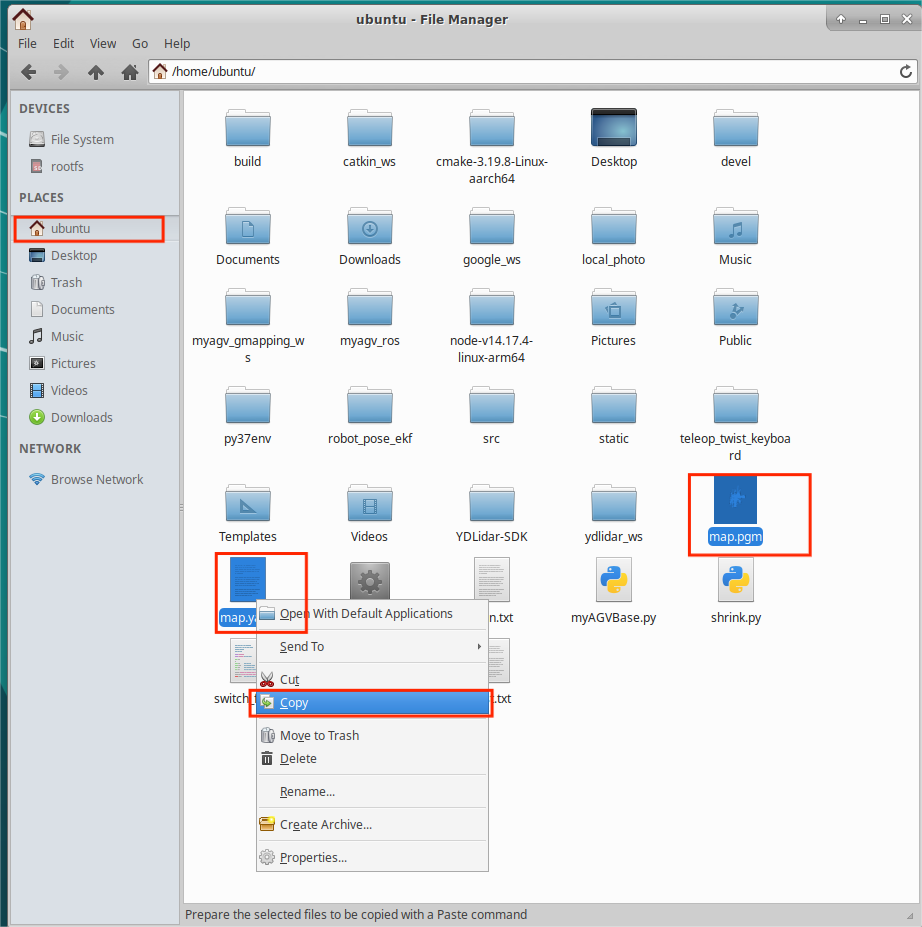
1)Click on the File system icon on the desktop to open the file manager, click on "ubuntu" on the right to enter the /home/ubuntu directory.
2)You can see that the map we created before is saved in this path, select these two files.
3)Right-click and click Copy to copy these two files.
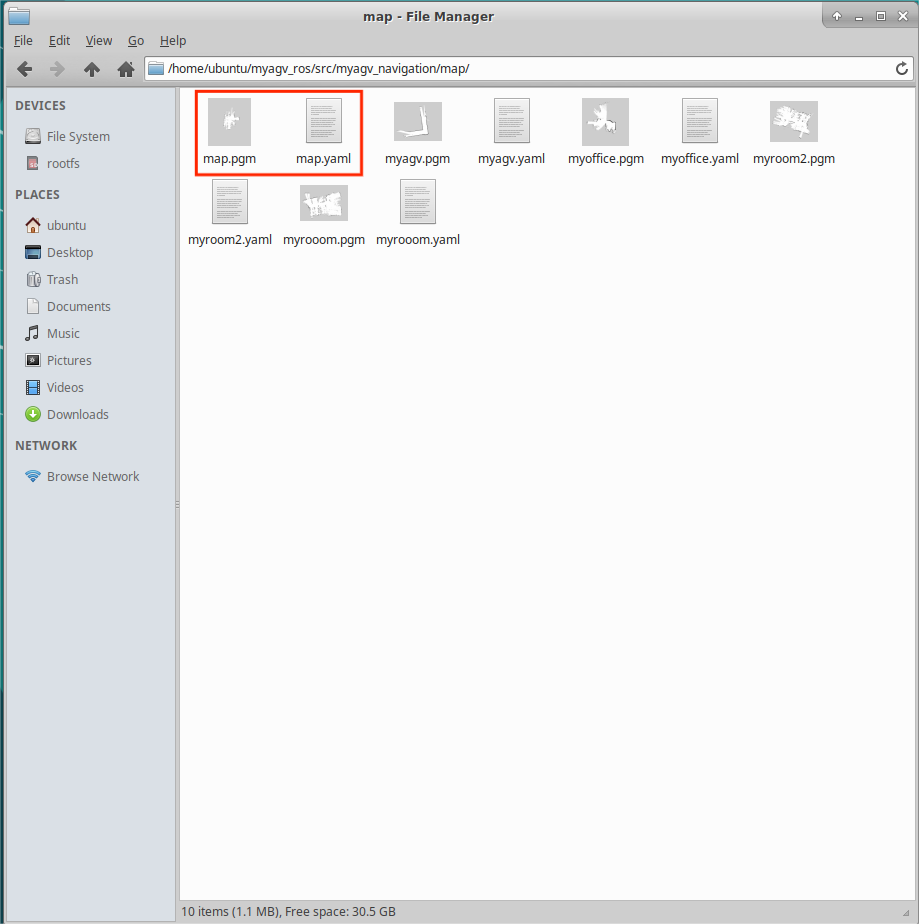
4)Click the File system icon on the desktop to open another file manager and enter the following path, paste the map files you just copied into that path:
/home/ubuntu/myagv_ros/src/myagv_navigation/map/
2、Modify the launch file
1)Click to open Visual Studio Code in the top left corner to open the code editor.
2)Open the navigation_active.launch file in /home/ubuntu/myagv_ros/src/myagv_navigation/launch/ path.
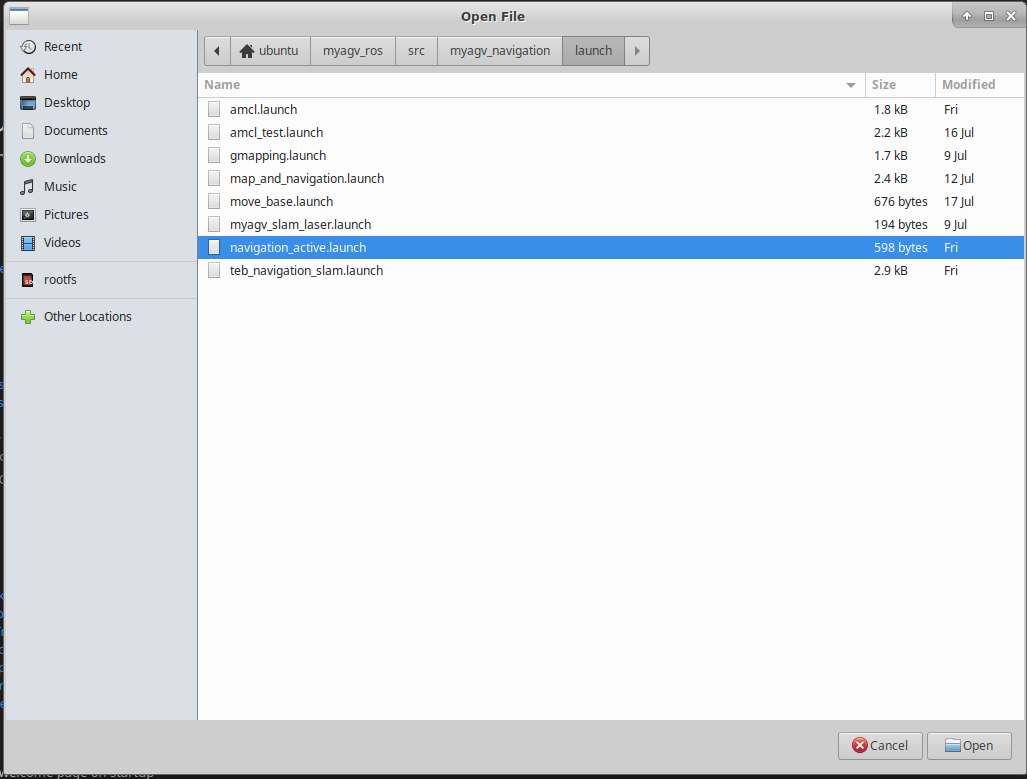
3)Replace the myroom2.yaml in line 5 with our own map file name map.yaml.

4)Save the modified file and exit (VScode is more memory intensive when running, it is recommended to close VScode after modifying the code, otherwise the running carsystem will be very laggy, you can also use vim and other lightweight editors.)
3、Run the launch file
1)After opening the car, open the console terminal (shortcut Ctrl+Alt+T) and enter the following command on the command line:
cd myagv_ros
roslaunch myagv odometry myagv base.launch
2)Open another console terminal (shortcut Ctrl+Alt+T),and type the following command:
teb navigation
cd myagv_ros
roslaunch myagv_navigation teb_navigation_slam.launch
dwa navigation
cd myagv_ros
roslaunch myagv_navigation dwa_navigation.launch
Note:Two algorithms are supported for navigation, just choose one to run, teb navigation is better, it is recommended to use teb navigation; dwa dynamic obstacle avoidance is less effective.
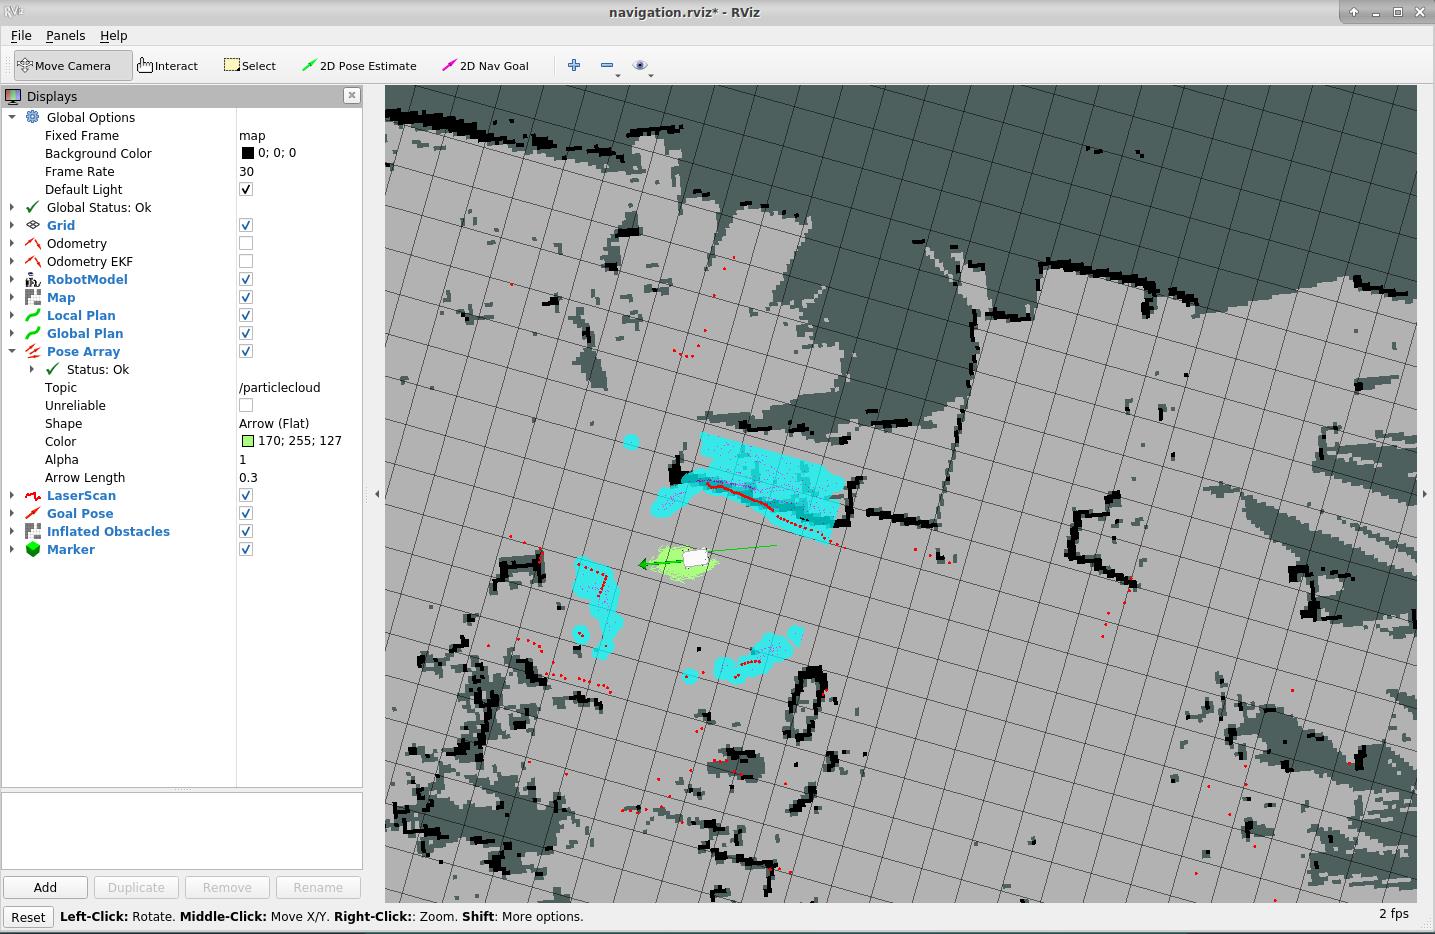
3)You can see that an Rviz simulation window is opened.
Note: The initial position of the car is best placed at the starting position of the car when we build the map
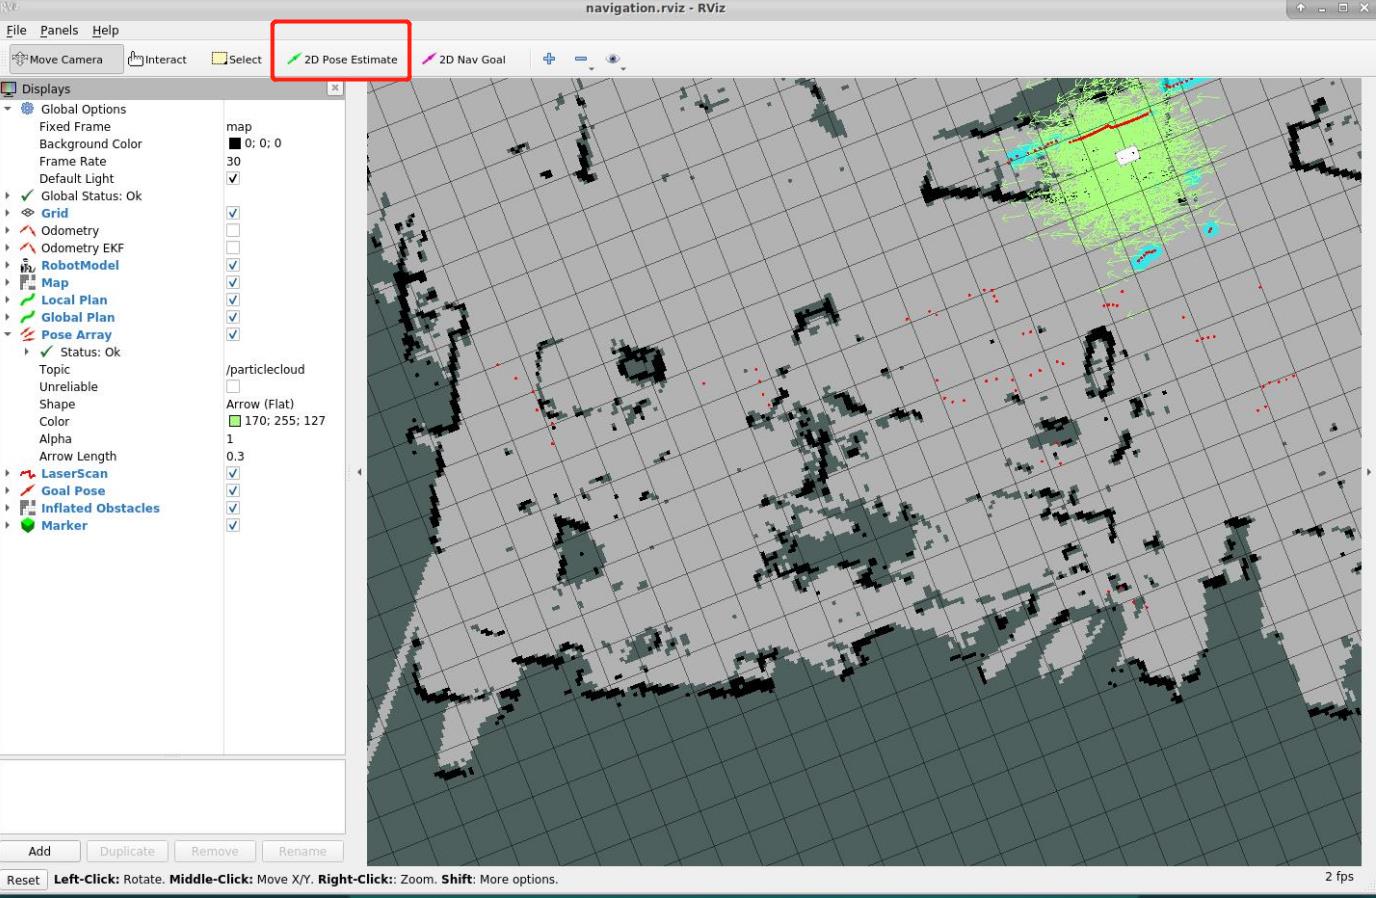
If the car on the Rviz interface does not correspond to the actual car, click "2D Pose Estimate" on the top toolbar to adjust, so that the car on the Rviz interface and the realized car can correspond, and navigate after adjustment.
4)Click on "2D Nav Goal" in the top toolbar.
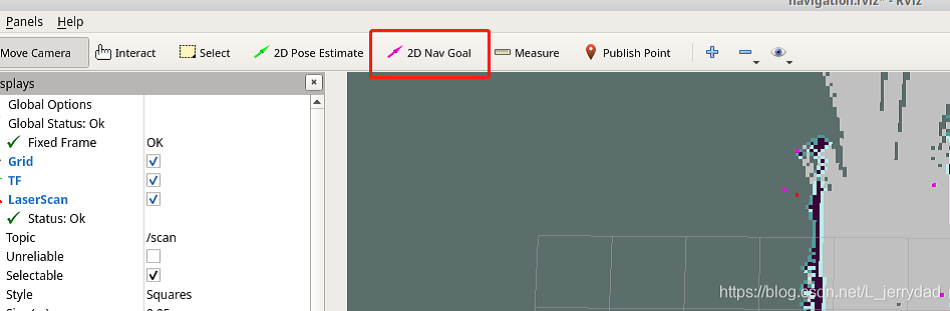
5)Click on the point we want to reach on the map, the carwill start towards the target point, and you can also see in the rviz a planned path of the carbetween the starting point and the target point, the carwill move along the route to the target point.