识别颜色物块
本案例使用eye-to-hand的模式,使用摄像头,通过OpenCV进行颜色定位,并将符合情况的颜色物块框出,通过相关点位计算出物块相对于机械臂的空间坐标位置。为机械臂设置一套相关动作,根据识别的物块颜色不同放置不同的桶中。在接下来的章节中将详细介绍整个案例的代码实现过程。
1 更新 mycobot_ai 包
为确保用户能够及时使用官方提供的最新程序包 (新用户无需更新),可通过文件管理器去到 /home/ubuntu/catkin_ws/src文件夹中,打开控制台终端(快捷键Ctrl+Alt+T) ,输入下面命令进行更新:
# 克隆github上的代码
mkdir -p ~/catkin_ws/src  # 创建文件夹(若文件夹已存在则无需再创建)
cd ~/catkin_ws/src
git clone https://github.com/elephantrobotics/mycobot_ros.git # 请先查看下面的注意部分再判断是否需要执行该命令
cd ~/catkin_ws      # 返回工作区
catkin_make # 构建工作区中的代码
source devel/setup.bash # 添加环境变量
注意: 若/home/ubuntu/catkin_ws/src (等效于 ~/catkin_ws/src)目录中已经存在mycobot_ros文件夹,则需要先删除原有的 mycobot_ros,再执行以上命令。其中,目录路径中的ubuntu为虚拟机的用户名,若不一致请修改。
2 摄像头调整
首先,需要使用python运行mycobot_ai包下的openVideo.py。若开启的摄像头为电脑摄像头则需要修改cap_num,具体可参考:注意事项。确保摄像头完全包含整个识别区域,且识别区域在视频中是正正方方的,如下图所示。若识别区域在视频中不符合要求,则需要调整摄像头的位置。
- 进入到目标文件夹
cd ~/catkin_ws/src/mycobot_ros/mycobot_ai/ai_mycobot_280/
输入
python scripts/openVideo.py打开摄像头进行调整。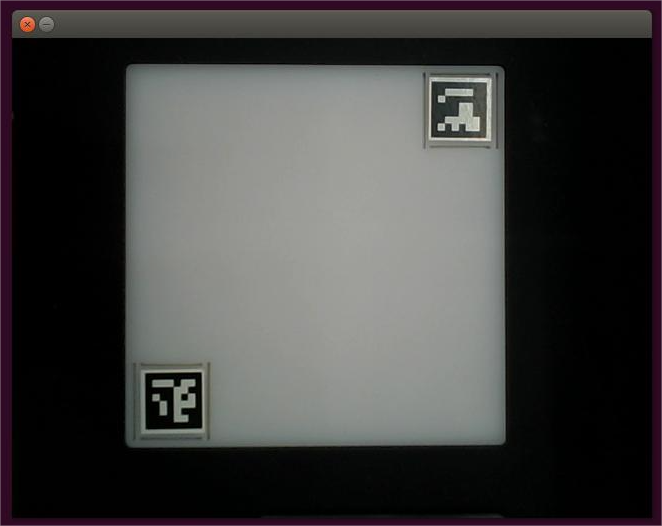
3 案例重现
M5版本:
- 使用 Ctrl+Alt+T 组合快捷键开启一个终端窗口,输入以下命令启动master节点:
roscore
- 在命令终端中键入 Ctrl+Shift+T 开启同目录下的另一个终端窗口,查看设备名称:
# 查看机械臂设备名称
ls /dev/ttyUSB* # 旧版 myCobot280 M5

# 若终端没有显示/dev/ttyUSB相关名称,则需要使用以下命令
ls /dev/ttyACM* # 新版 myCobot280 M5
- 赋予操作机械臂权限:
# 默认设备名称为/dev/ttyUSB0,若设备名称不是默认值则需修改。
sudo chmod 777 /dev/ttyUSB0 # 旧版 myCobot280 M5

sudo chmod 777 /dev/ttyACM0 # 新版 myCobot280 M5
- 输入以下命令启动launch文件。
# 设备名称不是默认值时需修改port值
roslaunch ai_mycobot_280 vision_m5.launch port:=/dev/ttyUSB0 baud:=115200   # 旧版 myCobot280 M5

roslaunch ai_mycobot_280 vision_wio.launch port:=/dev/ttyACM0 baud:=115200  # 新版 myCobot280 M5
- 使用 Ctrl+Alt+T 快捷键开启另一个终端窗口,进入机械臂相对应的目录:
cd ~/catkin_ws/src/mycobot_ros/mycobot_ai/ai_mycobot_280/
- 输入
python scripts/combine_detect_obj_color.py打开识别颜色程序,即可实现颜色识别并抓取了。
树莓派版本:
- 使用 Ctrl+Alt+T 组合快捷键开启一个终端窗口,输入以下命令启动master节点:
roscore
- 在命令终端中键入 Ctrl+Shift+T 开启同目录下的另一个终端窗口,查看设备名称:
# 查看机械臂设备名称
ls /dev/ttyAMA*
- 赋予机械臂权限:
# 默认设备名称为/dev/ttyAMA0,若设备名称不是默认值则需修改
sudo chmod 777 /dev/ttyAMA0
- 输入以下命令启动launch文件。
# 设备名称不是默认值时需修改port值
roslaunch ai_mycobot_280 vision_pi.launch port:=/dev/ttyAMA0 baud:=1000000
- 使用 Ctrl+Alt+T 快捷键开启另一个终端窗口,进入机械臂相对应的目录:
cd ~/catkin_ws/src/mycobot_ros/mycobot_ai/ai_mycobot_280/
- 输入
python scripts/combine_detect_obj_color.py打开识别颜色程序,即可实现颜色识别并抓取了。
注意事项
- 当摄像头没有正确自动框出识别区域,需要关闭程序,调整摄像头的位置,可将摄像头向左向右移动等操作。
- 若命令终端没有出现ok,且无法识别颜色时,需要将摄像头稍微向后或向前移动一下,当命令终端出现ok时程序即可正常运行。
- OpenCV图像识别会受环境的影响,若处在较为昏暗的环境下识别效果将大大降低。
4 代码讲解
本案例是基于 OpenCV 以及 ROS 通信控制机械臂实现的。首先,对摄像头进行校准,确保摄像头的准确性。通过识别抓取范围内的两个aruco码智能定位识别范围,并确定实际识别范围的中心点与视频像素点位之间的对应关系。使用 OpenCV 自带的颜色识别函数对物块进行识别并确定物块在视频中的像素点位,根据物块在视频中的像素点与实际识别范围中心的视频像素点计算出物块相对于实际识别范围中心的坐标情况,之后根据实际识别范围中心与机械臂的相对坐标可计算出物块相对于机械臂的相对坐标。最后通过设计一系列动作抓取物块并放置到相应的桶中。
看完之后如果还是不太明白,不用担心,接下来将分步讲解整个实现流程。
4.1 识别aruco模块
使用 OpenCV 自带的aruco识别函数识别图片的aruco,进行一些简要的信息筛选,获得两个aruco的像素点位信息。
    def get_calculate_params(self,img):
        # 将图片转换为灰色度图片
        gray = cv2.cvtColor(img, cv2.COLOR_BGR2GRAY)
        # 检测图片中是否有aruco
        corners, ids, rejectImaPoint = cv2.aruco.detectMarkers(
            gray, self.aruco_dict, parameters=self.aruco_params
        )

        """
        要求图片中存在两个aruco,并且顺序一致。
        corners中存在两个aruco,每个aruco包含着其四个角的像素点位。
        根据aruco的四个角确定aruco的中心位置。
        """
        if len(corners) > 0:
            if ids is not None:
                if len(corners) <= 1 or ids[0]==1:
                    return None
                x1=x2=y1=y2 = 0
                point_11,point_21,point_31,point_41 = corners[0][0]
                x1, y1 = int((point_11[0] + point_21[0] + point_31[0] + point_41[0]) / 4.0), int((point_11[1] + point_21[1] + point_31[1] + point_41[1]) / 4.0)
                point_1,point_2,point_3,point_4 = corners[1][0]
                x2, y2 = int((point_1[0] + point_2[0] + point_3[0] + point_4[0]) / 4.0), int((point_1[1] + point_2[1] + point_3[1] + point_4[1]) / 4.0)
                return x1,x2,y1,y2
        return None
4.2 裁剪视频模块
根据两个aruco的像素点位,确定识别范围在视频中的像素范围然后进行裁剪。
    """
    将视频像素扩大1.5倍,也就是将视频大小放大1.5倍。
    若已经计算出两个aruco值,则进行视频裁剪。
    """
    def transform_frame(self, frame):
        # 将图片放大1.5倍
        fx = 1.5
        fy = 1.5
        frame = cv2.resize(frame, (0, 0), fx=fx, fy=fy, interpolation=cv2.INTER_CUBIC)
        if self.x1 != self.x2:
            # 这里的裁剪比例是根据实际情况调整而来的
            frame = frame[int(self.y2*0.4):int(self.y1*1.15), int(self.x1*0.7):int(self.x2*1.15)]
        return frame
4.3 颜色识别模块
对接收到的图片进行色度转换处理,将图片转换为灰色度图片,根据自定义类初始化的HSV设置颜色识别范围。将转换后的灰色度图片进行腐蚀、膨胀等操作,加深图片颜色对比程度。通过过滤以及检查轮廓等操作,识别物块颜色并对其进行定位。最后,通过一些必要的数据筛选,在图片中框出颜色物块。
 def color_detect(self, img):
        x = y = 0
        for mycolor, item in self.HSV.items():
            redLower = np.array(item[0])
            redUpper = np.array(item[1])
            # 将图片转换为灰色度图片
            hsv = cv2.cvtColor(img, cv2.COLOR_BGR2HSV)
            # 设置颜色识别范围
            mask = cv2.inRange(hsv, item[0], item[1])
            # 对图片进行腐蚀操作,其作用是去除边缘毛躁
            erosion = cv2.erode(mask, np.ones((1, 1), np.uint8), iterations=2)
            # 对图片进行膨胀操作,其作用是加深图片中的颜色深度
            dilation =cv2.dilate(erosion, np.ones((1, 1), np.uint8), iterations=2)
            # 对图片进行像素加和
            target = cv2.bitwise_and(img, img, mask=dilation)
            # 将滤波后的图像变成二值图像放在binary中
            ret, binary = cv2.threshold(dilation, 127, 255, cv2.THRESH_BINARY)
            # 获取图像轮廓坐标,其中contours为坐标值,此处只检测外形轮廓
            contours, hierarchy = cv2.findContours(
                dilation, cv2.RETR_EXTERNAL, cv2.CHAIN_APPROX_SIMPLE)

            if len(contours) > 0:
                # 对误识别的情况进行一些处理
                boxes = [
                        box
                        for box in [cv2.boundingRect(c) for c in contours]
                        if min(img.shape[0], img.shape[1]) / 10
                        < min(box[2], box[3])
                        < min(img.shape[0], img.shape[1]) / 1
                    ]
                if boxes:
                    for box in boxes:
                        x, y, w, h = box
                    # 找到符合要求最大的物体
                    c = max(contours, key=cv2.contourArea)
                    # 获得定位物体的左下点和右上点
                    x, y, w, h = cv2.boundingRect(c)
                    # 在图片中框出物块
                    cv2.rectangle(img, (x, y), (x+w, y+h), (153, 153, 0), 2)
                    # 计算物块中心
                    x, y = (x*2+w)/2, (y*2+h)/2
                    # 判断物体是什么颜色
                    if mycolor == "red":
                        self.color = 0
                    elif mycolor == "green":
                        self.color = 1
                    elif mycolor == "cyan":
                        self.color = 2
                    else:
                        self.color = 3

        # 判断是否正常识别
        if abs(x) + abs(y) > 0:
            return x, y
        else:
            return None
4.4 抓取实现模块
为机械臂的运动设计一系列的点,如机械臂的初始化点、待抓取点、蓝桶上方点、绿桶上方点等。为了能在rviz中模拟物块的移动,还为物块的运动设置了一系列点。由于rviz里面的模型坐标是以m为单位的,而机械臂坐标是以mm为单位的,所以在传递数据时需要除以1000。
class Object_detect(Movement):

    def __init__(self, camera_x = 160, camera_y = -5):
        # inherit the parent class
        super(Object_detect, self).__init__()
        # get path of file
        dir_path = os.path.dirname(__file__)
        self.mc = None

        # 移动角度
        self.move_angles = [
            [-7.11, -6.94, -55.01, -24.16, 0, -15],  # 初始化点 init the point
            [18.8, -7.91, -54.49, -23.02, -0.79, -14.76],  # point to grab
        ]

        # 移动坐标
        self.move_coords = [
            [120.8, -134.4, 258.0, -172.72, -5.31, -109.09],  # 红桶上方点 above the red bucket
            [219.8, -126.4, 249.7, -158.68, -7.93, -101.6], # 绿桶上方点 green
            [124.7, 145.3, 250.4, -173.5, -2.23, -11.7], # 蓝桶上方点 blue
            [14.6, 175.9, 250.4, -177.42, -0.08, 25.93], # 灰桶上方点 gray
        ]


    def move(self, x, y, color):
        # send Angle to move mycobot
        print (color)
        self.mc.send_angles(self.move_angles[1], 25)
        time.sleep(3)

        # send coordinates to move mycobot
        self.mc.send_coords([x, y,  190.6, 179.87, -3.78, -62.75], 25, 1) # usb :rx,ry,rz -173.3, -5.48, -57.9
        time.sleep(3)

        # self.mc.send_coords([x, y, 150, 179.87, -3.78, -62.75], 25, 0)
        # time.sleep(3)

        self.mc.send_coords([x, y, 96, 179.87, -3.78, -62.75], 25, 0)
        time.sleep(3)

        # open pump
        if "dev" in self.robot_m5 or "dev" in self.robot_wio:
            self.pump_on()
        elif "dev" in self.robot_raspi or "dev" in self.robot_jes:
            self.gpio_status(True)
        time.sleep(1.5)

        tmp = []
        while True:
            if not tmp:
                tmp = self.mc.get_angles()
            else:
                break
        time.sleep(0.5)

        # print(tmp)
        self.mc.send_angles([tmp[0], -0.71, -54.49, -23.02, -0.79, tmp[5]],25) # [18.8, -7.91, -54.49, -23.02, -0.79, -14.76]
        time.sleep(4)

        self.pub_marker(
            self.move_coords[2][0]/1000.0, self.move_coords[2][1]/1000.0, self.move_coords[2][2]/1000.0)

        self.mc.send_coords(self.move_coords[color], 25, 1)
        self.pub_marker(self.move_coords[color][0]/1000.0, self.move_coords[color]
                        [1]/1000.0, self.move_coords[color][2]/1000.0)
        time.sleep(3)

        # close pump
        if "dev" in self.robot_m5 or "dev" in self.robot_wio:
            self.pump_off()
        elif "dev" in self.robot_raspi or "dev" in self.robot_jes:
            self.gpio_status(False)
        time.sleep(4)

        if color == 1:
            self.pub_marker(
                self.move_coords[color][0]/1000.0+0.04, self.move_coords[color][1]/1000.0-0.02)
        elif color == 0:
            self.pub_marker(
                self.move_coords[color][0]/1000.0+0.03, self.move_coords[color][1]/1000.0)
        # self.pub_angles(self.move_angles[0], 20)
        self.mc.send_angles(self.move_angles[0], 25)
        time.sleep(3)
4.5 吸取点位校准
当吸泵抓取木块不准时,可通过修改代码坐标进行校准,代码修改位置如下(位置1和位置2的坐标皆可修改,二选一即可):
~/catkin_ws/src/mycobot_ros/mycobot_ai/ai_mycobot_280/scripts/combine_detect_obj_color.py
class Object_detect(Movement):
    # 位置1:调整吸泵吸取位置,y增大,向左移动;y减小,向右移动;x增大,前方移动;x减小,向后方移动
    def __init__(self, camera_x = 160, camera_y = -5):
        # inherit the parent class
        super(Object_detect, self).__init__()
        # get path of file
        dir_path = os.path.dirname(__file__)
        self.mc = None

        # 移动角度
        self.move_angles = [
            [-7.11, -6.94, -55.01, -24.16, 0, -15],  # init the point
            [18.8, -7.91, -54.49, -23.02, -0.79, -14.76],  # point to grab
        ]

        # 移动坐标
        self.move_coords = [
            [120.8, -134.4, 258.0, -172.72, -5.31, -109.09],  # above the red bucket
            [219.8, -126.4, 249.7, -158.68, -7.93, -101.6], # green
            [124.7, 145.3, 250.4, -173.5, -2.23, -11.7], # blue
            [14.6, 175.9, 250.4, -177.42, -0.08, 25.93], # gray
        ]
        # which robot: USB* is m5; ACM* is wio; AMA* is raspi
        self.robot_m5 = os.popen("ls /dev/ttyUSB*").readline()[:-1]
        self.robot_wio = os.popen("ls /dev/ttyACM*").readline()[:-1]
        self.robot_raspi = os.popen("ls /dev/ttyAMA*").readline()[:-1]
        self.robot_jes = os.popen("ls /dev/ttyTHS1").readline()[:-1]


    # decide whether grab cube
    def decide_move(self, x, y, color):
        print(x, y, self.cache_x, self.cache_y)
        # detect the cube status move or run
        if (abs(x - self.cache_x) + abs(y - self.cache_y)) / 2 > 5:  # mm
            self.cache_x, self.cache_y = x, y
            return
        else:
            self.cache_x = self.cache_y = 0
            # 位置2:调整吸泵吸取位置,y增大,向左移动;y减小,向右移动;x增大,前方移动;x减小,向后方移动
            self.move(x, y, color)
4.6 位置计算
通过测量抓取区域中的两个aruco的像素点位可计算出两个aruco的之间的像素距离M1,测量两个aruco的实际距离M2,这样我们就能获得像素与实际距离的比值 ratio = M2 / M1。我们可以从图片中计算出颜色物块距离抓取区域中心的像素差,这样我们可以计算出物块实际距离抓取区域中心的相对坐标(x1, y1)。将相对坐标(x1, y1)加上抓取区域中心到机械臂的相对坐标(x2, y2),即可求得物块对于机械臂的相对坐标(x3, y3)。具体的代码实现可查看程序源码。
如果想要对整个程序的实现进行透彻的了解,可以直接查看程序源码,源码中提供了详细的注解参考。